Chapter 1
Subsections of
Subsections of Introduction
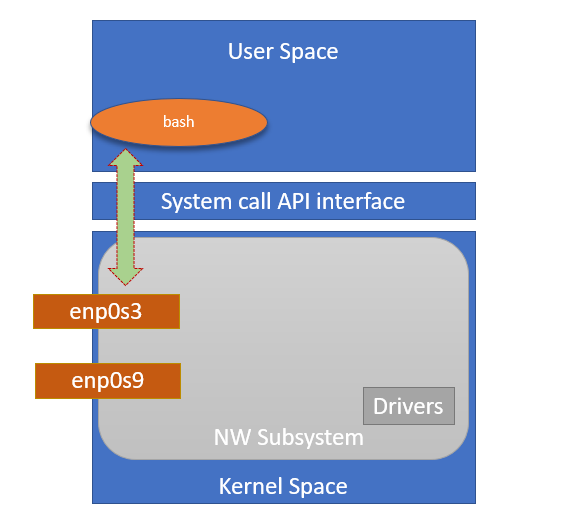
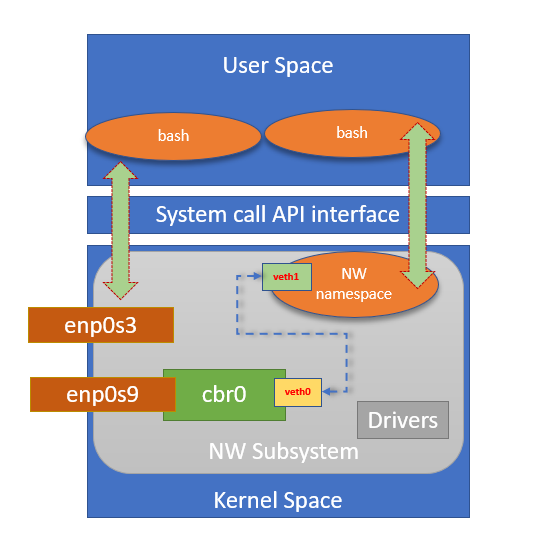
Linux Kernel Architecture
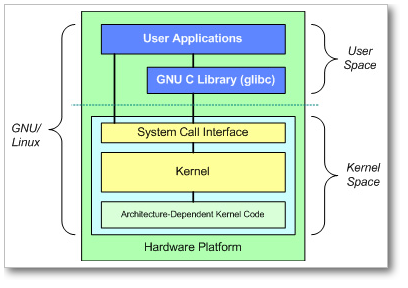
At the top is the user, or application, space. This is where the user applications are executed. Below the user space is the kernel space.
There is also the GNU C Library (glibc). This provides the system call interface that connects to the kernel and provides the mechanism to transition between the user-space application and the kernel. This is important because the kernel and user application occupy different protected address spaces. And while each user-space process occupies its own virtual address space, the kernel occupies a single address space.
The Linux kernel can be further divided into three gross levels.
- At the top is the system call interface, which implements the basic functions such as read and write.
- Below the system call interface is the kernel code, which can be more accurately defined as the architecture-independent kernel code. This code is common to all of the processor architectures supported by Linux.
- Below this is the architecture-dependent code, which forms what is more commonly called a BSP (Board Support Package). This code serves as the processor and platform-specific code for the given architecture.
The Linux kernel implements a number of important architectural attributes. At a high level, and at lower levels, the kernel is layered into a number of distinct subsystems.
Linux Namespaces
Namespaces are a feature of the Linux kernel that partitions kernel resources such that one set of processes sees one set of resources while another set of processes sees a different set of resources. The feature works by having the same name space for these resources in the various sets of processes, but those names referring to distinct resources. Examples of resource names that can exist in multiple spaces, so that the named resources are partitioned, are process IDs, hostnames, user IDs, file names, and some names associated with network access, and interprocess communication.
Namespaces are a fundamental aspect of containers on Linux.
| Namespace | Constant | Isolates |
|---|---|---|
| Cgroup | CLONE_NEWCGROUP | Cgroup root directory |
| IPC | CLONE_NEWIPC | System V IPC, POSIX message queues |
| Network | CLONE_NEWNET | Network devices, stacks, ports, etc. |
| Mount | CLONE_NEWNS | Mount points |
| PID | CLONE_NEWPID | Process IDs |
| User | CLONE_NEWUSER | User and group IDs |
| UTS | CLONE_NEWUTS | Hostname and NIS domain name |
The kernel assigns each process a symbolic link per namespace kind in /proc/<pid>/ns/. The inode number pointed to by this symlink is the same for each process in this namespace. This uniquely identifies each namespace by the inode number pointed to by one of its symlinks.
Reading the symlink via readlink returns a string containing the namespace kind name and the inode number of the namespace.
CGroups
cgroups (abbreviated from control groups) is a Linux kernel feature that limits, accounts for, and isolates the resource usage (CPU, memory, disk I/O, network, etc.) of a collection of processes.
Resource limiting
groups can be set to not exceed a configured memory limit
Prioritization
Some groups may get a larger share of CPU utilization or disk I/O throughput
Accounting
Measures a group’s resource usage, which may be used
Control
Freezing groups of processes, their checkpointing and restarting
You can read and explore more about cGroups in this post
Container from scratch
Using namespaces , we can start a process which will be completely isolated from other processes running in the system.
Create root File System
Create directory to store rootfs contents
$ mkdir -p /root/busybox/rootfs
$ CONTAINER_ROOT=/root/busybox/rootfs
$ cd ${CONTAINER_ROOT}
Download busybox binary
$ wget https://busybox.net/downloads/binaries/1.28.1-defconfig-multiarch/busybox-x86_64Create needed directories and symlinks
$ mv busybox-x86_64 busybox
$ chmod 755 busybox
$ mkdir bin
$ mkdir proc
$ mkdir sys
$ mkdir tmp
$ for i in $(./busybox --list)
do
   ln -s /busybox bin/$i
done
Start Container
Start a shell in new contianer
$ unshare --mount --uts --ipc --net --pid --fork --user --map-root-user chroot ${CONTAINER_ROOT} /bin/shMount essential kernel structures
$ mount -t proc none /proc
$ mount -t sysfs none /sys
$ mount -t tmpfs none /tmp
Configure networking
From Host system , create a veth pair and then map that to container
$ sudo ip link add vethlocal type veth  peer name vethNS
$ sudo ip link set vethlocal up
$ sudo ip link set vethNS up
$ sudo ps -ef |grep '/bin/sh'
$ sudo ip link set vethNS netns <pid of /bin/sh>
From container , execute ip link
What is Docker
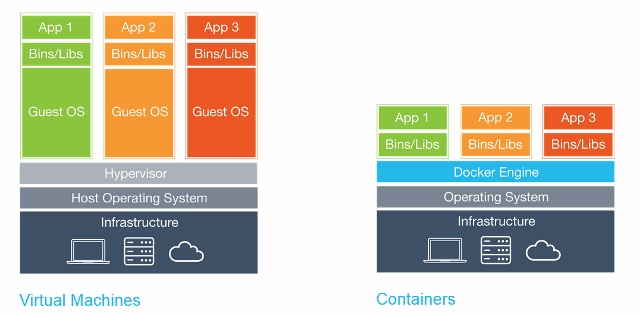
Docker is a tool designed to make it easier to create, deploy, and run applications by using containers. Containers allow a developer to package up an application with all of the parts it needs, such as libraries and other dependencies, and ship it all out as one package.
In a way, Docker is a bit like a virtual machine. But unlike a virtual machine, rather than creating a whole virtual operating system, Docker allows applications to use the same Linux kernel as the system that they’re running on and only requires applications be shipped with things not already running on the host computer. This gives a significant performance boost and reduces the size of the application.
Kubernetes
Pet vs Cattle.
In the pets service model, each pet server is given a loving names like zeus, ares, hades, poseidon, and athena. They are “unique, lovingly hand-raised, and cared for, and when they get sick, you nurse them back to health”. You scale these up by making them bigger, and when they are unavailable, everyone notices.
In the cattle service model, the servers are given identification numbers like web-01, web-02, web-03, web-04, and web-05, much the same way cattle are given numbers tagged to their ear. Each server is “almost identical to each other” and “when one gets sick, you replace it with another one”. You scale these by creating more of them, and when one is unavailable, no one notices.
Kubernetes is a portable, extensible open-source platform for managing containerized workloads and services, that facilitates both declarative configuration and automation. It has a large, rapidly growing ecosystem. Kubernetes services, support, and tools are widely available.
Google open-sourced the Kubernetes project in 2014. Kubernetes builds upon a decade and a half of experience that Google has with running production workloads at scale, combined with best-of-breed ideas and practices from the community

Kubernetes Architecture
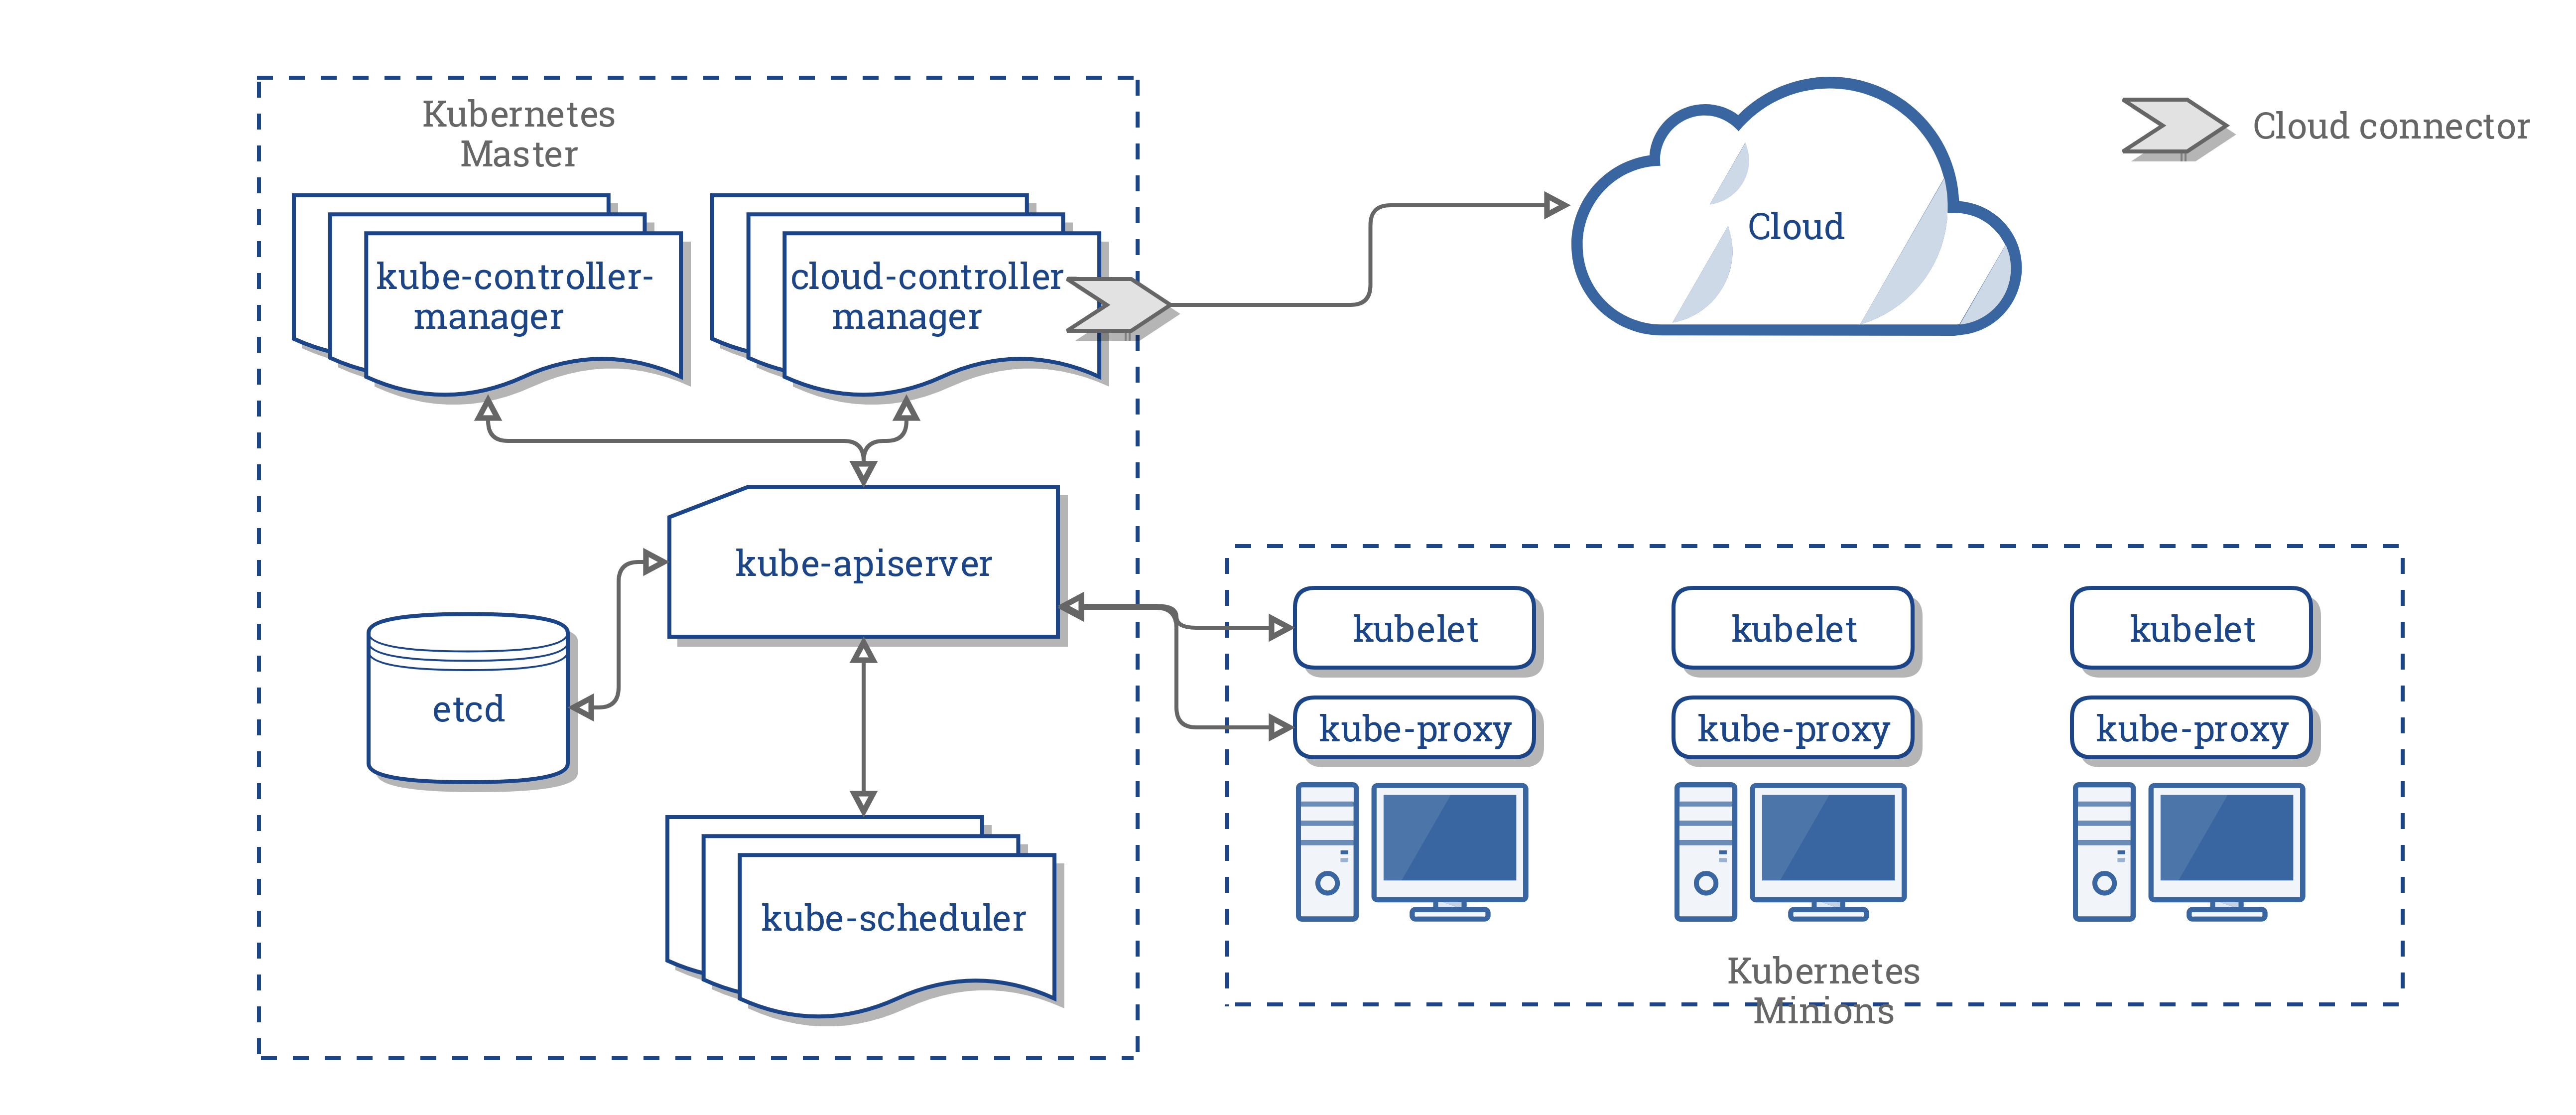
Container runtime
Docker , rkt , containerd or any OCI compliant runtime which will download image , configures network , mount volumes and assist container life cycle management.
kubelet
Responsible for instructing container runtime to start , stop or modify a container
kube-proxy
Manage service IPs and iptables rules
kube-apiserver
API server interacts with all other components in cluster All client interactions will happen via API server
kube-scheduler
Responsible for scheduling workload on minions or worker nodes based on resource constraints
kube-controller-manager
Responsible for monitoring different containers in reconciliation loop Will discuss more about different controllers later in this course
etcd
Persistent store where we store all configurations and cluster state
cloud-controller-manager
Cloud vendor specific controller and cloud vendor is Responsible to develop this program
Container Networking
We need to access the container from outside world and the container running on different hosts have to communicate each other.
Here we will see how can we do it with bridging.
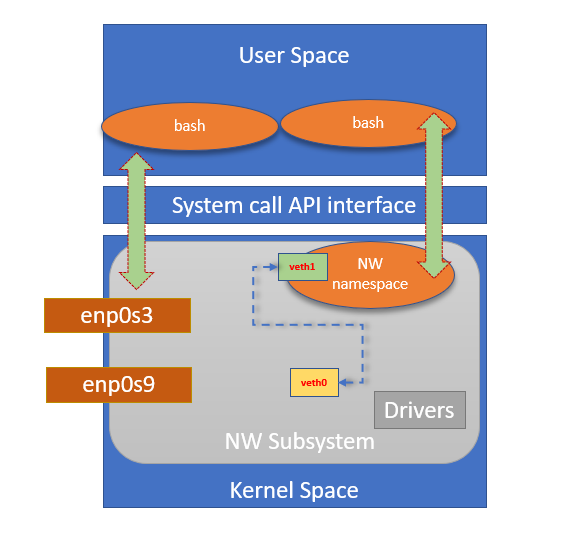
Traditional networking
Create a veth pair on Host.
$ sudo ip link add veth0 type veth peer name veth1
$ sudo ip link show
Create a network namespace
$ sudo ip netns add bash-nw-namespace
$ sudo ip netns show
Connect one end to namespace
$ sudo ip link set veth1 netns bash-nw-namespace
$ sudo ip link list
Resulting network
Create a Bridge interface
$ sudo brctl addbr cbr0Add an external interface to bridge
$ sudo brctl addif cbr0 enp0s9
$ sudo brctl show
Connect other end to a switch
$ sudo brctl addif cbr0 veth0
$ sudo brctl show
Resulting network
Assign IP to interface
$ sudo ip netns exec bash-nw-namespace bash
$ sudo ip addr add 192.168.56.10/24 dev veth1
$ sudo ip link set lo up
$ sudo ip link set dev veth1 up
Access container IP from outside
Like bridging , we can opt other networking solutions.
Later we will see how Weave Network and Calico plugins works. You may read bit more on Docker networking basics on below blog post
Chapter 2
Installation
- In this chapter we will install VirtualBox and setup networking.
- We will learn how to install and configure Docker.
- Also we will install a two node kubernetes cluster using kubeadm.
Subsections of Installation
Install VirtualBox
Download the latest VBox installer and VBox Extension Pack
Installation procedure is available in below link
VirtualBox Network Configuration
- Create HostOnly network ( Default will be 192.168.56.0/24)
- Open Virtual Box
- Got to menu and navigate to File ->Host Network Manager
- Then click “Create” This will create a Host-Only Network.
DHCP should be disabled on this network.
Internet access is needed on all VMs (for downloading needed binaries).
Make sure you can see the NAT network.(If not , create one).
| VBox Host Networking | |
|---|---|
| HostOnly | 192.168.56.0/24 |
| NAT | VBOX Defined |
Ubuntu 16.04 Installation
- Download Ubuntu 16.04 ISO http://releases.ubuntu.com/16.04/ubuntu-16.04.5-server-amd64.iso
Create a template VM which will be used to clone all needed VMs
- You need at least 50GB free space to host all VMs
- All VMs will be placed in a directory called (Don’t create these manually now!)
DRIVE_NAME:/VMs/(ReplaceDRIVE_NAMEwith a mount point or Driver name) - Install Ubuntu 16.04 with latest patches
- VM configuration
- VM Name :
k8s-master-01 - Memory : 2 GB
- CPU : 2
- Disk : 100GB
- HostOnly interface : 1 (ref. step 1).
- NAT network interface : 1
- VM Name :
Warning
By default , NAT will be the first in network adapter order , change it. NAT interface should be the second interface and Host-Only should be the first one
Install Ubuntu on this VM and go ahead with all default options
When asked, provide user name
k8sand set passwordMake sure to select the NAT interface as primary during installation.
Select below in
Software SelectionscreenManual Software Selection
OpenSSH Server
After restart , make sure NAT interface is up
Login to the template VM with user
k8sand execute below commands to install latest patches.
$ sudo apt-get update
$ sudo apt-get upgrade- Poweroff template VM
$ sudo poweroffClone VM
You may use VirtualBox GUI to create a full clone - Preferred You can use below commands to clone a VM - Execute it at your own risk ;)
- Open CMD and execute below commands to create all needed VMs.
You can replace the value of
DRIVER_NAMEwith a drive which is having enough free space (~50GB) - Windows
 set DRIVE_NAME=D
 cd C:\Program Files\Oracle\VirtualBox
VBoxManage.exe clonevm "k8s-master-01" --name "k8s-worker-01" --groups "/K8S Training" --basefolder "%DRIVE_NAME%:\VMs" --register- Mac or Linux (Need to test)
 DRIVE_NAME=${HOME}
 VBoxManage clonevm "k8s-master-01" --name "k8s-worker-01" --groups "/K8S Training" --basefolder ${DRIVE_NAME}/VMs" --register
Start VMs one by one and perform below
Execute below steps on both master and worker nodes
- Assign IP address and make sure it comes up at boot time.
$ sudo systemctl stop networking
$ sudo vi /etc/network/interfaces
auto enp0s3 #<-- Make sure to use HostOnly interface (it can also be enp0s8)
iface enp0s3 inet static
address 192.168.56.X #<--- Replace X with corresponding IP octet
netmask 255.255.255.0$ sudo systemctl restart networking Note
You may access the VM using the IP via SSH and can complete all remaining steps from that session (for copy paste :) )
- Change Host name
Execute below steps only on worker node
$ HOST_NAME=<host name> # <--- Replace <host name> with corresponding one$ sudo hostnamectl set-hostname ${HOST_NAME} --static --transient- Regenrate SSH Keys
$ sudo /bin/rm -v /etc/ssh/ssh_host_*
$ sudo dpkg-reconfigure openssh-server- Change iSCSI initiator IQN
$ sudo vi /etc/iscsi/initiatorname.iscsiInitiatorName=iqn.1993-08.org.debian:01:HOST_NAME #<--- Append HostName to have unique iscsi iqn- Change Machine UUID
$ sudo rm /etc/machine-id /var/lib/dbus/machine-id
$ sudo systemd-machine-id-setup
Execute below steps on both master and worker nodes
Remove 127.0.1.1 entry from /etc/hosts
Add needed entries in /etc/hosts
$ sudo bash -c  "cat <<EOF >>/etc/hosts
192.168.56.201 k8s-master-01
192.168.56.202 k8s-worker-01
EOF"- Add public DNS incase the local one is not responding in NAT
$ sudo bash -c  "cat <<EOF >>/etc/resolvconf/resolv.conf.d/tail
nameserver 8.8.8.8
EOF"- Disable swap by commenting out swap_1 LV
$ sudo vi /etc/fstab# /dev/mapper/k8s--master--01--vg-swap_1 none swap sw 0 0- Reboot VMs
$ sudo reboot Note
Do a ping test to make sure both VMs can reach each other.
Install Docker
In this session, we will install and setup docker in a simple and easy way on Ubuntu 16.04.
- Add gpg key to aptitude
$ curl -fsSL https://download.docker.com/linux/ubuntu/gpg | sudo apt-key add -- Add repository
$ sudo add-apt-repository "deb [arch=amd64] https://download.docker.com/linux/ubuntu $(lsb_release -cs) stable"- Refresh repository
$ sudo apt-get update- Verify whether docker is available in repo or not
$ sudo apt-cache policy docker-cedocker-ce:
Installed: (none)
Candidate: 5:18.09.0~3-0~ubuntu-xenial
Version table:
5:18.09.0~3-0~ubuntu-xenial 500
...- Install docker
$ sudo apt-get install -y docker-ce- Make sure docker is running
$ sudo systemctl status docker● docker.service - Docker Application Container Engine
Loaded: loaded (/lib/systemd/system/docker.service; enabled; vendor preset: enabled)
Active: active (running) since Wed 2018-12-26 17:14:59 UTC; 4min 27s ago
Docs: https://docs.docker.com
Main PID: 1191 (dockerd)
Tasks: 10
Memory: 76.4M
CPU: 625ms
CGroup: /system.slice/docker.service
└─1191 /usr/bin/dockerd -H unix://
...- Add user to docker group so that this user can execute docker commands.
$ sudo usermod -aG docker ${USER} Info
Logout the session and login again to refresh the group membership.
- Verify docker by executing info command.
$ docker info |grep 'Server Version'Server Version: 18.09.0
Setup Golang
- Download Golang tarball
$ curl -O https://dl.google.com/go/go1.11.4.linux-amd64.tar.gz- Extract the contents
$ tar -xvf go1.11.4.linux-amd64.tar.gz- Move the contents to /usr/local directory
$ sudo mv go /usr/local/- Add the environmental variable GOPATH to .profile
cat <<EOF >>~/.profile
export GOPATH=\$HOME/work
export PATH=\$PATH:/usr/local/go/bin:\$GOPATH/bin
EOF- Create the work directory
$ mkdir $HOME/work- Load the profile
$ source ~/.profile- Verify Golang setup
$ go versiongo version go1.11.4 linux/amd64
- Create a directory tree to map to a github repository
$ mkdir -p $GOPATH/src/github.com/ansilh/golang-demo- Create a hello world golang program
$ vi $GOPATH/src/github.com/ansilh/golang-demo/main.go- Paste below code
package main
import "fmt"

func main(){
 fmt.Println("Hello World.!")
}- Build and install the program
go install github.com/ansilh/golang-demo
- Execute the program to see the output
$ golang-demoHello World.!
Build a Demo WebApp
- Create a directory for the demo app.
$ mkdir -p ${GOPATH}/src/github.com/ansilh/demo-webapp- Create demo-webapp.go file
$ vi ${GOPATH}/src/github.com/ansilh/demo-webapp/demo-webapp.gopackage main
import (
"fmt"
"net/http"
"log"
)
func demoDefault(w http.ResponseWriter, r *http.Request) {
fmt.Fprintf(w, "404 - Page not found - This is a dummy default backend") // send data to client side
}
func main() {
http.HandleFunc("/", demoDefault) // set router
err := http.ListenAndServe(":9090", nil) // set listen port
if err != nil {
log.Fatal("ListenAndServe: ", err)
}
}- Build a static binary
$ cd $GOPATH/src/github.com/ansilh/demo-webapp
$ CGO_ENABLED=0 GOOS=linux GOARCH=amd64 go build -a -installsuffix cgo -ldflags="-w -s" -o $GOPATH/bin/demo-webapp- Execute the program
$ demo-webappOpen the browser and check if you can see the response using IP:9090 If you see the output “404 – Page not found – This is a dummy default backend” indicates that the program is working
Press Ctrl+c to terminate the program
Build a Docker image
Create a Docker Hub account
- Let’s create a directory to store the Dockerfile
$ mkdir ~/demo-webapp- Copy the pre-built program
$ cp $GOPATH/bin/demo-webapp ~/demo-webapp/- Create a Dockerfile.
$ cd ~/demo-webapp/
$ vi Dockerfile
FROM scratch
LABEL maintainer="Ansil H"
LABEL email="ansilh@gmail.com"
COPY demo-webapp /
CMD ["/demo-webapp"]- Build the docker image
$ sudo docker build -t <docker login name>/demo-webapp .
Eg:-
$ sudo docker build -t ansilh/demo-webapp .- Login to Docker Hub using your credentials
$ docker login- Push image to Docker hub
$ docker push <docker login name>/demo-webapp
Eg:-
$ docker push ansilh/demo-webapp
Congratulations ! . Now the image you built is available in Docker Hub and we can use this image to run containers in upcoming sessions
Docker - Container management
Start a Container
- Here we map port 80 of host to port 9090 of cotainer
- Verify application from browser
- Press Ctrl+c to exit container
$ docker run -p 80:9090 ansilh/demo-webapp- Start a Container in detach mode
$ docker run -d -p 80:9090 ansilh/demo-webapp- List Container
$ docker ps
CONTAINER ID        IMAGE                COMMAND             CREATED             STATUS              PORTS                  NAMES
4c8364e0d031 ansilh/demo-webapp "/demo-webapp" 11 seconds ago Up 10 seconds 0.0.0.0:80->9090/tcp zen_gauss- List all containers including stopped containers
$ docker ps -a
CONTAINER ID        IMAGE                COMMAND             CREATED             STATUS                     PORTS                  NAMES
4c8364e0d031        ansilh/demo-webapp   "/demo-webapp"      2 minutes ago       Up 2 minutes               0.0.0.0:80->9090/tcp   zen_gauss
acb01851c20a ansilh/demo-webapp "/demo-webapp" 2 minutes ago Exited (2) 2 minutes ago condescending_antonelli- List resource usage (Press Ctrl+c to exit)
$ docker stats zen_gauss- Stop Container
$ docker stop zen_gauss- List images
$ docker images
REPOSITORY           TAG                 IMAGE ID            CREATED             SIZE
ansilh/demo-webapp latest b7c5e17ae85e 8 minutes ago 4.81MB- Remove containers
$ docker rm zen_gauss- Delete images
$ docker rmi ansilh/demo-webappInstall kubeadm
Note
Verify the MAC address and product_uuid are unique for every node
(ip link or ifconfig -a and sudo cat /sys/class/dmi/id/product_uuid)
- Download pre-requisites
$ sudo apt-get update && sudo apt-get install -y apt-transport-https curl- Add gpg key for apt
$ curl -s https://packages.cloud.google.com/apt/doc/apt-key.gpg |sudo apt-key add -- Add apt repository
$ cat <<EOF |sudo tee -a /etc/apt/sources.list.d/kubernetes.list
deb https://apt.kubernetes.io/ kubernetes-xenial main
EOF- Install kubelet , kubeadm and kubectl
$ sudo apt-get update
$ sudo apt-get install -y kubelet kubeadm kubectl
$ sudo apt-mark hold kubelet kubeadm kubectl
Repeat the same steps on worker node
Deploy master Node
- Initialize kubeadm with pod IP range
$ sudo kubeadm init --apiserver-advertise-address=192.168.56.201 --pod-network-cidr=10.10.0.0/16 --service-cidr=192.168.10.0/24- Configure
kubectl
$ mkdir -p $HOME/.kube
$ sudo cp -i /etc/kubernetes/admin.conf $HOME/.kube/config
$ sudo chown $(id -u):$(id -g) $HOME/.kube/config- Verify master node status
$ kubectl cluster-info- Output will be like below
Kubernetes master is running at https://192.168.56.201:6443
KubeDNS is running at https://192.168.56.201:6443/api/v1/namespaces/kube-system/services/kube-dns:dns/proxy

To further debug and diagnose cluster problems, use 'kubectl cluster-info dump'.
Info
Move to next session to deploy network plugin.
Deploy Network Plugin - Calico
- Apply RBAC rules (More about RBAC will discuss later)
$ kubectl apply -f https://docs.projectcalico.org/v3.3/getting-started/kubernetes/installation/hosted/rbac-kdd.yaml- Download Calico deployment YAML
$ wget https://docs.projectcalico.org/v3.3/getting-started/kubernetes/installation/hosted/kubernetes-datastore/calico-networking/1.7/calico.yaml- Edit
CALICO_IPV4POOL_CIDRvalue to10.10.0.0/16
- name: CALICO_IPV4POOL_CIDR
value: "10.10.0.0/16"- Add
name: IP_AUTODETECTION_METHOD&value: "can-reach=192.168.56.1"(This IP should be the host only network ip on your laptop)
...
image: quay.io/calico/node:v3.3.2
env:
  - name: IP_AUTODETECTION_METHOD
    value: "can-reach=192.168.56.1"
...- Apply Deployment
$ kubectl apply -f calico.yaml- Make sure the
READYstatus should show same value on left and right side of/andPodSTATUSshould beRunning
$ kubectl get pods -n kube-system |nl1 NAME READY STATUS RESTARTS AGE
2 calico-node-2pwv9 2/2 Running 0 20m
3 coredns-86c58d9df4-d9q2l 1/1 Running 0 21m
4 coredns-86c58d9df4-rwv7r 1/1 Running 0 21m
5 etcd-k8s-master-01 1/1 Running 0 20m
6 kube-apiserver-k8s-master-01 1/1 Running 0 20m
7 kube-controller-manager-k8s-master-01 1/1 Running 0 20m
8 kube-proxy-m6m9n 1/1 Running 0 21m
9 kube-scheduler-k8s-master-01 1/1 Running 0 20m Tip
Contact the Trainer if the output is not the expected one after few minutes (~3-4mins).
Add worker node to cluster
- Get discovery secret from Master node.
$ echo sha256:$(openssl x509 -in /etc/kubernetes/pki/ca.crt -noout -pubkey | openssl rsa -pubin -outform DER 2>/dev/null | sha256sum | cut -d' ' -f1)- Get node join token from Master node.
$ kubeadm token list |grep bootstra |awk '{print $1}'- Execute kubeadm command to add the Worker to cluster
$ sudo kubeadm join 192.168.56.201:6443 --token <token> --discovery-token-ca-cert-hash <discovery hash>- Verify system Pod status
$ kubectl get pods -n kube-system |nl- Output
 1  NAME                                    READY   STATUS    RESTARTS   AGE
 2  calico-node-2pwv9                       2/2     Running   0          20m
 3  calico-node-hwnfh                       2/2     Running   0          19m
 4  coredns-86c58d9df4-d9q2l                1/1     Running   0          21m
 5  coredns-86c58d9df4-rwv7r                1/1     Running   0          21m
 6  etcd-k8s-master-01                      1/1     Running   0          20m
 7  kube-apiserver-k8s-master-01            1/1     Running   0          20m
 8  kube-controller-manager-k8s-master-01   1/1     Running   0          20m
 9  kube-proxy-m6m9n                        1/1     Running   0          21m
10  kube-proxy-shwgp                        1/1     Running   0          19m
11  kube-scheduler-k8s-master-01            1/1     Running   0          20m
Chapter 3
Pods & Nodes
In this session , we will explore Pods and Nodes.
We will also create a Coffee application Pod
Subsections of Pods & Nodes
Introduction
What is a Pod ?
 A Pod is the basic building block of Kubernetes–the smallest and simplest unit in the Kubernetes object model that you create or deploy. A Pod represents a running process on your cluster
The “one-container-per-Pod” model is the most common Kubernetes use case; in this case, you can think of a Pod as a wrapper around a single container, and Kubernetes manages the Pods rather than the containers directly.

A Pod might encapsulate an application composed of multiple co-located containers that are tightly coupled and need to share resources. These co-located containers might form a single cohesive unit of service–one container serving files from a shared volume to the public, while a separate “sidecar” container refreshes or updates those files. The Pod wraps these containers and storage resources together as a single manageable entity.
What is a Node?
 A Pod always runs on a Node. A Node is a worker machine in Kubernetes and may be either a virtual or a physical machine, depending on the cluster. Each Node is managed by the Master. A Node can have multiple pods, and the Kubernetes master automatically handles scheduling the pods across the Nodes in the cluster. The Master’s automatic scheduling takes into account the available resources on each Node.
Create a Pod - Declarative
After completing this session , you will be able to create Pod declaratively and will be able to login to check services running on other pods.
So lets get started.
Lets Check the running Pods
k8s@k8s-master-01:~$ kubectl get pods
No resources found.
k8s@k8s-master-01:~$
Nothing
Lets create one using a YAML file
$ vi pod.yamlapiVersion: v1
kind: Pod
metadata:
name: coffee-app
spec:
containers:
- image: ansilh/demo-coffee
name: coffeeApply YAML using kubectl command
$ kubectl apply -f pod.yamlView status of Pod
Pod status is ContainerCreating
$ kubectl get podsOutput
NAME         READY   STATUS              RESTARTS   AGE
coffee-app   0/1     ContainerCreating   0          4s
Execute kubectl get pods after some time
Now Pod status will change to Running
$ kubectl get podsOutput
NAME         READY   STATUS    RESTARTS   AGE
coffee-app   1/1     Running   0          27s
Now we can see our first Pod
Get the IP address of Pod
$ kubectl get pods -o wideOutput
NAME         READY   STATUS    RESTARTS   AGE    IP            NODE            NOMINATED NODE   READINESS GATES
coffee-app   1/1     Running   0          2m8s   192.168.1.7   k8s-worker-01   <none>           <none>
Create a new CentOS container
$ vi centos-pod.yamlapiVersion: v1
kind: Pod
metadata:
name: centos-pod
spec:
containers:
- image: tutum/centos
name: centosApply the Yaml spec
$ kubectl apply -f centos-pod.yamlVerify the status of Pod
$ kubectl get podsNAME READY STATUS RESTARTS AGE
centos-pod 0/1 ContainerCreating 0 12s
coffee-app 1/1 Running 0 5m31s
After some time status will change to Running
$ kubectl get podsNAME READY STATUS RESTARTS AGE
centos-pod 1/1 Running 0 59s
coffee-app 1/1 Running 0 6m18sLogin to CentOS Pod
$ kubectl exec -it centos-pod -- /bin/bashVerify Coffee app using curl
$ curl -s 192.168.1.13:9090 |grep 'Serving'<html><head></head><title></title><body><div> <h2>Serving Coffee from</h2><h3>Pod:coffee-app</h3><h3>IP:192.168.1.13</h3><h3>Node:172.16.0.1</h3><img src="data:image/png;base64,
[root@centos-pod /]#
Delete pod
$ kubectl delete pod coffee-app centos-podpod "coffee-app" deleted
pod "centos-pod" deleted
Make sure not pod is running
$ kubectl get podsCreate a Pod - Imperative
Execute kubectl command to create a Pod.
$ kubectl run coffee --image=ansilh/demo-coffee --restart=Never
pod/coffee created
Verify Pod status
$ kubectl get pods -o wide
NAME     READY   STATUS              RESTARTS   AGE   IP       NODE            NOMINATED NODE   READINESS GATES
coffee   0/1     ContainerCreating   0          6s    <none>   k8s-worker-01   <none>           <none>
$ kubectl get pods -o wide
NAME     READY   STATUS    RESTARTS   AGE   IP             NODE            NOMINATED NODE   READINESS GATES
coffee   1/1     Running   0          19s   192.168.1.15   k8s-worker-01   <none>           <none>
Start a CentOS container
$ kubectl run centos-pod --image=tutum/centos --restart=Never
pod/centos-pod created
verify status of the Pod ; it should be in Running
$ kubectl get pods
NAME         READY   STATUS    RESTARTS   AGE
centos-pod   1/1     Running   0          25s
coffee       1/1     Running   0          2m10s
Logon to CentOS Pod
$ kubectl exec -it centos-pod -- /bin/bash
[root@centos-pod /]#
Verify Coffee App status
[root@centos-pod /]# curl -s 192.168.1.15:9090 |grep 'Serving Coffee'
<html><head></head><title></title><body><div> <h2>Serving Coffee from</h2><h3>Pod:coffee</h3><h3>IP:192.168.1.15</h3><h3>Node:172.16.0.1</h3><img src="data:image/png;base64,
[root@centos-pod /]# exit
Delete pod
k8s@k8s-master-01:~$ kubectl delete pod coffee centos-pod
pod "coffee" deleted
pod "centos-pod" deleted
k8s@k8s-master-01:~$ kubectl get pods
No resources found.
k8s@k8s-master-01:~$
Nodes
In this session , we will explore the node details
List nodes
$ k8s@k8s-master-01:~$ kubectl get nodesOutput
NAME            STATUS   ROLES    AGE   VERSION
k8s-master-01   Ready    master   38h   v1.13.1
k8s-worker-01   Ready    <none>   38h   v1.13.1
Extended listing
$ kubectl get nodes -o wideOutput
NAME            STATUS   ROLES    AGE   VERSION   INTERNAL-IP      EXTERNAL-IP   OS-IMAGE             KERNEL-VERSION      CONTAINER-RUNTIME
k8s-master-01   Ready    master   38h   v1.13.1   192.168.56.201   <none>        Ubuntu 16.04.5 LTS   4.4.0-131-generic   docker://18.9.0
k8s-worker-01   Ready    <none>   38h   v1.13.1   192.168.56.202   <none>        Ubuntu 16.04.5 LTS   4.4.0-131-generic   docker://18.9.0
k8s@k8s-master-01:~$
Details on a node
$ kubectl describe node k8s-master-01Output
Name:               k8s-master-01
Roles:              master
Labels:             beta.kubernetes.io/arch=amd64
                    beta.kubernetes.io/os=linux
                    kubernetes.io/hostname=k8s-master-01
                    node-role.kubernetes.io/master=
Annotations:        kubeadm.alpha.kubernetes.io/cri-socket: /var/run/dockershim.sock
                    node.alpha.kubernetes.io/ttl: 0
                    projectcalico.org/IPv4Address: 192.168.56.201/24
                    volumes.kubernetes.io/controller-managed-attach-detach: true
CreationTimestamp:  Mon, 31 Dec 2018 02:10:05 +0530
Taints:             node-role.kubernetes.io/master:NoSchedule
Unschedulable:      false
Conditions:
  Type             Status  LastHeartbeatTime                 LastTransitionTime                Reason                       Message
  ----             ------  -----------------                 ------------------                ------                       -------
  MemoryPressure   False   Tue, 01 Jan 2019 17:01:28 +0530   Mon, 31 Dec 2018 02:10:02 +0530   KubeletHasSufficientMemory   kubelet has sufficient memory available
  DiskPressure     False   Tue, 01 Jan 2019 17:01:28 +0530   Mon, 31 Dec 2018 02:10:02 +0530   KubeletHasNoDiskPressure     kubelet has no disk pressure
  PIDPressure      False   Tue, 01 Jan 2019 17:01:28 +0530   Mon, 31 Dec 2018 02:10:02 +0530   KubeletHasSufficientPID      kubelet has sufficient PID available
  Ready            True    Tue, 01 Jan 2019 17:01:28 +0530   Mon, 31 Dec 2018 22:59:35 +0530   KubeletReady                 kubelet is posting ready status. AppArmor enabled
Addresses:
  InternalIP:  192.168.56.201
  Hostname:    k8s-master-01
Capacity:
 cpu:                1
 ephemeral-storage:  49732324Ki
 hugepages-2Mi:      0
 memory:             2048168Ki
 pods:               110
Allocatable:
 cpu:                1
 ephemeral-storage:  45833309723
 hugepages-2Mi:      0
 memory:             1945768Ki
 pods:               110
System Info:
 Machine ID:                 96cedf74a821722b0df5ee775c291ea2
 System UUID:                90E04905-218D-4673-A911-9676A65B07C5
 Boot ID:                    14201246-ab82-421e-94f6-ff0d8ad3ba54
 Kernel Version:             4.4.0-131-generic
 OS Image:                   Ubuntu 16.04.5 LTS
 Operating System:           linux
 Architecture:               amd64
 Container Runtime Version:  docker://18.9.0
 Kubelet Version:            v1.13.1
 Kube-Proxy Version:         v1.13.1
PodCIDR:                     192.168.0.0/24
Non-terminated Pods:         (6 in total)
  Namespace                  Name                                     CPU Requests  CPU Limits  Memory Requests  Memory Limits  AGE
  ---------                  ----                                     ------------  ----------  ---------------  -------------  ---
  kube-system                calico-node-nkcrd                        250m (25%)    0 (0%)      0 (0%)           0 (0%)         38h
  kube-system                etcd-k8s-master-01                       0 (0%)        0 (0%)      0 (0%)           0 (0%)         38h
  kube-system                kube-apiserver-k8s-master-01             250m (25%)    0 (0%)      0 (0%)           0 (0%)         38h
  kube-system                kube-controller-manager-k8s-master-01    200m (20%)    0 (0%)      0 (0%)           0 (0%)         38h
  kube-system                kube-proxy-tzznm                         0 (0%)        0 (0%)      0 (0%)           0 (0%)         38h
  kube-system                kube-scheduler-k8s-master-01             100m (10%)    0 (0%)      0 (0%)           0 (0%)         38h
Allocated resources:
  (Total limits may be over 100 percent, i.e., overcommitted.)
  Resource           Requests    Limits
  --------           --------    ------
  cpu                800m (80%)  0 (0%)
  memory             0 (0%)      0 (0%)
  ephemeral-storage  0 (0%)      0 (0%)
Events:              <none>
We will discuss more about each of the fields on upcoming sessions.
For now lets discuss about Non-terminated Pods field;
Non-terminated Pods field
- Namespace : The namespace which the Pods were running .
The pods that we create will by default go to
defaultnamespace. - Name : Name of the Pod
- CPU Request : How much CPU resource requested by Pod during startup.
- CPU Limits : How much CPU the Pod can use.
- Memory Request : How much memory requested by Pod during startup.
- Memory Limits : How much memory the Pod can use.
Namespaces
What is a namespace
We have see namespaces in Linux , which ideally isolates objects and here also the concept is same but serves a different purpose. Suppose you have two departments in you organization and both departments have application which needs more fine grained control. We can use namespaces to separate the workload of each departments.
By default kubernetes will have three namespace
List namespace
$ kubectl get ns
NAME          STATUS   AGE
default       Active   39h
kube-public   Active   39h
kube-system   Active   39h
default : All Pods that we manually create will go to this namespace (There are ways to change it , but for now that is what it is). kube-public : All common workloads can be assigned to this namespace . Most of the time no-one use it. kube-system : Kubernetes specific Pods will be running on this namespace
List Pods in kube-system namespace
$ kubectl get pods --namespace=kube-system
NAME                                    READY   STATUS    RESTARTS   AGE
calico-node-n99tb                       2/2     Running   0          38h
calico-node-nkcrd                       2/2     Running   0          38h
coredns-86c58d9df4-4c22l                1/1     Running   0          39h
coredns-86c58d9df4-b49c2                1/1     Running   0          39h
etcd-k8s-master-01                      1/1     Running   0          39h
kube-apiserver-k8s-master-01            1/1     Running   0          39h
kube-controller-manager-k8s-master-01   1/1     Running   0          39h
kube-proxy-s6hc4                        1/1     Running   0          38h
kube-proxy-tzznm                        1/1     Running   0          39h
kube-scheduler-k8s-master-01            1/1     Running   0          39h
As you can see , there are many Pods running in kube-system namespace
All these Pods were running with one or mode containers
If you see the calico-node-n99tb pod , the READY says 2/2 , which means two containers were running fine in this Pod
List all resources in a namespace
k8s@k8s-master-01:~$ kubectl get all -n kube-system
NAME                                        READY   STATUS    RESTARTS   AGE
pod/calico-node-kr5xg                       2/2     Running   0          13m
pod/calico-node-lcpbw                       2/2     Running   0          13m
pod/coredns-86c58d9df4-h8pjr                1/1     Running   6          26m
pod/coredns-86c58d9df4-xj24c                1/1     Running   6          26m
pod/etcd-k8s-master-01                      1/1     Running   0          26m
pod/kube-apiserver-k8s-master-01            1/1     Running   0          26m
pod/kube-controller-manager-k8s-master-01   1/1     Running   0          26m
pod/kube-proxy-fl7rj                        1/1     Running   0          26m
pod/kube-proxy-q6w9l                        1/1     Running   0          26m
pod/kube-scheduler-k8s-master-01            1/1     Running   0          26m

NAME                   TYPE        CLUSTER-IP       EXTERNAL-IP   PORT(S)         AGE
service/calico-typha   ClusterIP   172.16.244.140   <none>        5473/TCP        13m
service/kube-dns       ClusterIP   172.16.0.10      <none>        53/UDP,53/TCP   27m

NAME                         DESIRED   CURRENT   READY   UP-TO-DATE   AVAILABLE   NODE SELECTOR                 AGE
daemonset.apps/calico-node   2         2         2       2            2           beta.kubernetes.io/os=linux   13m
daemonset.apps/kube-proxy    2         2         2       2            2           <none>                        27m

NAME                           READY   UP-TO-DATE   AVAILABLE   AGE
deployment.apps/calico-typha   0/0     0            0           13m
deployment.apps/coredns        2/2     2            2           27m

NAME                                      DESIRED   CURRENT   READY   AGE
replicaset.apps/calico-typha-5fc4874c76   0         0         0       13m
replicaset.apps/coredns-86c58d9df4        2         2         2       26m
k8s@k8s-master-01:~$
Self Healing - Readiness
Readiness Probe
We have seen that our coffee application was listening on port 9090. Lets assume that the application is not coming up but Pod status showing running. Everyone will think that application is up. You entire application stack might get affected because of this.
So here comes the question , “How can I make sure my application is started, not just the Pod ?”
Here we can use Pod spec, Readiness probe.
Official detention of readinessProbe is , “Periodic probe of container service readiness”.
Lets rewrite the Pod specification of Coffee App and add a readiness Probe.
$ vi pod-readiness.yamlapiVersion: v1
kind: Pod
metadata:
name: coffee-app
spec:
containers:
- image: ansilh/demo-coffee
name: coffee
readinessProbe:
initialDelaySeconds: 10
httpGet:
port: 9090Apply Yaml
$ kubectl apply -f pod-readiness.yaml
pod/coffee-app created
Verify Pod status
Try to identify the difference.
$ kubectl get pods
NAME         READY   STATUS              RESTARTS   AGE
coffee-app   0/1     ContainerCreating   0          3s
$ kubectl get pods
NAME         READY   STATUS    RESTARTS   AGE
coffee-app   0/1     Running   0          25s
$ kubectl get pods
NAME         READY   STATUS    RESTARTS   AGE
coffee-app   1/1     Running   0          32s
Delete the Pod
Yes ,we can delete the objects using the same yaml which we used to create/apply it
$ kubectl delete -f pod-readiness.yaml
pod "coffee-app" deleted
$
Probe Tuning.
failureThreshold     <integer>
  Minimum consecutive failures for the probe to be considered failed after
  having succeeded. Defaults to 3. Minimum value is 1.

initialDelaySeconds  <integer>
  Number of seconds after the container has started before liveness probes
  are initiated. More info:
  https://kubernetes.io/docs/concepts/workloads/pods/pod-lifecycle#container-probes

periodSeconds        <integer>
  How often (in seconds) to perform the probe. Default to 10 seconds. Minimum
  value is 1.

timeoutSeconds       <integer>
  Number of seconds after which the probe times out. Defaults to 1 second.
  Minimum value is 1. More info:
  https://kubernetes.io/docs/concepts/workloads/pods/pod-lifecycle#container-probes
Self Healing - Liveness
Liveness Probe
Lets assume the application failed after readiness probe execution completes Again we are back to service unavailability
To avoid this , we need a liveness check which will do a periodic health check after Pod start running or readiness probe completes.
Lets rewrite the Pod specification of Coffee App and add a liveness Probe.
$ vi pod-liveiness.yamlapiVersion: v1
kind: Pod
metadata:
name: coffee-app
spec:
containers:
- image: ansilh/demo-coffee
name: coffee
readinessProbe:
initialDelaySeconds: 10
httpGet:
port: 9090
livenessProbe:
periodSeconds: 5
httpGet:
port: 9090Create Pod
$ kubectl create -f pod-liveness.yamlResource Allocation
Limits
We can limit the CPU and Memory usage of a container so that one
Lets create the coffee Pod again with CPU and Memory limits
apiVersion: v1
kind: Pod
metadata:
  labels:
  name: coffee-limits
spec:
  containers:
  - image: ansilh/demo-coffee
    name: coffee
    resources:
      limits:
        CPU: 100m
        Memory: 123Mi
Resulting container will be allowed to use 100 millicores and 123 mebibyte (~128 Megabytes)
CPU
One CPU core is equivalent to 1000m (one thousand millicpu or one thousand millicores)
CPU is always expressed as an absolute quantity, never as a relative quantity; 0.1 is the same amount of CPU on a single-core, dual-core, or 48-core machine
Memory
You can express memory as a plain integer or as a fixed-point integer using one of these suffixes: E, P, T, G, M, K. You can also use the power-of-two equivalents: Ei, Pi, Ti, Gi, Mi, Ki. For example, the following represent roughly the same value:
128974848, 129e6, 129M, 123MiMebibyte vs Megabyte
1 Megabyte (MB) = (1000)^2 bytes = 1000000 bytes.
1 Mebibyte (MiB) = (1024)^2 bytes = 1048576 bytes.
Requests
We can request a specific amount of CPU and Memory when the container starts up.
Suppose if the Java application need at least 128MB of memory during startup , we can use resource request in Pod spec.
This will help the scheduler to select a node with enough memory.
Request also can be made of CPU as well.
Lets modify the Pod spec and add request
apiVersion: v1
kind: Pod
metadata:
  labels:
  name: coffee-limits
spec:
  containers:
  - image: ansilh/demo-coffee
    name: coffee
    resources:
      requests:
        CPU: 100m
        Memory: 123Mi
      limits:
        CPU: 200m
        Memory: 244Mi
Extra
Once you complete the training , you can visit below URLs to understand storage and network limits.
Chapter 4
Labels & Annotations
In this session , we will discuss the role of Labels and Annotations , also its role in fundamental k8s design.
Subsections of Labels & Annotations
Annotations
Why we need annotations ?
We can use either labels or annotations to attach metadata to Kubernetes objects. Labels can be used to select objects and to find collections of objects that satisfy certain conditions. In contrast, annotations are not used to identify and select objects. The metadata in an annotation can be small or large, structured or unstructured, and can include characters not permitted by labels.
Its just a place to store more metadata which is not used for any selection , grouping or operations.
Annotate Pod
Lets say , if you want to add a download URL to pod.
$ kubectl annotate pod coffee-app url=https://hub.docker.com/r/ansilh/demo-webapp
pod/coffee-app annotated
View annotations
k8s@k8s-master-01:~$ kubectl describe pod coffee-app
Name:               coffee-app
Namespace:          default
Priority:           0
PriorityClassName:  <none>
Node:               k8s-worker-01/192.168.56.202
Start Time:         Fri, 04 Jan 2019 00:47:10 +0530
Labels:             app=frontend
                    run=coffee-app
Annotations:        cni.projectcalico.org/podIP: 10.10.1.11/32
                    url: https://hub.docker.com/r/ansilh/demo-webapp
Status:             Running
IP:                 10.10.1.11
...
Annotations filed containe two entries
cni.projectcalico.org/podIP: 10.10.1.11/32
url: https://hub.docker.com/r/ansilh/demo-webapp
Remove annotation
Use same annotate command and mention only key with a dash (-) at the end of the key .
Below command will remove the annotation url: https://hub.docker.com/r/ansilh/demo-webapp from Pod.
k8s@k8s-master-01:~$ kubectl annotate pod coffee-app url-
pod/coffee-app annotated
k8s@k8s-master-01:~$
Annotation after removal.
k8s@k8s-master-01:~$ kubectl describe pod coffee-app
Name:               coffee-app
Namespace:          default
Priority:           0
PriorityClassName:  <none>
Node:               k8s-worker-01/192.168.56.202
Start Time:         Fri, 04 Jan 2019 00:47:10 +0530
Labels:             app=frontend
                    run=coffee-app
Annotations:        cni.projectcalico.org/podIP: 10.10.1.11/32
Status:             Running
IP:                 10.10.1.11
Labels
Why we need labels ?
If you have a bucket of white dominos and you want to group it based on the number of dots.
Lets say we want all dominos with 10 dots; we will take domino one by one and if its having 10 dots ,we will put it aside and continue the same operation until all dominos were checked.
Likewise , suppose if you have 100 pods and few of them are nginx and few of them are centos , how we can see only nginx pods ?
We need a label on each pod so that we can tell kubectl command to show the pods with that label.
In kubernetes , label is a key value pair and it provides ‘identifying metadata’ for objects. These are fundamental qualities of objects that will be used for grouping , viewing and operating.
For now we will se how we can view them (Will discuss about grouping and operation on pod groups later)
Pod labels
Lets run a Coffee app Pod
k8s@k8s-master-01:~$ kubectl run coffee-app --image=ansilh/demo-coffee --restart=Never
pod/coffee-app created
k8s@k8s-master-01:~$ kubectl get pods
NAME         READY   STATUS    RESTARTS   AGE
coffee-app   1/1     Running   0          4s
k8s@k8s-master-01:~$
See the labels of a Pods
k8s@k8s-master-01:~$ kubectl get pods --show-labels
NAME         READY   STATUS    RESTARTS   AGE   LABELS
coffee-app   1/1     Running   0          37s   run=coffee-app
k8s@k8s-master-01:~$
As you can see above , the lables is run=coffee-app which is a key value pair - key is run value is coffee-app.
When we run Pod imperatively , kubectl ass this label to Pod.
Add custom label to Pod
We can add label to Pod using kubectl label command.
k8s@k8s-master-01:~$ kubectl label pod coffee-app app=frontend
pod/coffee-app labeled
k8s@k8s-master-01:~$
Here we have add a label app=frontend to pod coffee-app.
Use label selectors
Lets start another coffee application pod with name coffee-app02.
k8s@k8s-master-01:~$ kubectl run coffee-app02 --image=ansilh/demo-coffee --restart=Never
pod/coffee-app02 created
k8s@k8s-master-01:~$
Now we have two Pods.
k8s@k8s-master-01:~$ kubectl get pods --show-labels
NAME           READY   STATUS    RESTARTS   AGE    LABELS
coffee-app     1/1     Running   0          5m5s   app=frontend,run=coffee-app
coffee-app02   1/1     Running   0          20s    run=coffee-app02
k8s@k8s-master-01:~$
Lets see how can I select the Pods with label app=frontend.
k8s@k8s-master-01:~$ kubectl get pods --selector=app=frontend
NAME         READY   STATUS    RESTARTS   AGE
coffee-app   1/1     Running   0          6m52s
k8s@k8s-master-01:~$
You can add as many as label you want.
We can add a prefix like app ( eg: app/dev=true ) which is also a valid label.
| Limitations | |
|---|---|
| Prefix | DNS subdomain with 256 characters |
| Key | 63 characters |
| Value | 63 characters |
Remove labels
See the labels of coffee-app
k8s@k8s-master-01:~$ kubectl get pods --show-labels
NAME           READY   STATUS    RESTARTS   AGE   LABELS
coffee-app     1/1     Running   0          28m   app=frontend,run=coffee-app
coffee-app02   1/1     Running   0          24m   run=coffee-app02
Remove the app label
k8s@k8s-master-01:~$ kubectl label pod coffee-app app-
pod/coffee-app labeled
Resulting output
k8s@k8s-master-01:~$ kubectl get pods --show-labels
NAME           READY   STATUS    RESTARTS   AGE   LABELS
coffee-app     1/1     Running   0          29m   run=coffee-app
coffee-app02   1/1     Running   0          24m   run=coffee-app02
k8s@k8s-master-01:~$
Chapter 5
Taints and Tolerations
Taints and tolerations work together to ensure that pods are not scheduled onto inappropriate nodes.
Subsections of Taints and Tolerations
Taints
Why we need Taints ?
Just like labels , one or more taints can be applied to a node; this marks that the node should not accept any pods that do not tolerate the taints
$ kubectl taint node k8s-master-ah-01 node-role.kubernetes.io/master="":NoScheduleFormat key=value:Effect
Effects
NoSchedule - Pods will not be schedules
PreferNoSchedule- This is a “preference” or “soft” version of NoSchedule – the system will try to avoid placing a pod that does not tolerate the taint on the node, but it is not required.
NoExecute - pod will be evicted from the node (if it is already running on the node), and will not be scheduled onto the node (if it is not yet running on the node)
Tolerations
Why we need Tolerations ?
Tolerations can be specified on Pods Based on the taints on the nodes , Pods will scheduler will allow to run the Pod on the node.
Toleration syntax in Pod spec.
spec:
  tolerations:
    - key: node-role.kubernetes.io/master
      effect: NoSchedule
Chapter 6
YAML Crash course
In this session we will learn k8s YAML specification and object types. We will cover only k8s dependent YAML specification
Subsections of YAML Crash course
Exploring Object Specs
So lets discuss about a new command kubectl explain so that we don’t have to remember all YAML specs of kubernetes objects.
With kubectl explain subcommand , you can see the specification of each objects and can use that as a reference to write your YAML files.
Fist level spec
We will use kubectl explain Pod command to see the specifications of a Pod YAML.
$ kubectl explain PodOutput
ubuntu@k8s-master-01:~$ kubectl explain pod
KIND:     Pod
VERSION:  v1

DESCRIPTION:
     Pod is a collection of containers that can run on a host. This resource is
     created by clients and scheduled onto hosts.

FIELDS:
   apiVersion	<string>
     APIVersion defines the versioned schema of this representation of an
     object. Servers should convert recognized schemas to the latest internal
     value, and may reject unrecognized values. More info:
     https://git.k8s.io/community/contributors/devel/api-conventions.md#resources

   kind	<string>
     Kind is a string value representing the REST resource this object
     represents. Servers may infer this from the endpoint the client submits
     requests to. Cannot be updated. In CamelCase. More info:
     https://git.k8s.io/community/contributors/devel/api-conventions.md#types-kinds

   metadata	<Object>
     Standard object's metadata. More info:
     https://git.k8s.io/community/contributors/devel/api-conventions.md#metadata

   spec	<Object>
     Specification of the desired behavior of the pod. More info:
     https://git.k8s.io/community/contributors/devel/api-conventions.md#spec-and-status

   status	<Object>
     Most recently observed status of the pod. This data may not be up to date.
     Populated by the system. Read-only. More info:
     https://git.k8s.io/community/contributors/devel/api-conventions.md#spec-and-status

ubuntu@k8s-master-01:~$
As we discussed earlier , the specification is very familiar.
Filed status is readonly and its system populated , so we don’t have to write anything for status.
Exploring inner fields
If we want to see the fields available in spec , then execute below command.
$ kubectl explain pod.specKIND: Pod
VERSION: v1
RESOURCE: spec <Object>
DESCRIPTION:
Specification of the desired behavior of the pod. More info:
https://git.k8s.io/community/contributors/devel/api-conventions.md#spec-and-status
PodSpec is a description of a pod.
FIELDS:
...
containers <[]Object> -required-
List of containers belonging to the pod. Containers cannot currently be
added or removed. There must be at least one container in a Pod. Cannot be
updated.
...How easy is that.
As you can see in spec the containers filed is -required- which indicates that this filed is mandatory.
<[]Object> indicates that its an array of objects , which means , you can put more than one element under containers
That make sense , because the Pod may contain more than one container.
In YAML we can use - infront of a filed to mark it as an array element.
Lets take a look at the YAML that we wrote earlier
apiVersion: v1
kind: Pod
metadata:
 name: coffee-app01
 labels:
  app: frontend
  run: coffee-app01
spec:
 containers:
 - name: demo-coffee
   image: ansilh/demo-coffee
There is a - under the fist filed of the containers.
If we say that in words ; “containers is an array object which contains one array element with filed name and image”
If you want to add one more container in Pod , we will add one more array element with needed values.
apiVersion: v1
kind: Pod
metadata:
 name: coffee-app01
 labels:
  app: frontend
  run: coffee-app01
spec:
 containers:
 - name: demo-coffee
   image: ansilh/demo-coffee
 - name: demo-tea
   image: ansilh/demo-tea
Now the Pod have two containers .
How I know the containers array element need name and image ?
We will use explain command to get those details.
$ kubectl explain pod.spec.containersSnipped Output
...
name	<string> -required-
  Name of the container specified as a DNS_LABEL. Each container in a pod
  must have a unique name (DNS_LABEL). Cannot be updated.

image	<string>
  Docker image name
...
As you can see , name and image are of type string which means , you have to provide a string value to it.
K8S YAML structure
What is YAML ?
Yet Another Markup Language
Kubernetes YAML have below structure
apiVersion:
kind:
metadata:
spec:
apiVersion:
Kubernetes have different versions of API for each objects. We discuss about API in detail in upcoming sessions. For now , lets keep it simple as possible.
Pod is one of the kind of object which is part of core v1 API
So for a Pod, we usually see apiVersion: v1
kind:
As explained above we specify the kind of API object with kind: field.
metadata:
We have seen the use of metadata earlier.
As the name implies , we usually store name of object and labels in metadata field.
spec:
Object specification will go hear.
The specification will depend on the kind and apiVersion we use
Exploring Pod spec
Lets write a Pod specification YAML
apiVersion: v1
kind: Pod
metadata:
 name: coffee-app01
 labels:
  app: frontend
  run: coffee-app01
spec:
 containers:
 - name: demo-coffee
   image: ansilh/demo-coffee
In above specification , you can see that we have specified name and labels in matadata field.
The spec starts with cotainer field and we have added a container specification under it.
You might be wondering , how can we memories all these options. In reality , you don’t have to.
We will discuss about it in next session.
Chapter 7
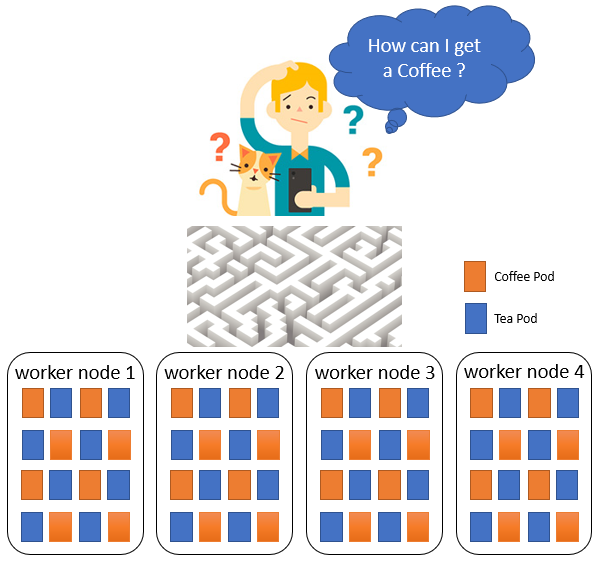
Services
In this session we will solve the maze
Subsections of Services
Expose services in Pod
Service
A Coffee Pod running in cluster and its listening on port 9090 on Pod’s IP. How can we expose that service to external world so that users can access it ?
We need to expose the service.
As we know , the Pod IP is not routable outside of the cluster. So we need a mechanism to reach the host’s port and then that traffic should be diverted to Pod’s port.
Lets create a Pod Yaml first.
$ vi coffe.yamlapiVersion: v1
kind: Pod
metadata:
name: coffee
spec:
containers:
- image: ansilh/demo-coffee
name: coffeeCreate Yaml
$ kubectl create -f coffe.yamlExpose the Pod with below command
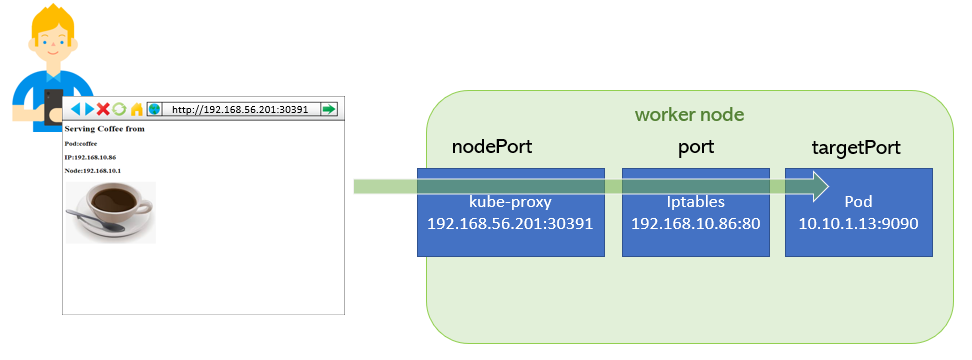
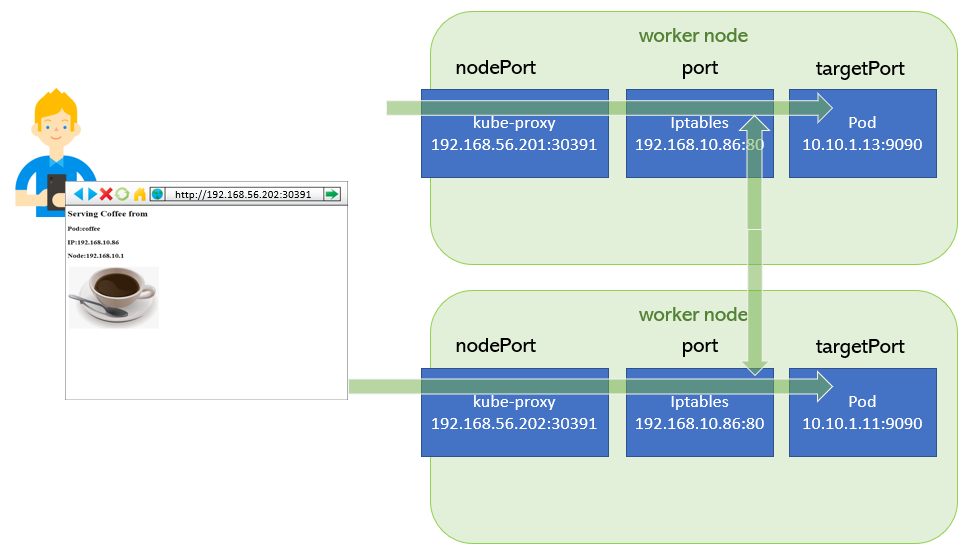
$ kubectl expose pod coffee --port=80 --target-port=9090 --type=NodePortThis will create a Service object in kubernetes , which will map the Node’s port 30836 to Service IP/Port 192.168.10.86:80
We can see the derails using kubectl get service command
$ kubectl get service
NAME         TYPE        CLUSTER-IP       EXTERNAL-IP   PORT(S)        AGE
coffee       NodePort    192.168.10.86    <none>        80:30391/TCP   6s
kubernetes   ClusterIP   192.168.10.1     <none>        443/TCP        26h
We can also see that the port is listening and kube-proxy is the one listening on that port.
$ sudo netstat -tnlup |grep 30836
tcp6       0      0 :::30391                :::*                    LISTEN      2785/kube-proxy
Now you can open browser and access the Coffee app using URL http://192.168.56.201:30391
Ports in Service Objects
nodePort
This setting makes the service visible outside the Kubernetes cluster by the node’s IP address and the port number declared in this property. The service also has to be of type NodePort (if this field isn’t specified, Kubernetes will allocate a node port automatically).
port
Expose the service on the specified port internally within the cluster. That is, the service becomes visible on this port, and will send requests made to this port to the pods selected by the service.
targetPort
This is the port on the pod that the request gets sent to. Your application needs to be listening for network requests on this port for the service to work.
NodePort
NodePort Exposes the service on each Node’s IP at a static port (the NodePort). A ClusterIP service, to which the NodePort service will route, is automatically created. You’ll be able to contact the NodePort service, from outside the cluster, by requesting
How nodePort works
kube-proxy watches the Kubernetes master for the addition and removal of Service and Endpoints objects.
(We will discuss about Endpoints later in this session.)
For each Service, it opens a port (randomly chosen) on the local node. Any connections to this “proxy port” will be proxied to one of the Service’s backend Pods (as reported in Endpoints). Lastly, it installs iptables rules which capture traffic to the Service’s clusterIP (which is virtual) and Port and redirects that traffic to the proxy port which proxies the backend Pod.
nodePort workflow.
nodePort->30391port->80targetPort->9090
ClusterIP
It exposes the service on a cluster-internal IP.
When we expose a pod using kubectl expose command , we are creating a service object in API.
Choosing this value makes the service only reachable from within the cluster. This is the default ServiceType.
We can see the Service spec using --dry-run & --output=yaml
$ kubectl expose pod coffee --port=80 --target-port=9090 --type=ClusterIP --dry-run --output=yaml
Output
apiVersion: v1
kind: Service
metadata:
  creationTimestamp: null
  labels:
    run: coffee
  name: coffee
spec:
  ports:
  - port: 80
    protocol: TCP
    targetPort: 9090
  selector:
    run: coffee
  type: ClusterIP
status:
  loadBalancer: {}
Cluster IP service is useful when you don’t want to expose the service to external world. eg:- database service.
With service names , a frontend tier can access the database backend without knowing the IPs of the Pods.
CoreDNS (kube-dns) will dynamically create a service DNS entry and that will be resolvable from Pods.
Verify Service DNS
Start debug-tools container which is an alpine linux image with network related binaries
$ kubectl run debugger --image=ansilh/debug-tools --restart=Never$ kubectl exec -it debugger -- /bin/sh
/ # nslookup coffee
Server: 192.168.10.10
Address: 192.168.10.10#53
Name: coffee.default.svc.cluster.local
Address: 192.168.10.86
/ # nslookup 192.168.10.86
86.10.168.192.in-addr.arpa name = coffee.default.svc.cluster.local.
/ #coffee.default.svc.cluster.local
^ ^ ^ k8s domain
| | | |-----------|
| | +--------------- Indicates that its a service
| +---------------------- Namespace
+----------------------------- Service NameLoadBalancer
Exposes the service externally using a cloud provider’s load balancer. NodePort and ClusterIP services, to which the external load balancer will route, are automatically created.
We will discuss more about this topic later in this training.
Endpoints
Pods behind a service.
 Lets
Lets describe the service to see how the mapping of Pods works in a service object.
(Yes , we are slowly moving from general wordings to pure kubernetes terms)
$ kubectl describe service coffee
Name:                     coffee
Namespace:                default
Labels:                   run=coffee
Annotations:              <none>
Selector:                 run=coffee
Type:                     NodePort
IP:                       192.168.10.86
Port:                     <unset>  80/TCP
TargetPort:               9090/TCP
NodePort:                 <unset>  30391/TCP
Endpoints:                10.10.1.13:9090
Session Affinity:         None
External Traffic Policy:  Cluster
Here the label run=coffee is the one which creates the mapping from service to Pod.
Any pod with label run=coffee will be mapped under this service.
Those mappings are called Endpoints.
Lets see the endpoints of service coffee
$ kubectl get endpoints  coffee
NAME     ENDPOINTS         AGE
coffee   10.10.1.13:9090   3h48m
As of now only one pod endpoint is mapped under this service.
lets create one more Pod with same label and see how it affects endpoints.
$ kubectl run coffee01 --image=ansilh/demo-coffee --restart=Never --labels=run=coffeeNow we have one more Pod
$ kubectl get pods
NAME       READY   STATUS    RESTARTS   AGE
coffee     1/1     Running   0          15h
coffee01   1/1     Running   0          6s
Lets check the endpoint
$ kubectl get endpoints  coffee
NAME     ENDPOINTS                         AGE
coffee   10.10.1.13:9090,10.10.1.19:9090   3h51m
Now we have two Pod endpoints mapped to this service. So the requests comes to coffee service will be served from these pods in a round robin fashion.
Chapter 8
Multi-Container Pods
In this session we will create Pods with more than one containers and few additional features in k8s.
Subsections of Multi-Container Pods
InitContainer
 In this session , we will discuss about InitContainer
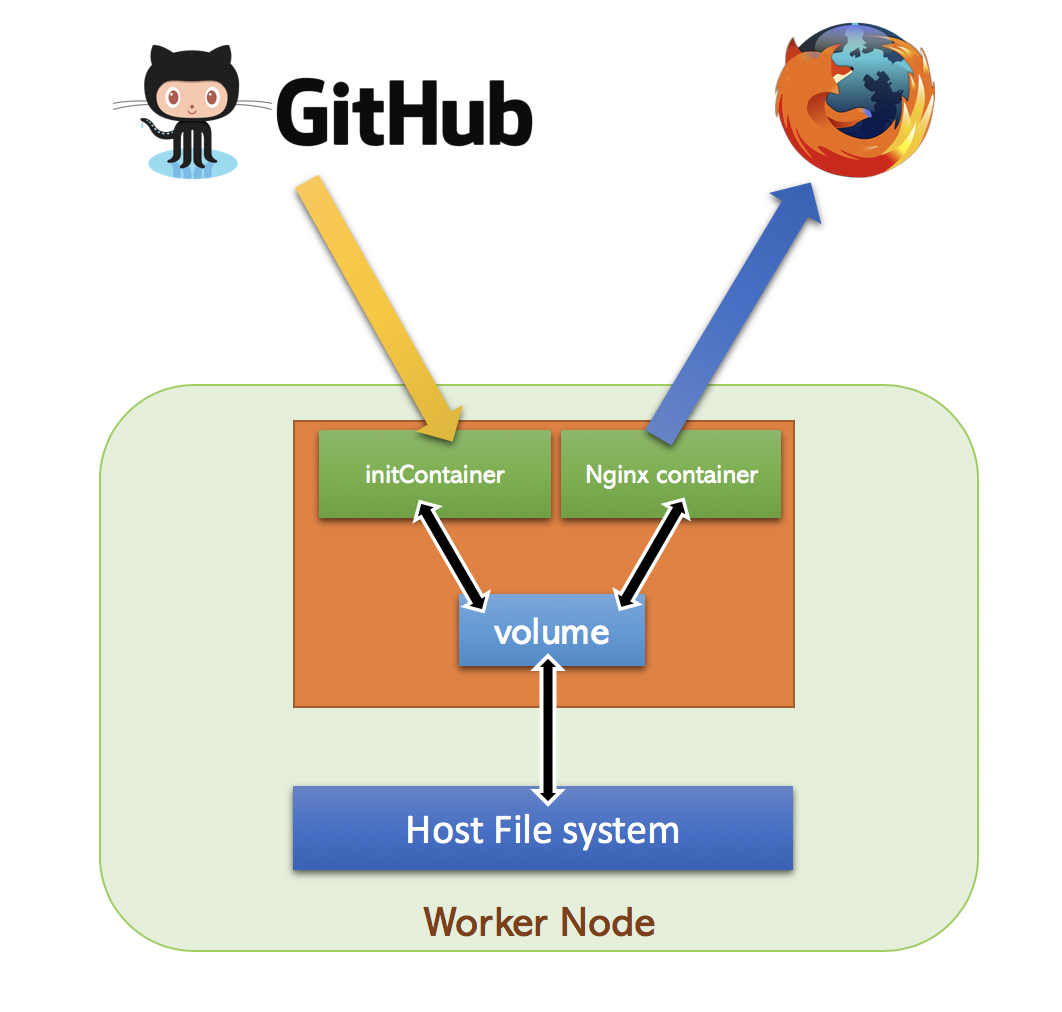
Non-persistent web server
As we already know ,containers are ephemeral and the modifications will be lost when container is destroyed.
In this example , we will download webpages from Github repository and store it in a emptyDir volume.
From this emptyDir volume , we will serve the HTML pages using an Nginx Pod
emptyDir is a volume type , just like hostPath , but the contents of emptyDir will be destroyed when Pod is stopped.
So lets write a Pod specification for Nginx container and add InitContainer to download HTML page
apiVersion: v1
kind: Pod
metadata:
  labels:
    run: demo-web
  name: demo-web
spec:
  volumes:
  - name: html
    emptyDir: {}
  containers:
  - image: nginx
    name: demo-web
    volumeMounts:
    - name: html
      mountPath: /usr/share/nginx/html
  initContainers:
  - image: ansilh/debug-tools
    name: git-pull
    args:
    - git
    - clone
    - https://github.com/ansilh/k8s-demo-web.git
    - /html/.
    volumeMounts:
    - name: html
      mountPath: /html/
Problem with this design is , no way to pull the changes once Pod is up. InitContainer run only once during the startup of the Pod.
Incase of InitContainer failure , Pod startup will fail and never start other containers.
We can specify more than one initcontainer if needed. Startup of initcontainer will be sequential and the order will be selected based on the order in yaml spec.
In next session , we will discuss about other design patterns for Pod.
Inject data to Pod
Inject data to pod via Environmental variable
We will create a Coffee Pod
$ kubectl run tea --image=ansilh/demo-tea --env=MY_NODE_NAME=scratch --restart=Never --dry-run -o yaml >pod-with-env.yamlapiVersion: v1
kind: Pod
metadata:
creationTimestamp: null
labels:
run: tea
name: tea
spec:
containers:
- env:
- name: MY_NODE_NAME
value: scratch
image: ansilh/demo-tea
name: coffee-new
resources: {}
dnsPolicy: ClusterFirst
restartPolicy: Never
status: {}Lets run this Pod
$ kubectl create -f pod-with-env.yaml$ kubectl get pods
NAME READY STATUS RESTARTS AGE
tea 1/1 Running 0 7sLets expose the pod as NodePort
$ kubectl expose pod tea --port=80 --target-port=8080 --type=NodePort$ kubectl get svc tea
NAME TYPE CLUSTER-IP EXTERNAL-IP PORT(S) AGE
tea NodePort 192.168.10.37 <none> 80:32258/TCP 42sAccess the service using browser uisng node IP and port 32258
You will see below in Page
Node:scratch
Expose Pod fields to containers
Lets extract the nodeName from spec ( Excuse me ? yeah we will see that in a moment )
k8s@k8s-master-01:~$ kubectl get pods tea -o=jsonpath='{.spec.nodeName}' && echo
k8s-worker-01
k8s@k8s-master-01:~$ kubectl get pods tea -o=jsonpath='{.status.hostIP}' && echo
192.168.56.202
k8s@k8s-master-01:~$ kubectl get pods tea -o=jsonpath='{.status.podIP}' && echo
10.10.1.23
k8s@k8s-master-01:~$
To get the JSON path , first we need to get the entire object output in JSON.
We have used output in YAML so far because its easy . But internally kubectl convers YAML to JSON
$ kubectl get pod tea -o json{
"apiVersion": "v1",
"kind": "Pod",
"metadata": {
"annotations": {
"cni.projectcalico.org/podIP": "10.10.1.23/32"
},
"creationTimestamp": "2019-01-06T15:09:36Z",
"labels": {
"run": "tea"
},
"name": "tea",
"namespace": "default",
"resourceVersion": "218696",
"selfLink": "/api/v1/namespaces/default/pods/tea",
"uid": "14c1715b-11c5-11e9-9f0f-0800276a1bd2"
},
"spec": {
"containers": [
{
"env": [
{
"name": "MY_NODE_NAME",
"value": "scratch"
}
],
"image": "ansilh/demo-tea",
"imagePullPolicy": "Always",
"name": "coffee-new",
"resources": {},
"terminationMessagePath": "/dev/termination-log",
"terminationMessagePolicy": "File",
"volumeMounts": [
{
"mountPath": "/var/run/secrets/kubernetes.io/serviceaccount",
"name": "default-token-72pzg",
"readOnly": true
}
]
}
],
"dnsPolicy": "ClusterFirst",
"enableServiceLinks": true,
"nodeName": "k8s-worker-01",
"priority": 0,
"restartPolicy": "Never",
"schedulerName": "default-scheduler",
"securityContext": {},
"serviceAccount": "default",
"serviceAccountName": "default",
"terminationGracePeriodSeconds": 30,
"tolerations": [
{
"effect": "NoExecute",
"key": "node.kubernetes.io/not-ready",
"operator": "Exists",
"tolerationSeconds": 300
},
{
"effect": "NoExecute",
"key": "node.kubernetes.io/unreachable",
"operator": "Exists",
"tolerationSeconds": 300
}
],
"volumes": [
{
"name": "default-token-72pzg",
"secret": {
"defaultMode": 420,
"secretName": "default-token-72pzg"
}
}
]
},
"status": {
"conditions": [
{
"lastProbeTime": null,
"lastTransitionTime": "2019-01-06T15:09:36Z",
"status": "True",
"type": "Initialized"
},
{
"lastProbeTime": null,
"lastTransitionTime": "2019-01-06T15:09:42Z",
"status": "True",
"type": "Ready"
},
{
"lastProbeTime": null,
"lastTransitionTime": "2019-01-06T15:09:42Z",
"status": "True",
"type": "ContainersReady"
},
{
"lastProbeTime": null,
"lastTransitionTime": "2019-01-06T15:09:36Z",
"status": "True",
"type": "PodScheduled"
}
],
"containerStatuses": [
{
"containerID": "docker://291a72e7fdab6a9f7afc47c640126cf596f5e071903b6a9055b44ef5bcb1c104",
"image": "ansilh/demo-tea:latest",
"imageID": "docker-pullable://ansilh/demo-tea@sha256:998d07a15151235132dae9781f587ea4d2822c62165778570145b0f659dda7bb",
"lastState": {},
"name": "coffee-new",
"ready": true,
"restartCount": 0,
"state": {
"running": {
"startedAt": "2019-01-06T15:09:42Z"
}
}
}
],
"hostIP": "192.168.56.202",
"phase": "Running",
"podIP": "10.10.1.23",
"qosClass": "BestEffort",
"startTime": "2019-01-06T15:09:36Z"
}
}Remove below from pod-with-env.yaml
  - name: MY_NODE_NAME
    value: scratch
Add below Pod spec
- name: MY_NODE_NAME
  valueFrom:
   fieldRef:
    fieldPath: spec.nodeName
Resulting Pod Yaml
apiVersion: v1
kind: Pod
metadata:
  creationTimestamp: null
  labels:
    run: tea
  name: tea
spec:
  containers:
  - env:
    - name: MY_NODE_NAME
      valueFrom:
       fieldRef:
        fieldPath: spec.nodeName
    image: ansilh/demo-tea
    name: coffee-new
    resources: {}
  dnsPolicy: ClusterFirst
  restartPolicy: Never
status: {}
Delete the running pod files
$ kubectl delete pod teaCreate the pod with modified yaml file
$ kubectl create -f pod-with-env.yamlMake sure endpoint is up in service
$ kubectl get ep tea
NAME   ENDPOINTS         AGE
tea    10.10.1.26:8080   31m
Refresh the browser page. This time you will see Node:k8s-worker-01
Lets do a cleanup on default namespace.
$ kubectl delete --all pods
$ kubectl delete --all services
Now you know
- How to use export Objects in Yaml and Json format
- How to access each fields using
jsonpath - How to inject environmental variables to
Pod - How to inject system generated fields to
Podusing environmental variables
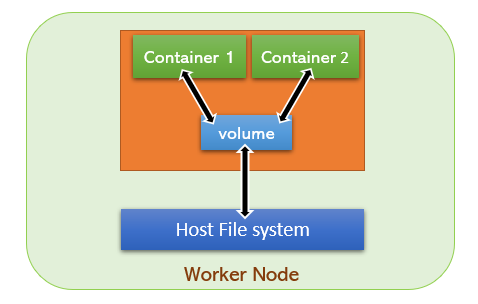
Introduction to Volumes
Persistent volumes
When a Pod dies , all container’s contents will be destroyed and never preserved by default. Sometimes you need to store the contents persistently (for eg:- etcd pod)
Kubernetes have a Volumes filed in Pod spec , which can be used to mount a volume inside container.
Lets explain the volume specs
$ kubectl explain pod.spec.volumesSo when you write Yaml , you have to put volumes object in spec. As we have seen , volumes type is <[]Object> ; means its an array
So the contents below volumes should start with a dash “-”. Name is a mandatory field , so lets write those.
spec:
 volumes:
 - name: "data"
We will use hostPath for now
$ kubectl explain pod.spec.volumes.hostPath
KIND:     Pod
VERSION:  v1

RESOURCE: hostPath <Object>

DESCRIPTION:
     HostPath represents a pre-existing file or directory on the host machine
     that is directly exposed to the container. This is generally used for
     system agents or other privileged things that are allowed to see the host
     machine. Most containers will NOT need this. More info:
     https://kubernetes.io/docs/concepts/storage/volumes#hostpath

     Represents a host path mapped into a pod. Host path volumes do not support
     ownership management or SELinux relabeling.

FIELDS:
   path <string> -required-
     Path of the directory on the host. If the path is a symlink, it will follow
     the link to the real path. More info:
     https://kubernetes.io/docs/concepts/storage/volumes#hostpath

   type <string>
     Type for HostPath Volume Defaults to "" More info:
     https://kubernetes.io/docs/concepts/storage/volumes#hostpath

k8s@k8s-master-01:~$
Host path needs a path on the host , so lets add that as well to the spec
spec:
 volumes:
 - name: "data"
   hostPath:
    path: "/var/data"
This will add a volume to Pod
Now we have to tell the pods to use it.
In containers specification, we have volumeMounts field which can be used to mount the volume.
$ kubectl explain pod.spec.containers.volumeMounts
KIND:     Pod
VERSION:  v1

RESOURCE: volumeMounts <[]Object>

DESCRIPTION:
     Pod volumes to mount into the container's filesystem. Cannot be updated.

     VolumeMount describes a mounting of a Volume within a container.

FIELDS:
   mountPath    <string> -required-
     Path within the container at which the volume should be mounted. Must not
     contain ':'.

   mountPropagation     <string>
     mountPropagation determines how mounts are propagated from the host to
     container and the other way around. When not set, MountPropagationNone is
     used. This field is beta in 1.10.

   name <string> -required-
     This must match the Name of a Volume.

   readOnly     <boolean>
     Mounted read-only if true, read-write otherwise (false or unspecified).
     Defaults to false.

   subPath      <string>
     Path within the volume from which the container's volume should be mounted.
     Defaults to "" (volume's root).
volumeMounts is <[]Object> . mountPath is required and name
name must match the Name of a Volume
Resulting Pod spec will become ;
spec:
 volumes:
 - name: "data"
   hostPath:
    path: "/var/data"
  containers:
  - name: nginx
    image: nginx
    volumeMounts:
    - name: "data"
      mountPath: "/usr/share/nginx/html"
Lets add the basic fields to complete the Yaml and save the file as nginx.yaml
apiVersion: v1
kind: Pod
metadata:
 name: nginx-pod01
spec:
 volumes:
 - name: "data"
   hostPath:
    path: "/var/data"
 containers:
 - name: nginx
   image: nginx
   volumeMounts:
   - name: "data"
     mountPath: "/usr/share/nginx/html"
Create the Pod
kubectl create -f nginx.yamlCheck where its running.
$ kubectl get pods -o wide
NAME          READY   STATUS    RESTARTS   AGE   IP           NODE            NOMINATED NODE   READINESS GATES
nginx-pod01   1/1     Running   0          55s   10.10.1.27   k8s-worker-01   <none>           <none>
Lets expose this Pod first.
$ kubectl expose pod nginx-pod01 --port=80 --target-port=80 --type=NodePorterror: couldn't retrieve selectors via --selector flag or introspection: the pod has no labels and cannot be exposed
See 'kubectl expose -h' for help and examples.This indicates that we didn’t add label , because the service needs a label to map the Pod to endpoint
Lets add a label to the Pod.
$ kubectl label pod nginx-pod01 run=nginx-pod01Now we can we can expose the Pod
$ kubectl expose pod nginx-pod01 --port=80 --target-port=80 --type=NodePortGet the node port which service is listening to
$ kubectl get svc nginx-pod01
NAME          TYPE       CLUSTER-IP      EXTERNAL-IP   PORT(S)        AGE
nginx-pod01   NodePort   192.168.10.51   <none>        80:31538/TCP   26s
You will get 403 Forbidden page , because there is no html page to load.
Now we can go to the node where the Pod is running and check the path /var/data
k8s@k8s-worker-01:~$ ls -ld /var/data
drwxr-xr-x 2 root root 4096 Jan  7 00:52 /var/data
k8s@k8s-worker-01:~$ cd /var/data
k8s@k8s-worker-01:/var/data$ ls -lrt
total 0
k8s@k8s-worker-01:/var/data$
Nothing is there.The directory is owned by root , so you have to create the file index.html with root.
k8s@k8s-worker-01:/var/data$ sudo -i
[sudo] password for k8s:
root@k8s-worker-01:~# cd /var/data
root@k8s-worker-01:/var/data#
root@k8s-worker-01:/var/data# echo "This is a test page" >index.html
root@k8s-worker-01:/var/data#
Reload the web page and you should see “This is a test page”
Now you know;
- How to create a volume.
- How to mount a volume.
- How to access the contents of volume from host.
Pod - manual scheduling
Node Selector
Suppose you have a Pod which needs to be running on a Pod which is having SSD in it.
First we need to add a label to the node which is having SSD
$ kubectl label node k8s-worker-01 disktype=ssdNow we can write a Pod spec with nodeSelector
apiVersion: v1
kind: Pod
metadata:
  name: nginx
  labels:
    env: test
spec:
  containers:
  - name: nginx
    image: nginx
  nodeSelector:
    disktype: ssd
Scheduler will look at the node selector and select apropriate node to run the pod
nodeName
- Kube-scheduler will find a suitable pod by evaluating the constraints.
- Scheduler will modify the value of .spec.nodeName of Pod object .
- kubelet will observe the change via API server and will start the pod based on the specification.
This means , we can manually specify the nodeName in Pod spec and schedule it.
You can read more about nodeName in below URL
https://kubernetes.io/docs/concepts/configuration/assign-pod-node/#nodename
Pod design patterns
When the containers have the exact same lifecycle, or when the containers must run on the same node. The most common scenario is that you have a helper process that needs to be located and managed on the same node as the primary container.
Another reason to combine containers into a single pod is for simpler communication between containers in the pod. These containers can communicate through shared volumes (writing to a shared file or directory) and through inter-process communication (semaphores or shared memory).
There are three common design patterns and use-cases for combining multiple containers into a single pod. We’ll walk through the sidecar pattern, the adapter pattern, and the ambassador pattern.
Example #1: Sidecar containers
Sidecar containers extend and enhance the “main” container, they take existing containers and make them better. As an example, consider a container that runs the Nginx web server. Add a different container that syncs the file system with a git repository, share the file system between the containers and you have built Git push-to-deploy.
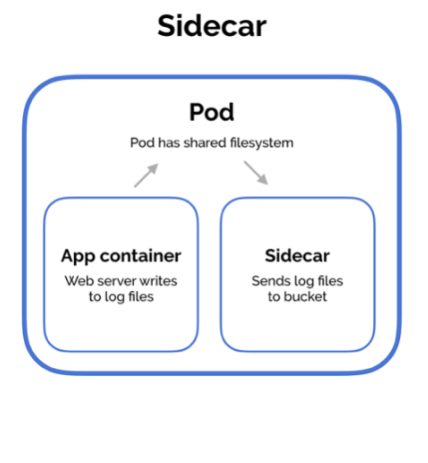
apiVersion: v1
kind: Pod
metadata:
  labels:
    run: demo-web
  name: demo-web
spec:
  volumes:
  - name: html
    emptyDir: {}
  containers:
  - image: nginx
    name: demo-web
    volumeMounts:
    - name: html
      mountPath: /usr/share/nginx/html
  - image: ansilh/debug-tools
    name: git-pull
    args:
    - sh
    - -c
    - 'while true ; do [ ! -d /html/.git ] && git  clone https://github.com/ansilh/k8s-demo-web.git /html/ || { cd /html; git pull; } ; date; sleep 5 ; done'
    volumeMounts:
    - name: html
      mountPath: /html/
Lets do a tail on the logs and see how the git-pull works
$ kubectl logs demo-web git-pull -f
Cloning into '/html'...
Fri Jan 11 20:39:25 UTC 2019
Already up to date.
Fri Jan 11 20:39:31 UTC 2019
Lets modify the WebPage and push the changes to Github
Already up to date.
Fri Jan 11 20:44:04 UTC 2019
From https://github.com/ansilh/k8s-demo-web
   e2df24f..1791ee1  master     -> origin/master
Updating e2df24f..1791ee1
Fast-forward
 images/pic-k8s.jpg | Bin 0 -> 14645 bytes
 index.html         |   4 ++--
 2 files changed, 2 insertions(+), 2 deletions(-)
 create mode 100644 images/pic-k8s.jpg
Fri Jan 11 20:44:10 UTC 2019
Already up to date.
Example #2: Ambassador containers
Ambassador containers proxy a local connection to the world. As an example, consider a Redis cluster with read-replicas and a single write master. You can create a Pod that groups your main application with a Redis ambassador container. The ambassador is a proxy is responsible for splitting reads and writes and sending them on to the appropriate servers. Because these two containers share a network namespace, they share an IP address and your application can open a connection on “localhost” and find the proxy without any service discovery. As far as your main application is concerned, it is simply connecting to a Redis server on localhost. This is powerful, not just because of separation of concerns and the fact that different teams can easily own the components, but also because in the development environment, you can simply skip the proxy and connect directly to a Redis server that is running on localhost.
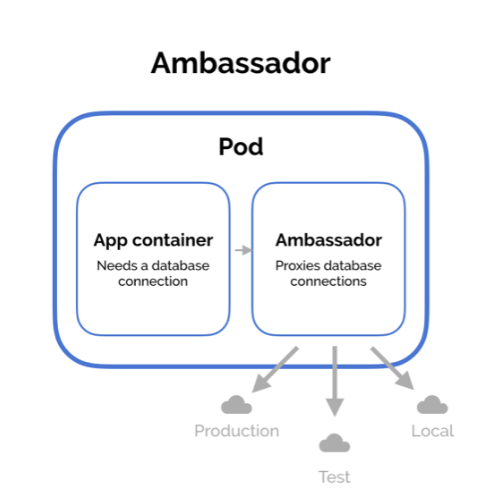
Example #3: Adapter containers
Adapter containers standardize and normalize output. Consider the task of monitoring N different applications. Each application may be built with a different way of exporting monitoring data. (e.g. JMX, StatsD, application specific statistics) but every monitoring system expects a consistent and uniform data model for the monitoring data it collects. By using the adapter pattern of composite containers, you can transform the heterogeneous monitoring data from different systems into a single unified representation by creating Pods that groups the application containers with adapters that know how to do the transformation. Again because these Pods share namespaces and file systems, the coordination of these two containers is simple and straightforward.
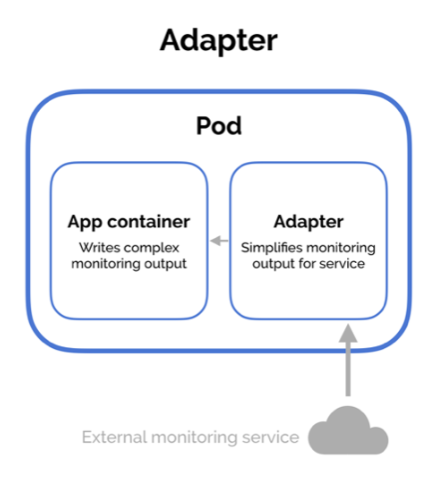
Taints and Tolerations
You add a taint to a node using kubectl taint. For example,
$ kubectl taint nodes k8s-worker-02 key=value:NoScheduleplaces a taint on node node1. The taint has key key, value value, and taint effect NoSchedule. This means that no pod will be able to schedule onto node1 unless it has a matching toleration.
To remove the taint added by the command above, you can run:
kubectl taint nodes k8s-worker-02 key:NoSchedule-You specify a toleration for a pod in the PodSpec. Both of the following tolerations “match” the taint created by the kubectl taint line above, and thus a pod with either toleration would be able to schedule onto node1:
tolerations:
- key: "key"
  operator: "Equal"
  value: "value"
  effect: "NoSchedule"
tolerations:
- key: "key"
operator: "Exists"
effect: "NoSchedule"A toleration “matches” a taint if the keys are the same and the effects are the same, and:
- the operator is Exists (in which case no value should be specified), or
- the operator is Equal and the values are equal Operator defaults to Equal if not specified.
The above example used effect of NoSchedule. Alternatively, you can use effect of PreferNoSchedule. This is a “preference” or “soft” version of NoSchedule – the system will try to avoid placing a pod that does not tolerate the taint on the node, but it is not required. The third kind of effect is NoExecute
Normally, if a taint with effect NoExecute is added to a node, then any pods that do not tolerate the taint will be evicted immediately, and any pods that do tolerate the taint will never be evicted. However, a toleration with NoExecute effect can specify an optional tolerationSeconds field that dictates how long the pod will stay bound to the node after the taint is added. For example,
tolerations:
- key: "key1"
  operator: "Equal"
  value: "value1"
  effect: "NoExecute"
  tolerationSeconds: 3600
Chapter 9
API reference
In this session we will explore k8s API , Objects and Versioning
Subsections of API reference
API Access
Lets explore how API defines and organizes objects
API organization
API is organized to two groups , one is Core group and second on is Named Groups
Core Group
Contains all stable and core API objects
/api (APIVersions)
This endpoint will return core API version & API address itself
Execute below commands if you are using Vagrant based setup
If you are using kubeadm based setup , then skip this.
$ sudo mkdir -p /etc/kubernetes/pki/
$ sudo cp /home/vagrant/PKI/ca.pem /etc/kubernetes/pki/ca.crt
$ sudo cp /home/vagrant/PKI/k8s-master-01.pem /etc/kubernetes/pki/apiserver-kubelet-client.crt
$ sudo cp /home/vagrant/PKI/k8s-master-01-key.pem /etc/kubernetes/pki/apiserver-kubelet-client.key
$ sudo curl -s --cacert /etc/kubernetes/pki/ca.crt --cert /etc/kubernetes/pki/apiserver-kubelet-client.crt --key /etc/kubernetes/pki/apiserver-kubelet-client.key -XGET 'https://192.168.56.201:6443/api?timeout=32s' |python3 -m json.tool
{
    "kind": "APIVersions",
    "versions": [
        "v1"
    ],
    "serverAddressByClientCIDRs": [
        {
            "clientCIDR": "0.0.0.0/0",
            "serverAddress": "192.168.56.201:6443"
        }
    ]
}
/api/v1 (APIResourceList)
This endpoint will return objects/resources in core group v1
$ sudo curl -s --cacert /etc/kubernetes/pki/ca.crt --cert /etc/kubernetes/pki/apiserver-kubelet-client.crt --key /etc/kubernetes/pki/apiserver-kubelet-client.key -XGET 'https://192.168.56.201:6443/api/v1?timeout=32s' |python3 -m json.tool
{
    "kind": "APIResourceList",
    "groupVersion": "v1",
    "resources": [
        {
            "name": "bindings",
            "singularName": "",
            "namespaced": true,
            "kind": "Binding",
            "verbs": [
                "create"
            ]
        },
        {
            "name": "componentstatuses",
            "singularName": "",
            "namespaced": false,
            "kind": "ComponentStatus",
            "verbs": [
                "get",
                "list"
            ],
            "shortNames": [
                "cs"
            ]
        },
        {
            "name": "configmaps",
            "singularName": "",
            "namespaced": true,
            "kind": "ConfigMap",
            "verbs": [
                "create",
                "delete",
                "deletecollection",
                "get",
                "list",
                "patch",
                "update",
                "watch"
            ],
            "shortNames": [
                "cm"
            ]
        },
...
...
...
        {
    "name": "services/status",
    "singularName": "",
    "namespaced": true,
    "kind": "Service",
    "verbs": [
        "get",
        "patch",
        "update"
    ]
}
]
}
Named Groups
/apis (APIGroupList)
This endpoint will return all named groups
$ sudo curl -s --cacert /etc/kubernetes/pki/ca.crt --cert /etc/kubernetes/pki/apiserver-kubelet-client.crt --key /etc/kubernetes/pki/apiserver-kubelet-client.key -XGET 'https://192.168.56.201:6443/apis?timeout=32s' |python3 -m json.tool
/api/apps (APIGroup)
$ sudo curl -s --cacert /etc/kubernetes/pki/ca.crt --cert /etc/kubernetes/pki/apiserver-kubelet-client.crt --key /etc/kubernetes/pki/apiserver-kubelet-client.key -XGET 'https://192.168.56.201:6443/apis/apps?timeout=32s' |python3 -m json.tool
{
    "kind": "APIGroup",
    "apiVersion": "v1",
    "name": "apps",
    "versions": [
        {
            "groupVersion": "apps/v1",
            "version": "v1"
        },
        {
            "groupVersion": "apps/v1beta2",
            "version": "v1beta2"
        },
        {
            "groupVersion": "apps/v1beta1",
            "version": "v1beta1"
        }
    ],
    "preferredVersion": {
        "groupVersion": "apps/v1",
        "version": "v1"
    }
}
/api/apps/v1 (APIResourceList)
Will return objects / resources under apps/v1
$ sudo curl -s --cacert /etc/kubernetes/pki/ca.crt --cert /etc/kubernetes/pki/apiserver-kubelet-client.crt --key /etc/kubernetes/pki/apiserver-kubelet-client.key -XGET 'https://192.168.56.201:6443/apis/apps/v1?timeout=32s' |python3 -m json.tool
{
    "kind": "APIResourceList",
    "apiVersion": "v1",
    "groupVersion": "apps/v1",
    "resources": [
        {
            "name": "controllerrevisions",
            "singularName": "",
            "namespaced": true,
            "kind": "ControllerRevision",
            "verbs": [
                "create",
                "delete",
                "deletecollection",
                "get",
                "list",
                "patch",
                "update",
                "watch"
            ]
        },
        {
            "name": "daemonsets",
            "singularName": "",
            "namespaced": true,
            "kind": "DaemonSet",
            "verbs": [
                "create",
                "delete",
                "deletecollection",
                "get",
                "list",
                "patch",
                "update",
                "watch"
            ],
            "shortNames": [
                "ds"
            ],
            "categories": [
                "all"
            ]
        },
...
...
...
        {
            "name": "statefulsets/status",
            "singularName": "",
            "namespaced": true,
            "kind": "StatefulSet",
            "verbs": [
                "get",
                "patch",
                "update"
            ]
        }
    ]
}
API versions
Different API versions imply different levels of stability and support
Alpha level:
- The version names contain alpha (e.g. v1alpha1).
- May be buggy. Enabling the feature may expose bugs. Disabled by default.
- Support for feature may be dropped at any time without notice.
- The API may change in incompatible ways in a later software release without notice.
- Recommended for use only in short-lived testing clusters, due to increased risk of bugs and lack of long-term support.
Beta level:
- The version names contain beta (e.g. v2beta3).
- Code is well tested. Enabling the feature is considered safe. Enabled by default.
- Support for the overall feature will not be dropped, though details may change.
- The schema and/or semantics of objects may change in incompatible ways in a subsequent beta or stable release. When this happens, k8s developers will provide instructions for migrating to the next version. This may require deleting, editing, and re-creating API objects. The editing process may require some thought. This may require downtime for applications that rely on the feature.
- Recommended for only non-business-critical uses because of potential for incompatible changes in subsequent releases. If you have multiple clusters which can be upgraded independently, you may be able to relax this restriction.
- Please do try our beta features and give feedback on them! Once they exit beta, it may not be practical for us to make more changes.
Stable level:
The version name is vX where X is an integer. Stable versions of features will appear in released software for many subsequent versions
List API version using kubectl
API Versions
$ kubectl api-versions
admissionregistration.k8s.io/v1beta1
apiextensions.k8s.io/v1beta1
apiregistration.k8s.io/v1
apiregistration.k8s.io/v1beta1
apps/v1
apps/v1beta1
apps/v1beta2
authentication.k8s.io/v1
authentication.k8s.io/v1beta1
authorization.k8s.io/v1
authorization.k8s.io/v1beta1
autoscaling/v1
autoscaling/v2beta1
autoscaling/v2beta2
batch/v1
batch/v1beta1
certificates.k8s.io/v1beta1
coordination.k8s.io/v1beta1
crd.projectcalico.org/v1
events.k8s.io/v1beta1
extensions/v1beta1
networking.k8s.io/v1
policy/v1beta1
rbac.authorization.k8s.io/v1
rbac.authorization.k8s.io/v1beta1
scheduling.k8s.io/v1beta1
storage.k8s.io/v1
storage.k8s.io/v1beta1
v1
API resources
$ kubectl api-resources
NAME                              SHORTNAMES   APIGROUP                       NAMESPACED   KIND
bindings                                                                      true         Binding
componentstatuses                 cs                                          false        ComponentStatus
configmaps                        cm                                          true         ConfigMap
endpoints                         ep                                          true         Endpoints
events                            ev                                          true         Event
limitranges                       limits                                      true         LimitRange
namespaces                        ns                                          false        Namespace
nodes                             no                                          false        Node
persistentvolumeclaims            pvc                                         true         PersistentVolumeClaim
persistentvolumes                 pv                                          false        PersistentVolume
pods                              po                                          true         Pod
podtemplates                                                                  true         PodTemplate
replicationcontrollers            rc                                          true         ReplicationController
resourcequotas                    quota                                       true         ResourceQuota
secrets                                                                       true         Secret
serviceaccounts                   sa                                          true         ServiceAccount
services                          svc                                         true         Service
mutatingwebhookconfigurations                  admissionregistration.k8s.io   false        MutatingWebhookConfiguration
validatingwebhookconfigurations                admissionregistration.k8s.io   false        ValidatingWebhookConfiguration
customresourcedefinitions         crd,crds     apiextensions.k8s.io           false        CustomResourceDefinition
apiservices                                    apiregistration.k8s.io         false        APIService
controllerrevisions                            apps                           true         ControllerRevision
daemonsets                        ds           apps                           true         DaemonSet
deployments                       deploy       apps                           true         Deployment
replicasets                       rs           apps                           true         ReplicaSet
statefulsets                      sts          apps                           true         StatefulSet
tokenreviews                                   authentication.k8s.io          false        TokenReview
localsubjectaccessreviews                      authorization.k8s.io           true         LocalSubjectAccessReview
selfsubjectaccessreviews                       authorization.k8s.io           false        SelfSubjectAccessReview
selfsubjectrulesreviews                        authorization.k8s.io           false        SelfSubjectRulesReview
subjectaccessreviews                           authorization.k8s.io           false        SubjectAccessReview
horizontalpodautoscalers          hpa          autoscaling                    true         HorizontalPodAutoscaler
cronjobs                          cj           batch                          true         CronJob
jobs                                           batch                          true         Job
certificatesigningrequests        csr          certificates.k8s.io            false        CertificateSigningRequest
leases                                         coordination.k8s.io            true         Lease
bgpconfigurations                              crd.projectcalico.org          false        BGPConfiguration
bgppeers                                       crd.projectcalico.org          false        BGPPeer
clusterinformations                            crd.projectcalico.org          false        ClusterInformation
felixconfigurations                            crd.projectcalico.org          false        FelixConfiguration
globalnetworkpolicies                          crd.projectcalico.org          false        GlobalNetworkPolicy
globalnetworksets                              crd.projectcalico.org          false        GlobalNetworkSet
hostendpoints                                  crd.projectcalico.org          false        HostEndpoint
ippools                                        crd.projectcalico.org          false        IPPool
networkpolicies                                crd.projectcalico.org          true         NetworkPolicy
events                            ev           events.k8s.io                  true         Event
daemonsets                        ds           extensions                     true         DaemonSet
deployments                       deploy       extensions                     true         Deployment
ingresses                         ing          extensions                     true         Ingress
networkpolicies                   netpol       extensions                     true         NetworkPolicy
podsecuritypolicies               psp          extensions                     false        PodSecurityPolicy
replicasets                       rs           extensions                     true         ReplicaSet
networkpolicies                   netpol       networking.k8s.io              true         NetworkPolicy
poddisruptionbudgets              pdb          policy                         true         PodDisruptionBudget
podsecuritypolicies               psp          policy                         false        PodSecurityPolicy
clusterrolebindings                            rbac.authorization.k8s.io      false        ClusterRoleBinding
clusterroles                                   rbac.authorization.k8s.io      false        ClusterRole
rolebindings                                   rbac.authorization.k8s.io      true         RoleBinding
roles                                          rbac.authorization.k8s.io      true         Role
priorityclasses                   pc           scheduling.k8s.io              false        PriorityClass
storageclasses                    sc           storage.k8s.io                 false        StorageClass
volumeattachments                              storage.k8s.io                 false        VolumeAttachment
Swagger - UI
Enable swagger
We can enable swagger UI in API Server
- Added –enable-swagger-ui=true to API manifest file /etc/kubernetes/manifests/kube-apiserver.yaml (only applicable to kubeadm deployments )
- Save the file
- API pod will restart itself
- Make sure API server pod is up
$ kubectl get pods -n kube-system  |grep kube-apiserver
kube-apiserver-k8s-master-01            1/1     Running   0          55s
- Enable API proxy access
$ kubectl proxy --port=8080
- Open an SSH tunnel from local system to server port 8080
- Access API swagger UI using webbrowser using URL
http://localhost:8080/swagger-ui/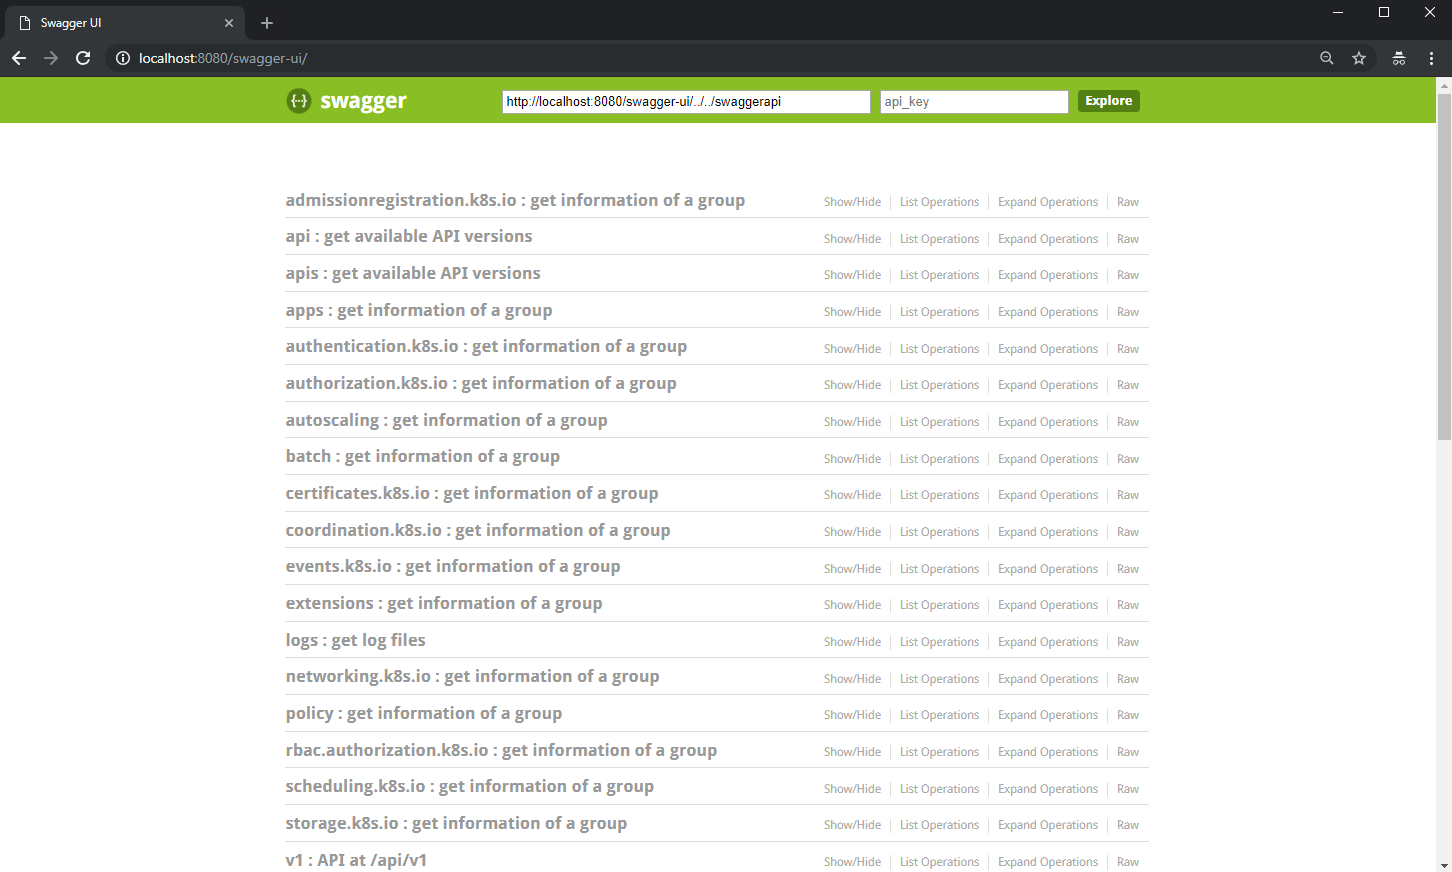
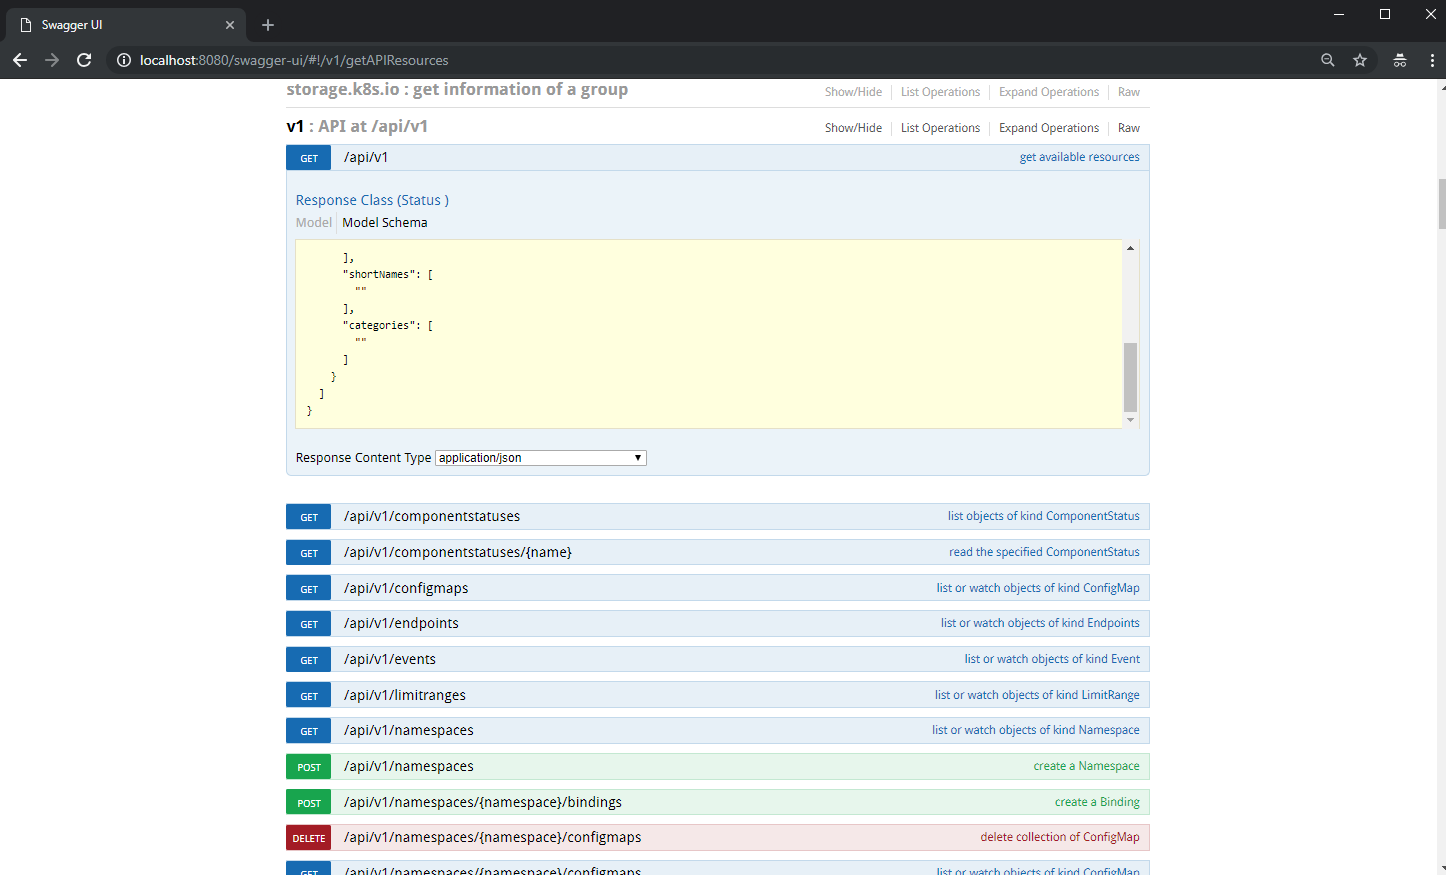
Note: Swagger UI is very slow because of the design of Swagger itself. Kubernetes may drop Swagger UI from API server. Github Issue
You can read more about API here
Chapter 10
ConfigMaps and Secrets
In this session we will explore the need of ConfigMaps and Secrets and its usage.
Subsections of ConfigMaps and Secrets
ConfigMaps
In this session , we will explore the use of ConfigMaps.
If you want to customize the configuration of an application inside a Pod , you have to change the configuration files inside the container and then we have to wait for the application to re-read the updated configuration file.
When Pod lifecycle ends , the changes we made will be lost and we have to redo the same changes when the Pod comes-up.
This is not convenient and we need a better way to manage these configuration related operations.
To achieve a persistent configuration regardless of the Pod state , k8s introduced ConfigMaps.
We can store environmental variables or a file content or both using ConfigMaps in k8s.
Use the kubectl create configmap command to create configmaps from directories, files, or literal values:
where
The data source corresponds to a key-value pair in the ConfigMap, where
key = the file name or the key you provided on the command line, and value = the file contents or the literal value you provided on the command line. You can use kubectl describe or kubectl get to retrieve information about a ConfigMap
Create ConfigMap from literals - Declarative
apiVersion: v1
kind: ConfigMap
metadata:
  name: myconfig
data:
  VAR1: val1
Create ConfigMap from literals - Imperative
$ kubectl create configmap myconfig --from-literal=VAR1=val1Create ConfigMap from file - Declarative
apiVersion: v1
kind: ConfigMap
metadata:
  name: myconfig
data:
  configFile: |
    This content is coming from a file
    Also this file have multiple lines
Create ConfigMap from file - Imperative
$ cat <<EOF >configFile
This content is coming from a file
EOF
$ cat configFile$ kubectl create configmap myconfig --from-file=configFileUse ConfigMaps in Pods
Define a container environment variable with data from a single ConfigMap
- Define an environment variable as a key-value pair in a ConfigMap:
$ kubectl create configmap special-config --from-literal=special.how=very- Assign the special.how value defined in the ConfigMap to the SPECIAL_LEVEL_KEY environment variable in the Pod specification.
apiVersion: v1
kind: Pod
metadata:
  name: test-pod
spec:
  containers:
    - name: test-container
      image: k8s.gcr.io/busybox
      command: [ "/bin/sh", "-c", "env" ]
      env:
        # Define the environment variable
        - name: SPECIAL_LEVEL_KEY
          valueFrom:
            configMapKeyRef:
              # The ConfigMap containing the value you want to assign to SPECIAL_LEVEL_KEY
              name: special-config
              # Specify the key associated with the value
              key: special.how
  restartPolicy: Never
Configure all key-value pairs in a ConfigMap as container environment variables
- Create a ConfigMap containing multiple key-value pairs.
apiVersion: v1
kind: ConfigMap
metadata:
  name: special-config
  namespace: default
data:
  SPECIAL_LEVEL: very
SPECIAL_TYPE: charm- Use envFrom to define all of the ConfigMap’s data as container environment variables. The key from the ConfigMap becomes the environment variable name in the Pod.
apiVersion: v1
kind: Pod
metadata:
  name: dapi-test-pod
spec:
  containers:
    - name: test-container
      image: k8s.gcr.io/busybox
      command: [ "/bin/sh", "-c", "env" ]
      envFrom:
      - configMapRef:
          name: special-config
  restartPolicy: Never
More about configmap can bre read from below link. https://kubernetes.io/docs/tasks/configure-pod-container/configure-pod-configmap/
Create Secret
A Secret is an object that contains a small amount of sensitive data
To use a secret, a pod needs to reference the secret. A secret can be used with a pod in two ways: as files in a volume mounted on one or more of its containers, or used by kubelet when pulling images for the pod
Secrets will be stored as base64 encoded values and it will be used mostly during creation of an object
Creating Secrets
From variables
$ kubectl create secret generic my-secret --from-literal=password=mypassword --dry-run -o yamlFrom files
$ kubectl create secret generic my-secret --from-file=user=user.txt --from-file=password.txt --dry-run -o yaml$ echo root >user.txt
$ echo password >password.txt$ kubectl create secret generic my-secret --from-file=user=user.txt --from-file=password=password.txt --dry-run -o yamlUse Secret in Pods
Using secrets
We can use secrets as environmental variable as well as mounts inside a Pod
Injecting as environmental variable
$ vi pod-secret.yamlapiVersion: v1
kind: Pod
metadata:
labels:
run: debugger
name: debugger
spec:
containers:
- image: ansilh/debug-tools
name: debugger
env:
- name: USER
valueFrom:
secretKeyRef:
name: my-secret
key: user
- name: PASSWORD
valueFrom:
secretKeyRef:
name: my-secret
key: password$ kubectl create -f pod-secret.yaml$ kubectl get pods
NAME READY STATUS RESTARTS AGE
debugger 1/1 Running 0 17s
Logon to container and verify the environmental variables
$ kubectl exec -it debugger -- /bin/shVerify environment variables inside Pod
/ # echo $USER
root
/ # echo $PASSWORD
mypassword
/ #
Delete the Pod
$ kubectl delete pod debuggerMounting as files using volumes
$ vi pod-secret.yamlapiVersion: v1
kind: Pod
metadata:
labels:
run: debugger
name: debugger
spec:
volumes:
- name: secret
secret:
secretName: my-secret
containers:
- image: ansilh/debug-tools
name: debugger
volumeMounts:
- name: secret
mountPath: /data$ kubectl create -f pod-secret.yaml$ kubectl exec -it debugger -- /bin/sh/ # cd /data
/data #
/data # cat user
root
/data # cat password
mypassword
/data #
Chapter 11
Deployments
We will not run individual Pods in K8S cluster for running the workload. Instead , we will use more abstract objects like Deployments.
Subsections of Deployments
Nginx Deployment
$ kubectl run nginx --image=nginxOutput
deployment.apps/nginx created
Verify the Pods running
$ kubectl get podsOutput
NAME                     READY   STATUS    RESTARTS   AGE
nginx-7cdbd8cdc9-9xsms   1/1     Running   0          27s
Here we can see that the Pod name is not like the usual one.
Lets delete the Pod and see what will happen.
$ kubectl delete pod nginx-7cdbd8cdc9-9xsmsOutput
pod "nginx-7cdbd8cdc9-9xsms" deleted
Verify Pod status
$ kubectl get podsOutput
NAME                     READY   STATUS    RESTARTS   AGE
nginx-7cdbd8cdc9-vfbn8   1/1     Running   0          81s
A new Pod has been created again !!!
Expose Nginx Deployment
We know how to expose a Pod using a service.
The endpoints will be created based on the label of the Pod.
Here how we can create a service which can be used to access Nginx from outside
First we will check the label of the Pod
$ kubectl get pod nginx-7cdbd8cdc9-vfbn8 --show-labelsOutput
NAME                     READY   STATUS    RESTARTS   AGE     LABELS
nginx-7cdbd8cdc9-vfbn8   1/1     Running   0          7m19s   pod-template-hash=7cdbd8cdc9,run=nginx
As you can see , one of the label is run=nginx
Next write a Service spec and use selector as run: nginx
$ vi nginx-svc.yamlapiVersion: v1
kind: Service
metadata:
creationTimestamp: null
labels:
run: nginx-svc
name: nginx-svc
spec:
ports:
- port: 80
protocol: TCP
targetPort: 80
selector:
run: nginx
type: LoadBalancerThis service will look for Pods with label “run=nginx”
$ kubectl apply -f nginx-svc.yamlVerify the service details
$ kubectl get svcOutput
NAME         TYPE           CLUSTER-IP       EXTERNAL-IP      PORT(S)        AGE
kubernetes   ClusterIP      172.168.0.1      <none>           443/TCP        103m
nginx-svc    LoadBalancer   172.168.47.182   192.168.31.201   80:32369/TCP   3s
Now we will be able to see the default nginx page with IP 192.168.31.201
Scaling
When load increases , we can scale the pods using deployment scaling
$ kubectl scale deployment --replicas=3 nginx$ kubectl get podsOutput
NAME                     READY   STATUS    RESTARTS   AGE
nginx-7cdbd8cdc9-4lhh4   1/1     Running   0          6s
nginx-7cdbd8cdc9-mxhnl   1/1     Running   0          6s
nginx-7cdbd8cdc9-vfbn8   1/1     Running   0          14m
Lets see the endpoints of service
$ kubectl get ep nginx-svcOutput
NAME        ENDPOINTS                                         AGE
nginx-svc   10.10.36.201:80,10.10.36.202:80,10.10.36.203:80   5m40s
Endpoints will be automatically mapped , because when we scale the deployment , the newly created pod will have same label which matches the Service selector.
Chapter 12
DaemonSets
With DaemonSets , we can run one pod on each nodes or minions. This kind of pods will act more or less like an agent.
Subsections of DaemonSets
DaemonSet
A DaemonSet ensures that all (or some) Nodes run a copy of a Pod. As nodes are added to the cluster, Pods are added to them. As nodes are removed from the cluster, those Pods are garbage collected. Deleting a DaemonSet will clean up the Pods it created.
Lets imagine that we need an agent deployed on all nodes which reads the system logs and sent to a log analysis database
Here we are mimicking the agent using a simple pod. A pod that mounts /var/log inside the pod and do tail of syslog file
$ vi logger.yamlapiVersion: v1
kind: Pod
metadata:
name: log-tailer
spec:
volumes:
- name: syslog
hostPath:
path: /var/log
containers:
- name: logger
image: ansilh/debug-tools
args:
- /bin/sh
- -c
- tail -f /data/logs/syslog
volumeMounts:
- name: syslog
mountPath: /data/logs/
securityContext:
privileged: true$ kubectl create -f logger.yamlNow we can execute a logs command to see the system log
$ kubectl logs log-tailer -f$ kubectl delete pod log-tailerNow we need the same kind of Pod to be running on all nodes. If we add a node in future , the same pod should start on that node as well.
To accomplish this goal , we can use DaemonSet.
$ vi logger.yamlapiVersion: apps/v1
kind: DaemonSet
metadata:
name: log-tailer
spec:
selector:
matchLabels:
name: log-tailer
template:
metadata:
labels:
name: log-tailer
spec:
tolerations:
- key: node-role.kubernetes.io/master
effect: NoSchedule
volumes:
- name: syslog
hostPath:
path: /var/log
containers:
- name: logger
image: ansilh/debug-tools
args:
- /bin/sh
- -c
- tail -f /data/logs/syslog
volumeMounts:
- name: syslog
mountPath: /data/logs/
securityContext:
privileged: true $ kubectl create -f logger.yaml$ kubectl get pods -o wideNAME READY STATUS RESTARTS AGE IP NODE NOMINATED NODE READINESS GATES
log-tailer-hzjzx 1/1 Running 0 22s 10.10.36.242 k8s-worker-01 <none> <none>
log-tailer-rqgrf 1/1 Running 0 22s 10.10.151.153 k8s-master-01 <none> <none>
Important notes at the end of the page in this URL : https://kubernetes.io/docs/concepts/workloads/controllers/daemonset/
Chapter 13
Jobs and CronJobs
With Jobs and CronJobs we can run a process once or schedule a Pod to run periodically.
Subsections of Jobs and CronJobs
Jobs
A job creates one or more pods and ensures that a specified number of them successfully terminate. As pods successfully complete, the job tracks the successful completions.
When a specified number of successful completions is reached, the job itself is complete.
Deleting a Job will cleanup the pods it created.
- Start a Job to print date
$ kubectl run date-print --image=ansilh/debug-tools --restart=OnFailure -- /bin/sh -c date$ kubectl get jobsOutput
NAME         COMPLETIONS   DURATION   AGE
date-print   0/1           3s         3s
$ kubectl get podsOutput
NAME               READY   STATUS      RESTARTS   AGE
date-print-psxw6   0/1     Completed   0          8s
$ kubectl get jobsOutput
NAME         COMPLETIONS   DURATION   AGE
date-print   1/1           4s         10s
$ kubectl logs date-print-psxw6Output
Sun Feb 3 18:10:45 UTC 2019To control the number of failure and restart , we can use spec.backoffLimit
To start n number of pods that will run in sequential order , we can use ``.spec.completions`
To start multiple pods in parallel , we can use .spec.parallelism
To cleanup the completed Jobs automatically , we can use ttlSecondsAfterFinished (1.12 alpha feature)
https://kubernetes.io/docs/concepts/workloads/controllers/jobs-run-to-completion/
CronJob
CronJob is another abstraction of Job , which will create Job objects periodically based on the mentioned schedule. The schedule notation is taken from Linux cron scheduler
$ kubectl run date-print --image=ansilh/debug-tools --restart=OnFailure --schedule="* * * * *" -- /bin/sh -c date$ kubectl get cronjobs.batchNAME SCHEDULE SUSPEND ACTIVE LAST SCHEDULE AGE
date-print * * * * * False 0 <none> 7s$ kubectl get podsNo resources found.$ kubectl get cronjobs.batchNAME SCHEDULE SUSPEND ACTIVE LAST SCHEDULE AGE
date-print * * * * * False 0 22s 60s$ kubectl get pods
NAME READY STATUS RESTARTS AGE
date-print-1549217580-qmjxt 0/1 Completed 0 36s$ kubectl logs date-print-1549217580-qmjxtSun Feb 3 18:13:08 UTC 2019Concurrency Policy
The ``.spec.concurrencyPolicy` field is also optional.
It specifies how to treat concurrent executions of a job that is created by this cron job. the spec may specify only one of the following concurrency policies:
Allow (default): The cron job allows concurrently running jobs
Forbid: The cron job does not allow concurrent runs; if it is time for a new job run and the previous job run hasn’t finished yet, the cron job skips the new job run
Replace: If it is time for a new job run and the previous job run hasn’t finished yet, the cron job replaces the currently running job run with a new job run
Note that concurrency policy only applies to the jobs created by the same cron job.
https://kubernetes.io/docs/tasks/job/automated-tasks-with-cron-jobs/
Chapter 14
Deployment Rollouts
In this session we will see how to do deployment rollouts and rollbacks
Subsections of Deployment Rollouts
Deployment & Replicaset
The following are typical use cases for Deployments:
- Create a Deployment to rollout a ReplicaSet. The ReplicaSet creates Pods in the background. Check the status of the rollout to see if it succeeds or not.
- Declare the new state of the Pods by updating the PodTemplateSpec of the Deployment. A new ReplicaSet is created and the Deployment manages moving the Pods from the old ReplicaSet to the new one at a controlled rate. - Each new ReplicaSet updates the revision of the Deployment.
- Rollback to an earlier Deployment revision if the current state of the Deployment is not stable. Each rollback updates the revision of the Deployment.
- Scale up the Deployment to facilitate more load.
- Pause the Deployment to apply multiple fixes to its PodTemplateSpec and then resume it to start a new rollout.
- Use the status of the Deployment as an indicator that a rollout has stuck.
- Clean up older ReplicaSets that you don’t need anymore.
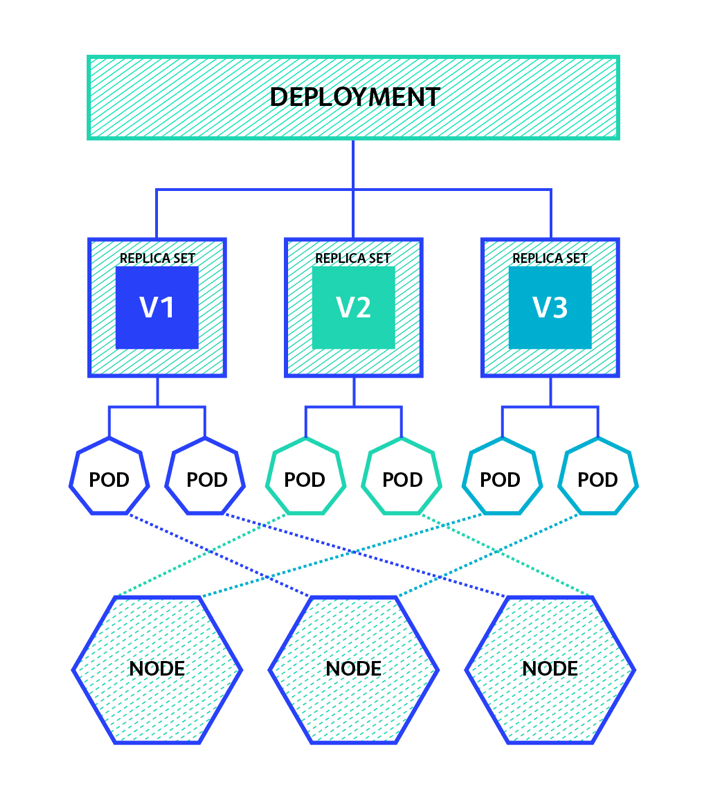
Rollout Demo
Creating a Deployment
$ vi nginx-deployment.yamlapiVersion: apps/v1
kind: Deployment
metadata:
name: nginx-deployment
labels:
app: nginx
spec:
replicas: 3
selector:
matchLabels:
app: nginx
template:
metadata:
labels:
app: nginx
spec:
containers:
- name: nginx
image: nginx:1.7.9
ports:
- containerPort: 80$ kubectl create -f nginx-deployment.yamlOutput
deployment.apps/nginx-deployment created$ kubectl get allOutput
NAME                                    READY   STATUS    RESTARTS   AGE
pod/nginx-deployment-76bf4969df-c7jrz   1/1     Running   0          38s --+
pod/nginx-deployment-76bf4969df-gl5cv   1/1     Running   0          38s   |-----> These Pods are spawned by ReplicaSet nginx-deployment-76bf4969df
pod/nginx-deployment-76bf4969df-kgmx9   1/1     Running   0          38s --+

NAME                 TYPE        CLUSTER-IP       EXTERNAL-IP   PORT(S)        AGE
service/kubernetes   ClusterIP   172.168.0.1      <none>        443/TCP        3d23h

NAME                               READY   UP-TO-DATE   AVAILABLE   AGE
deployment.apps/nginx-deployment   3/3     3            3           38s ---------> Deployment

NAME                                          DESIRED   CURRENT   READY   AGE
replicaset.apps/nginx-deployment-76bf4969df   3         3         3       38s ---> ReplicaSet
As we already know , Deployment controller uses labels to select the Pods In Yaml spec , you can see below selector fields.
selector:
  matchLabels:
    app: nginx
Lets examine the Pods. We can see that there are two labels. The pod-template-hash label is added by the Deployment controller to every ReplicaSet that a Deployment creates or adopts.
$ kubectl get pods --show-labelsOutput
NAME                                READY   STATUS    RESTARTS   AGE     LABELS
nginx-deployment-76bf4969df-hm5hf   1/1     Running   0          3m44s   app=nginx,pod-template-hash=76bf4969df
nginx-deployment-76bf4969df-tqn2k   1/1     Running   0          3m44s   app=nginx,pod-template-hash=76bf4969df
nginx-deployment-76bf4969df-wjmqp   1/1     Running   0          3m44s   app=nginx,pod-template-hash=76bf4969df
You may see the parameters of a replicaset using below command.
$ kubectl get replicasets nginx-deployment-76bf4969df -o yaml --exportWe can update the nginx image to a new version using set image.
Here we are executing both set image and rollout status together so that we can monitor the status.
$ kubectl set image deployment nginx-deployment nginx=nginx:1.9.1 ; kubectl rollout status deployment nginx-deploymentOutput
deployment.extensions/nginx-deployment image updated
Waiting for deployment "nginx-deployment" rollout to finish: 1 out of 3 new replicas have been updated...
Waiting for deployment "nginx-deployment" rollout to finish: 1 out of 3 new replicas have been updated...
Waiting for deployment "nginx-deployment" rollout to finish: 1 out of 3 new replicas have been updated...
Waiting for deployment "nginx-deployment" rollout to finish: 2 out of 3 new replicas have been updated...
Waiting for deployment "nginx-deployment" rollout to finish: 2 out of 3 new replicas have been updated...
Waiting for deployment "nginx-deployment" rollout to finish: 2 out of 3 new replicas have been updated...
Waiting for deployment "nginx-deployment" rollout to finish: 1 old replicas are pending termination...
Waiting for deployment "nginx-deployment" rollout to finish: 1 old replicas are pending termination...
deployment "nginx-deployment" successfully rolled out
To view the history of rollout
$ kubectl rollout history deployment nginx-deploymentOutput
deployment.extensions/nginx-deployment
REVISION  CHANGE-CAUSE
1         <none>
2         <none>
To see the changes we made on each version, we can use below commands
$ kubectl rollout history deployment nginx-deployment --revision=1First revision have image nginx:1.7.9
deployment.extensions/nginx-deployment with revision #1
Pod Template:
  Labels:       app=nginx
        pod-template-hash=76bf4969df
  Containers:
   nginx:
    Image:      nginx:1.7.9
    Port:       80/TCP
    Host Port:  0/TCP
    Environment:        <none>
    Mounts:     <none>
  Volumes:      <none>
First revision have image nginx:1.9.1
$ kubectl rollout history deployment nginx-deployment --revision=2deployment.extensions/nginx-deployment with revision #2
Pod Template:
Labels: app=nginx
pod-template-hash=779fcd779f
Containers:
nginx:
Image: nginx:1.9.1
Port: 80/TCP
Host Port: 0/TCP
Environment: <none>
Mounts: <none>
Volumes: <none>Now lets rollback the update.
$ kubectl rollout undo deployment nginx-deployment ;kubectl rollout status deployment nginx-deploymentOutput
deployment.extensions/nginx-deployment rolled back
Waiting for deployment "nginx-deployment" rollout to finish: 1 out of 3 new replicas have been updated...
Waiting for deployment "nginx-deployment" rollout to finish: 1 out of 3 new replicas have been updated...
Waiting for deployment "nginx-deployment" rollout to finish: 1 out of 3 new replicas have been updated...
Waiting for deployment "nginx-deployment" rollout to finish: 2 out of 3 new replicas have been updated...
Waiting for deployment "nginx-deployment" rollout to finish: 2 out of 3 new replicas have been updated...
Waiting for deployment "nginx-deployment" rollout to finish: 2 out of 3 new replicas have been updated...
Waiting for deployment "nginx-deployment" rollout to finish: 1 old replicas are pending termination...
Waiting for deployment "nginx-deployment" rollout to finish: 1 old replicas are pending termination...
deployment "nginx-deployment" successfully rolled out
Now we have revision 2 and 3.
When we rollback version 1 become 3 . In this way the latest active one and the previous revision will be the highest and second highest revisions respectively. This logic will allow quick rollbacks.
$ kubectl rollout history deployment nginx-deploymentdeployment.extensions/nginx-deployment
REVISION CHANGE-CAUSE
2 <none>
3 <none>Check each revision changes
$ kubectl rollout history deployment nginx-deployment --revision=2deployment.extensions/nginx-deployment with revision #2
Pod Template:
Labels: app=nginx
pod-template-hash=779fcd779f
Containers:
nginx:
Image: nginx:1.9.1
Port: 80/TCP
Host Port: 0/TCP
Environment: <none>
Mounts: <none>
Volumes: <none>$ kubectl rollout history deployment nginx-deployment --revision=3deployment.extensions/nginx-deployment with revision #3
Pod Template:
Labels: app=nginx
pod-template-hash=76bf4969df
Containers:
nginx:
Image: nginx:1.7.9
Port: 80/TCP
Host Port: 0/TCP
Environment: <none>
Mounts: <none>
Volumes: <none>Lets check the status of replicaset
$ kubectl get rsNAME DESIRED CURRENT READY AGE
nginx-deployment-76bf4969df 3 3 3 145m
nginx-deployment-779fcd779f 0 0 0 69mHere we can see two replicaset
$ kubectl describe rs nginx-deployment-76bf4969dfName: nginx-deployment-76bf4969df
Namespace: default
Selector: app=nginx,pod-template-hash=76bf4969df
Labels: app=nginx
pod-template-hash=76bf4969df
Annotations: deployment.kubernetes.io/desired-replicas: 3
deployment.kubernetes.io/max-replicas: 4
deployment.kubernetes.io/revision: 3
deployment.kubernetes.io/revision-history: 1
Controlled By: Deployment/nginx-deployment
Replicas: 3 current / 3 desired <<<<<<<<<<<<<<-------------------------
Pods Status: 3 Running / 0 Waiting / 0 Succeeded / 0 Failed
Pod Template:
Labels: app=nginx
pod-template-hash=76bf4969df
Containers:
nginx:
Image: nginx:1.7.9 <<<<<<<<<<<<<<-------------------------
Port: 80/TCP
Host Port: 0/TCP
Environment: <none>
Mounts: <none>
Volumes: <none>
Events: <none>$ kubectl describe rs nginx-deployment-779fcd779fName: nginx-deployment-779fcd779f
Namespace: default
Selector: app=nginx,pod-template-hash=779fcd779f
Labels: app=nginx
pod-template-hash=779fcd779f
Annotations: deployment.kubernetes.io/desired-replicas: 3
deployment.kubernetes.io/max-replicas: 4
deployment.kubernetes.io/revision: 2
Controlled By: Deployment/nginx-deployment
Replicas: 0 current / 0 desired <<<<<<<<<<<<<<-------------------------
Pods Status: 0 Running / 0 Waiting / 0 Succeeded / 0 Failed
Pod Template:
Labels: app=nginx
pod-template-hash=779fcd779f
Containers:
nginx:
Image: nginx:1.9.1 <<<<<<<<<<<<<<-------------------------
Port: 80/TCP
Host Port: 0/TCP
Environment: <none>
Mounts: <none>
Volumes: <none>
Events: <none>We can pause and resume a rollout using below commands
$ kubectl rollout pause deployment nginx-deployment$ kubectl rollout resume deployment nginx-deploymentWe can use revisionHistoryLimit field in a Deployment to specify how many old ReplicaSets for this Deployment you want to retain. The rest will be garbage-collected in the background. By default, it is 10
We can read more about strategy here
Chapter 15
Accounts and RBACs
In this chapter we will discuss about how k8s uses accounts and how to control resource access using RBAC.
Subsections of Accounts and RBACs
Mutual SSL Authentication
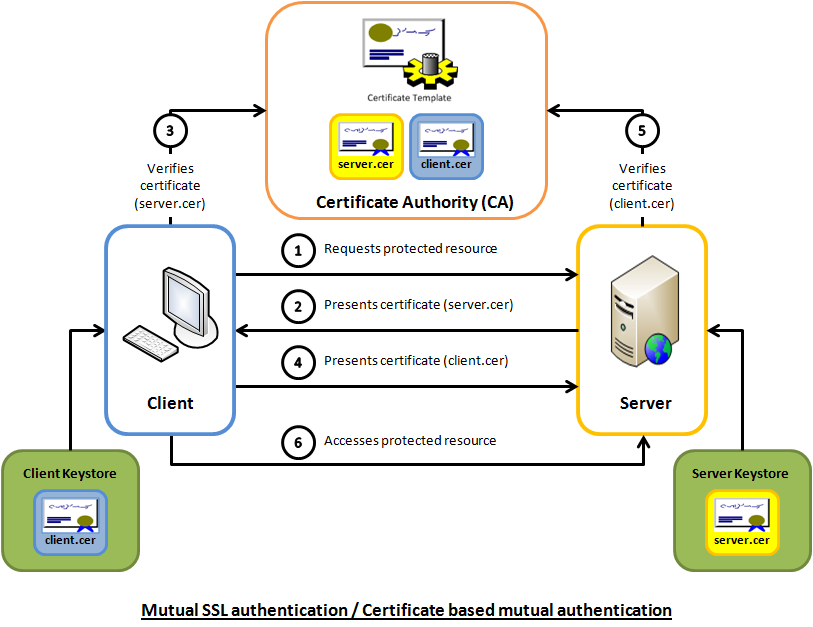
Authorization with Certificates
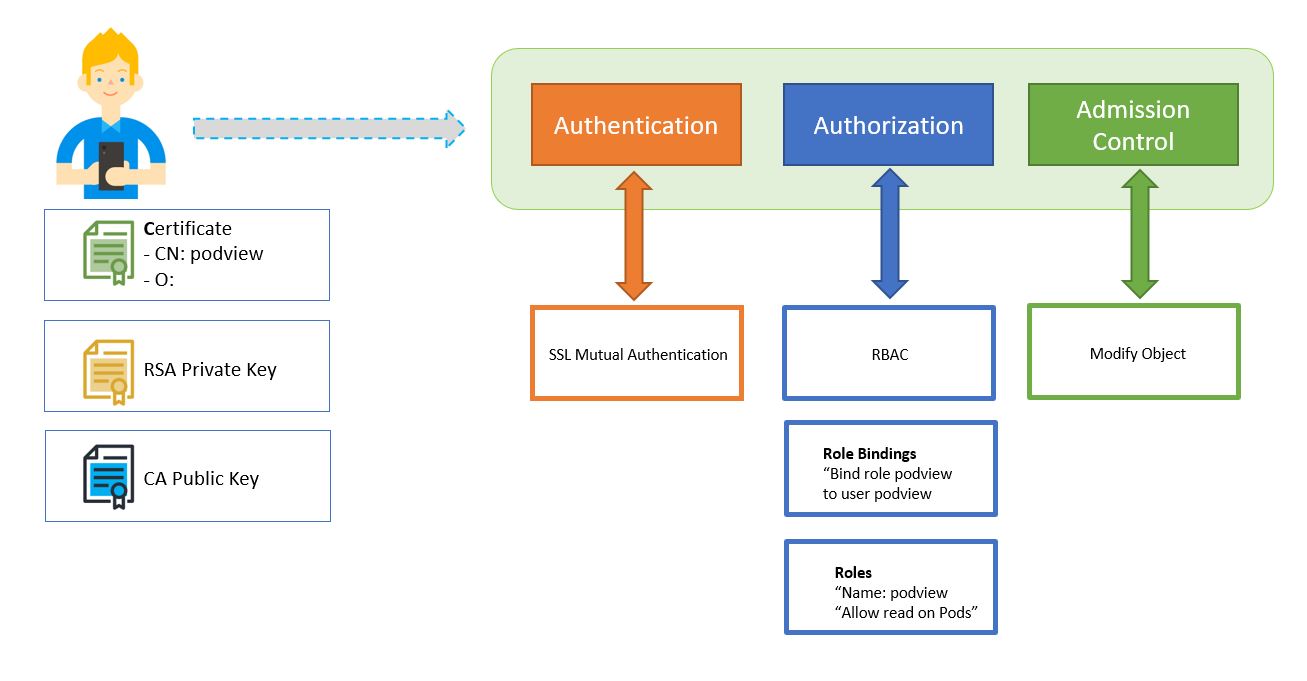
RBAC
RBAC in Action
Role
In the RBAC API, a role contains rules that represent a set of permissions. Permissions are purely additive (there are no “deny” rules). A role can be defined within a namespace with a Role, or cluster-wide with a ClusterRole
ClusterRole
A ClusterRole can be used to grant the same permissions as a Role, but because they are cluster-scoped, they can also be used to grant access to:
- cluster-scoped resources (like nodes)
- non-resource endpoints (like “/healthz”)
- namespaced resources (like pods) across all namespaces (needed to run kubectl get pods –all-namespaces, for example)
Role Binding
A role binding grants the permissions defined in a role to a user or set of users. It holds a list of subjects (users, groups, or service accounts), and a reference to the role being granted. Permissions can be granted within a namespace with a RoleBinding
Cluster Role Binding
A ClusterRoleBinding may be used to grant permission at the cluster level and in all namespaces
A RoleBinding may also reference a ClusterRole to grant the permissions to namespaced resources defined in the ClusterRole within the RoleBinding’s namespace. This allows administrators to define a set of common roles for the entire cluster, then reuse them within multiple namespaces.
We can read more about RBAC , Role , RoleBindings , ClusterRoles and ClusterRole Bindings here
Scenario: Provide read-only access to Pods running in namespace monitoring
User Name: podview
Namespace: monitoring- Lets create a namespace first
$ kubectl create ns monitoring$ kubectl get nsOutput
NAME          STATUS   AGE
default       Active   19h
kube-public   Active   19h
kube-system   Active   19h
monitoring Active 9s- Lets create a CSR JSON and get it signed by the CA
cat <<EOF >podview-csr.json
{
  "CN": "podview",
  "key": {
    "algo": "rsa",
    "size": 2048
  },
  "names": [
    {
      "C": "IN",
      "L": "Bangalore",
      "OU": "Kubernetes from Scratch",
      "ST": "Karnataka"
    }
  ]
}
EOF- Create CSR Certificate and Sign it using cfssl. We moved the ca.pem and ca-key.pem from the home directory while configuring control plane . Lets copy it back to home.
$ cp -p /var/lib/kubernetes/ca.pem /var/lib/kubernetes/ca-key.pem ~/Generate Certificates
cfssl gencert \
  -ca=ca.pem \
  -ca-key=ca-key.pem \
  -config=ca-config.json \
  -profile=kubernetes \
  podview-csr.json | cfssljson -bare podview
Output
$ ls -lrt podview*
-rw-rw-r-- 1 k8s k8s  235 Feb  3 15:42 podview-csr.json
-rw-rw-r-- 1 k8s k8s 1428 Feb  3 15:48 podview.pem
-rw------- 1 k8s k8s 1675 Feb  3 15:48 podview-key.pem
-rw-r--r-- 1 k8s k8s 1037 Feb  3 15:48 podview.csr
Now we can use this certificate to configure kubectl.
kubectl will read .kube/config .
So you can either modify it manually or use the kubectl command to modify it
Lets do a cat on existing config.(snipped certificate data)
$ cat ~/.kube/config
apiVersion: v1
clusters:
- cluster:
    certificate-authority-data: SWUZNY2UxeDZkOWtDMWlKQ1puc0VRL3lnMXBobXYxdkxvWkJqTGlBWkRvCjVJYVd
    server: https://127.0.0.1:6443
  name: kubernetes-the-hard-way
contexts:
- context:
    cluster: kubernetes-the-hard-way
    user: admin
  name: default
current-context: default
kind: Config
preferences: {}
users:
- name: admin
  user:
    client-certificate-data: iUUsyU1hLT0lWQXYzR3hNMVRXTUhqVzcvSy9scEtSTFd
client-key-data: BTCtwb29ic1oxbHJYcXFzTTdaQVN6bUJucldRUTRIU1VFYV- Add new credentials to kubectl configuration
$ kubectl config set-credentials podview --client-certificate=podview.pem --client-key=podview-key.pem- Lets see what modifications happened with above command.
$ cat ~/.kube/config
apiVersion: v1
clusters:
- cluster:
    certificate-authority-data: SWUZNY2UxeDZkOWtDMWlKQ1puc0VRL3lnMXBobXYxdkxvWkJqTGlBWkRvCjVJYVd
    server: https://127.0.0.1:6443
  name: kubernetes-the-hard-way
contexts:
- context:
    cluster: kubernetes-the-hard-way
    user: admin
  name: default
current-context: default
kind: Config
preferences: {}
users:
- name: admin
  user:
    client-certificate-data: iUUsyU1hLT0lWQXYzR3hNMVRXTUhqVzcvSy9scEtSTFd
    client-key-data: BTCtwb29ic1oxbHJYcXFzTTdaQVN6bUJucldRUTRIU1VFYV
- name: podview
  user:
    client-certificate: /home/k8s/podview.pem
    client-key: /home/k8s/podview-key.pem
As we all know , kubectl by deafult will act on default namespace.
But here we can change that to monitoring namespace.
$ kubectl config set-context podview-context --cluster=kubernetes-the-hard-way --namespace=monitoring --user=podview- Lets see if we can see the Pods
$ kubectl get pods --context=podview-contextOutput
Error from server (Forbidden): pods is forbidden: User "podview" cannot list resource "pods" in API group "" in the namespace "monitoring"- Lets create a Role to view Pods
$ vi podview-role.yamlkind: Role
apiVersion: rbac.authorization.k8s.io/v1beta1
metadata:
namespace: monitoring
name: podview-role
rules:
- apiGroups: [""]
resources: ["pods"]
verbs: ["get", "list", "watch"]$ kubectl create -f podview-role.yamlOutput
role.rbac.authorization.k8s.io/podview-role created$ vi podview-role-binding.yamlkind: RoleBinding
apiVersion: rbac.authorization.k8s.io/v1beta1
metadata:
name: podview-role-binding
namespace: monitoring
subjects:
- kind: User
name: podview
apiGroup: ""
roleRef:
kind: Role
name: podview-role
apiGroup: ""$ kubectl create -f podview-role-binding.yaml
rolebinding.rbac.authorization.k8s.io/podview-role-binding created- Verify Role Binding in Action
$ kubectl get pods --context=podview-contextOutput
No resources found.Service Accounts
When you (a human) access the cluster (for example, using kubectl), you are authenticated by the apiserver as a particular User Account (currently this is usually admin, unless your cluster administrator has customized your cluster). Processes in containers inside pods can also contact the apiserver. When they do, they are authenticated as a particular Service Account (for example, default).
When you create a pod, it is automatically assigns the default service account in the same namespace.
$ kubectl get pods nginx --output=jsonpath={.spec.serviceAccount} && echoYou can access the API from inside a pod using automatically mounted service account credentials.
Lets start a Pod
$ kubectl run debugger --image=ansilh/debug-tools --restart=NeverLogin to the Pod
$ kubectl exec -it debugger -- /bin/shKubernetes will inject KUBERNETES_SERVICE_HOST & KUBERNETES_SERVICE_PORT_HTTPS variables to the Pod during object creation. We can use these variables to formulate the API URL
Also , there is a bearer token which kubernetes mounts to the pod via path /run/secrets/kubernetes.io/serviceaccount/token We can use this bearer token and pass it as part of HTTP header.
APISERVER=https://${KUBERNETES_SERVICE_HOST}:${KUBERNETES_SERVICE_PORT_HTTPS}
TOKEN=$(cat /run/secrets/kubernetes.io/serviceaccount/token)
Use curl command to access the API details
curl $APISERVER/api --header "Authorization: Bearer $TOKEN" --cacert /run/secrets/kubernetes.io/serviceaccount/ca.crtOutput
{
  "kind": "APIVersions",
  "versions": [
    "v1"
  ],
  "serverAddressByClientCIDRs": [
    {
      "clientCIDR": "0.0.0.0/0",
      "serverAddress": "10.136.102.232:6443"
    }
  ]
}
From where we get this Token and how kubernetes know this token is for which user or group ?
Kubernetes uses service accounts and tokens to pass authentication and authorization data to objects
When you create a Pod object , kubernetes will use default service account and inject the token corresponding to the default user.
Lets see the service accounts in default namespace.
$ kubectl get serviceaccountsOutput
NAME      SECRETS   AGE
default   1         24h
Who creates this service account ?
The default service account will be created by kubernetes during namespace creation.
Which means , when ever you create a namespace , a default service account will also be created.
In RBAC scheme , the service account will have below naming convention
system:serviceaccount:
Lets try to access another API endpoint
curl $APISERVER/api/v1/pods --header "Authorization: Bearer $TOKEN" --cacert /run/secrets/kubernetes.io/serviceaccount/ca.crtOutput
{
  "kind": "Status",
  "apiVersion": "v1",
  "metadata": {

  },
  "status": "Failure",
  "message": "pods is forbidden: User \"system:serviceaccount:default:default\" cannot list resource \"pods\" in API group \"\" at the cluster scope",
  "reason": "Forbidden",
  "details": {
    "kind": "pods"
  },
  "code": 403
}
This indicates that the default account have no view access to objects in that namespace
How can give access in this case ?
- Create a new service account
- Create a Role
- Map the Role to the service account using RoleMapping
- Finally , use the newly created service account to access objects
We already discussed about Roles and RoleMappings in previous session But we didn’t discuss about service accounts or using the service accounts.
Lets demonstrate that then.
- Create a service account called podview
$ kubectl create serviceaccount podview$ kubectl get serviceaccounts podview -o yamlapiVersion: v1
kind: ServiceAccount
metadata:
creationTimestamp: "2019-02-03T16:53:32Z"
name: podview
namespace: default
resourceVersion: "131763"
selfLink: /api/v1/namespaces/default/serviceaccounts/podview
uid: 3d601276-27d4-11e9-aa2d-506b8db54343
secrets:
- name: podview-token-4blzvHere we can see a secret named podview-token-4blzv
$ kubectl get secrets podview-token-4blzv -o yamlapiVersion: v1
data:
ca.crt: LS0tLS1CRUdJTiBDRVJUSUZJQ0FUR
namespace: ZGVmYXVsdA==
token: ZXlKaGJHY2lPaUpTVXpJMU5pSXNJbXR
kind: Secret
metadata:
annotations:
kubernetes.io/service-account.name: podview
kubernetes.io/service-account.uid: 3d601276-27d4-11e9-aa2d-506b8db54343
creationTimestamp: "2019-02-03T16:53:32Z"
name: podview-token-4blzv
namespace: default
resourceVersion: "131762"
selfLink: /api/v1/namespaces/default/secrets/podview-token-4blzv
uid: 3d61d6ce-27d4-11e9-aa2d-506b8db54343
type: kubernetes.io/service-account-token(keys were snipped to fit screen)
The type is kubernetes.io/service-account-token and we can see ca.crt , namespace (base64 encoded) and a token
These fields will be injected to the Pod if we use the service account podview to create the Pod.
$ vi pod-token.yamlapiVersion: v1
kind: Pod
metadata:
name: debugger
spec:
containers:
- image: ansilh/debug-tools
name: debugger
serviceAccountName: podview$ kubectl create -f pod-token.yaml$ kubectl exec -it debugger -- /bin/shAPISERVER=https://${KUBERNETES_SERVICE_HOST}:${KUBERNETES_SERVICE_PORT_HTTPS}
TOKEN=$(cat /run/secrets/kubernetes.io/serviceaccount/token)
curl $APISERVER/api/v1/pods --header "Authorization: Bearer $TOKEN" --cacert /run/secrets/kubernetes.io/serviceaccount/ca.crt{
"kind": "Status",
"apiVersion": "v1",
"metadata": {
},
"status": "Failure",
"message": "pods is forbidden: User \"system:serviceaccount:default:podview\" cannot list resource \"pods\" in API group \"\" at the cluster scope",
"reason": "Forbidden",
"details": {
"kind": "pods"
},
"code": 403
}We got the same message as the one we got while using default account. Message says that the service account don’t have access to Pod object.
So we will create a ClusterRole first , which will allow this user to access all Pods
$ kubectl create clusterrole podview-role --verb=get,list,watch --resource=pods --dry-run -o yamlOutput
apiVersion: rbac.authorization.k8s.io/v1beta1
kind: ClusterRole
metadata:
name: podview-role
rules:
- apiGroups:
- ""
resources:
- pods
verbs:
- list
- watch$ kubectl create clusterrole podview-role --verb=list,watch --resource=podsOutput
clusterrole.rbac.authorization.k8s.io/podview-role createdNow we will bind this role to the user podview
$ kubectl create clusterrolebinding podview-role-binding --clusterrole=podview-role --serviceaccount=default:podview --dry-run -o yamlapiVersion: rbac.authorization.k8s.io/v1beta1
kind: ClusterRoleBinding
metadata:
creationTimestamp: null
name: podview-role-binding
roleRef:
apiGroup: rbac.authorization.k8s.io
kind: ClusterRole
name: podview-role
subjects:
- kind: ServiceAccount
name: podview
namespace: default$ kubectl create clusterrolebinding podview-role-binding --clusterrole=podview-role --serviceaccount=default:podviewOutput
clusterrolebinding.rbac.authorization.k8s.io/podview-role-binding createdLets try to access the API from pod again
k8s@k8s-master-ah-01:~$ kubectl exec -it debugger -- /bin/sh
/ # APISERVER=https://${KUBERNETES_SERVICE_HOST}:${KUBERNETES_SERVICE_PORT_HTTPS}
/ # TOKEN=$(cat /run/secrets/kubernetes.io/serviceaccount/token)
/ #
/ # curl $APISERVER/api/v1/pods --header "Authorization: Bearer $TOKEN" --cacert /run/secrets/kubernetes.io/serviceaccount/ca.crt
(If not working , then delete the service account and recreate it. Need to verify this step)
You can also create a single yaml file for ServiceAccount , ClusterRole and ClusterRoleBinding
apiVersion: v1
kind: ServiceAccount
metadata:
name: podview
namespace: default
---
apiVersion: rbac.authorization.k8s.io/v1beta1
kind: ClusterRole
metadata:
name: podview-role
rules:
- apiGroups:
- ""
resources:
- pods
verbs:
- list
- watch
---
apiVersion: rbac.authorization.k8s.io/v1beta1
kind: ClusterRoleBinding
metadata:
name: podview-role-binding
roleRef:
apiGroup: rbac.authorization.k8s.io
kind: ClusterRole
name: podview-role
subjects:
- kind: ServiceAccount
name: podview
namespace: defaultChapter 16
K8S From Scratch
We will build a kubernetes cluster from scratch
Subsections of K8S From Scratch
API Access Control
Users access the API using kubectl, client libraries, or by making REST requests. Both human users and Kubernetes service accounts can be authorized for API access. When a request reaches the API, it goes through several stages, illustrated in the following diagram:
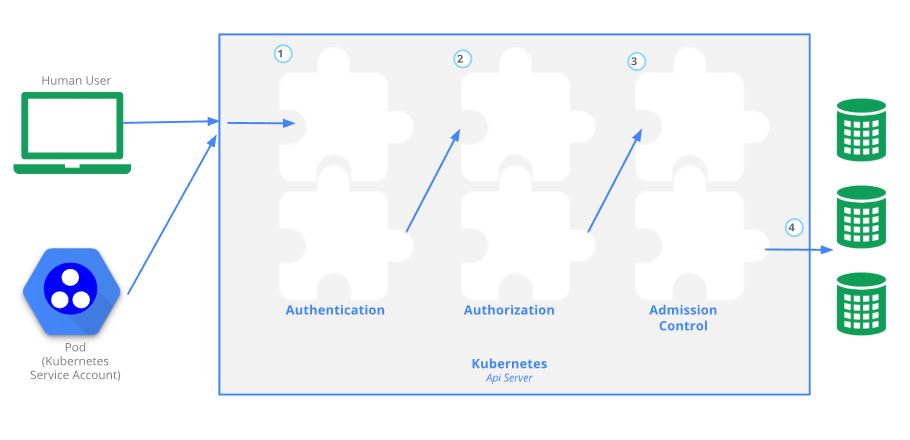
Authentication
Once TLS is established, the HTTP request moves to the Authentication step. This is shown as step 1 in the diagram.
We use X509 Client Certs for authentication.
When a client certificate is presented and verified, the common name (CN) of the subject is used as the user name for the request.
Client certificates can also indicate a user’s group memberships using the certificate’s organization fields (O). To include multiple group memberships for a user, include multiple organization fields in the certificate.
While Kubernetes uses usernames for access control decisions and in request logging, it does not have a user object nor does it store usernames or other information about users in its object store.
Authorization
After the request is authenticated as coming from a specific user, the request must be authorized. This is shown as step 2 in the diagram.
A request must include the username of the requester, the requested action, and the object affected by the action. The request is authorized if an existing role and role mapping declares that the user has permissions to complete the requested action.
Admission Control
Admission Control Modules are software modules that can modify or reject requests. This is shown as step 3 in the diagram. In addition to rejecting objects, admission controllers can also set complex defaults for fields. Once a request passes all admission controllers, it is validated using the validation routines for the corresponding API object, and then written to the object store (shown as step 4).
Example of an Admission Controller is here
Pre-requisites
- Install an Ubuntu 16.04 VM and create 4 clones from it.
- Make sure to create a user called
k8swhich will be used in upcoming steps. - Names should contain your initials for identification purpose if you are using a shared environment.
- Do not change any VM parameters except name while cloning.
- Once cloning completes , start all VMs.
- Make sure to give the hostname with prefix
k8s-master-for Master andk8s-worker-for worker If you miss this , then the scripts/command may fail down the line. - Create a shell script
init.shon each VM and execute it as mentioned below.
cat <<EOF >init.sh
#!/usr/bin/env bash
disable_ipv6(){
echo "[INFO] Disabling IPv6"
sysctl -w net.ipv6.conf.all.disable_ipv6=1
sysctl -w net.ipv6.conf.default.disable_ipv6=1
sysctl -w net.ipv6.conf.lo.disable_ipv6=1
cat <<EOF >>/etc/sysctl.conf
net.ipv6.conf.all.disable_ipv6 = 1
net.ipv6.conf.default.disable_ipv6 = 1
net.ipv6.conf.lo.disable_ipv6 = 1
EOF
}
regenerate_uuid(){
echo "[INFO] Regenerating machine UUID"
rm /etc/machine-id /var/lib/dbus/machine-id
systemd-machine-id-setup
}
regenerate_ssh_keys(){
echo "[INFO] Regenerating SSH Keys"
/bin/rm -v /etc/ssh/ssh_host_*
dpkg-reconfigure openssh-server
}
regenerate_iscsi_iqn(){
echo "[INFO] Changing iSCSI InitiatorName"
echo "InitiatorName=iqn.1993-08.org.debian:01:$(openssl rand -hex 4)" >/etc/iscsi/initiatorname.iscsi
}
disable_ipv6
regenerate_uuid
regenerate_ssh_keys
regenerate_iscsi_iqn
EOF- Give execution permission and execute it using
sudo
$ chmod 755 init.sh
$ sudo ./init.sh- Set hostname on each VMs eg:- For master
$ hostnamectl set-hostname k8s-master-ah-01 --static --transient- Reboot all VMs once host names were set.
- Note down IP each VMs from Prism
- Create /etc/hosts entries on each VM for all VMs.
eg:-
10.136.102.232 k8s-master-ah-01
10.136.102.116 k8s-worker-ah-01
10.136.102.24 k8s-worker-ah-02
10.136.102.253 k8s-worker-ah-03Tools
Logon to master node and follow below steps
1. Install cfssl to generate certificates
$ wget -q --show-progress --https-only --timestamping \
https://pkg.cfssl.org/R1.2/cfssl_linux-amd64 \
https://pkg.cfssl.org/R1.2/cfssljson_linux-amd64$ chmod +x cfssl_linux-amd64 cfssljson_linux-amd64$ sudo mv cfssl_linux-amd64 /usr/local/bin/cfssl$ sudo mv cfssljson_linux-amd64 /usr/local/bin/cfssljson- Verification
$ cfssl version- Output
Version: 1.2.0
Revision: dev
Runtime: go1.6
2. Install kubectl
- Download
kubectl
wget https://storage.googleapis.com/kubernetes-release/release/v1.13.0/bin/linux/amd64/kubectl- Make it executable and move to one of the shell
$PATH
$ chmod +x kubectl
$ sudo mv kubectl /usr/local/bin/- Verification
$ kubectl version --client- Output
Client Version: version.Info{Major:"1", Minor:"12", GitVersion:"v1.12.0", GitCommit:"0ed33881dc4355495f623c6f22e7dd0b7632b7c0", GitTreeState:"clean", BuildDate:"2018-09-27T17:05:32Z", GoVersion:"go1.10.4", Compiler:"gc", Platform:"linux/amd64"}
CA Configuration
PKI Infrastructure
We will provision a PKI Infrastructure using CloudFlare’s PKI toolkit, cfssl, then use it to bootstrap a Certificate Authority, and generate TLS certificates for the following components: etcd, kube-apiserver, kube-controller-manager, kube-scheduler, kubelet, and kube-proxy.
Certificate Authority
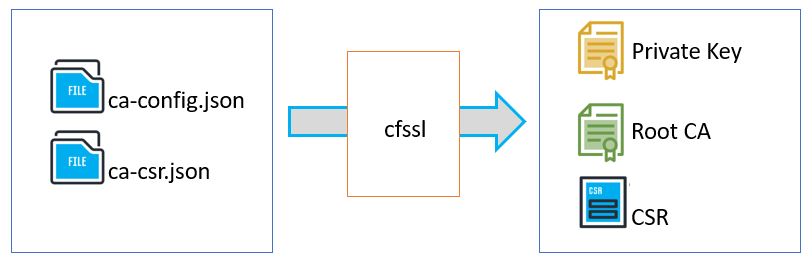
In cryptography, a certificate authority or certification authority (CA) is an entity that issues digital certificates.
- Generate CA default files (To understand the structure of CA and CSR json . We will overwrite this configs in next steps)
$ cfssl print-defaults config > ca-config.json
$ cfssl print-defaults csr > ca-csr.json- Modify ca-config and ca-csr to fit your requirement
OR
- Use below commands to create ca-config and ca-csr JSON files
CA Configuration
$ cat <<EOF >ca-config.json
{
"signing": {
"default": {
"expiry": "8760h"
},
"profiles": {
"kubernetes": {
"expiry": "8760h",
"usages": [
"signing",
"key encipherment",
"server auth",
"client auth"
]
}
}
}
}
EOFCA CSR
$ cat <<EOF >ca-csr.json
{
"CN": "Kubernetes",
"key": {
"algo": "rsa",
"size": 2048
},
"names": [
{
"C": "IN",
"L": "KL",
"O": "Kubernetes",
"OU": "CA",
"ST": "Kerala"
}
]
}
EOF$ cfssl gencert -initca ca-csr.json |cfssljson -bare ca- Output
2018/10/01 22:03:14 [INFO] generating a new CA key and certificate from CSR
2018/10/01 22:03:14 [INFO] generate received request
2018/10/01 22:03:14 [INFO] received CSR
2018/10/01 22:03:14 [INFO] generating key: rsa-2048
2018/10/01 22:03:14 [INFO] encoded CSR
2018/10/01 22:03:14 [INFO] signed certificate with serial number 621260968886516247086480084671432552497699065843- ca.pem , ca-key.pem, ca.csr files will be created , but we need only ca.pem and ca-key.pem
$ ls -lrt ca*-rw-rw-r-- 1 k8s k8s 385 Oct 1 21:53 ca-config.json
-rw-rw-r-- 1 k8s k8s 262 Oct 1 21:56 ca-csr.json
-rw-rw-r-- 1 k8s k8s 1350 Oct 1 22:03 ca.pem
-rw------- 1 k8s k8s 1679 Oct 1 22:03 ca-key.pem
-rw-r--r-- 1 k8s k8s 997 Oct 1 22:03 ca.csrClient and Server Certificates
In this section you will generate client and server certificates for each Kubernetes component and a client certificate for the Kubernetes admin user.
The Admin Client Certificate (This will be used for kubectl command)
$ {
cat > admin-csr.json <<EOF
{
"CN": "admin",
"key": {
"algo": "rsa",
"size": 2048
},
"names": [
{
"C": "IN",
"L": "Bangalore",
"O": "system:masters",
"OU": "Kubernetes from Scratch",
"ST": "Karnataka"
}
]
}
EOF
$ cfssl gencert \
-ca=ca.pem \
-ca-key=ca-key.pem \
-config=ca-config.json \
-profile=kubernetes \
admin-csr.json | cfssljson -bare admin
}Results:
admin-key.pem
admin.pem
The Kubelet Client Certificates
Kubernetes uses a special-purpose authorization mode called Node Authorizer, that specifically authorizes API requests made by Kubelets. In order to be authorized by the Node Authorizer, Kubelets must use a credential that identifies them as being in the system:nodes group, with a username of system:node:<nodeName>. In this section you will create a certificate for each Kubernetes worker node that meets the Node Authorizer requirements.
Generate a certificate and private key for each Kubernetes worker node:
$ for instance in $(cat /etc/hosts| grep k8s |awk '{print $2}'); do
cat > ${instance}-csr.json <<EOF
{
"CN": "system:node:${instance}",
"key": {
"algo": "rsa",
"size": 2048
},
"names": [
{
"C": "IN",
"L": "Bangalore",
"O": "system:masters",
"OU": "Kubernetes from Scratch",
"ST": "Karnataka"
}
]
}
EOF
cfssl gencert \
-ca=ca.pem \
-ca-key=ca-key.pem \
-config=ca-config.json \
-hostname=${instance} \
-profile=kubernetes \
${instance}-csr.json | cfssljson -bare ${instance}
doneResults:
$ ls -lrt k8s*
-rw-rw-r-- 1 k8s k8s 268 Feb 2 16:54 k8s-master-ah-01-csr.json
-rw-rw-r-- 1 k8s k8s 268 Feb 2 16:54 k8s-worker-ah-01-csr.json
-rw-rw-r-- 1 k8s k8s 1513 Feb 2 16:54 k8s-master-ah-01.pem
-rw------- 1 k8s k8s 1679 Feb 2 16:54 k8s-master-ah-01-key.pem
-rw-r--r-- 1 k8s k8s 1082 Feb 2 16:54 k8s-master-ah-01.csr
-rw-rw-r-- 1 k8s k8s 1513 Feb 2 16:54 k8s-worker-ah-01.pem
-rw------- 1 k8s k8s 1679 Feb 2 16:54 k8s-worker-ah-01-key.pem
-rw-r--r-- 1 k8s k8s 1082 Feb 2 16:54 k8s-worker-ah-01.csr
-rw-rw-r-- 1 k8s k8s 268 Feb 2 16:54 k8s-worker-ah-02-csr.json
-rw-rw-r-- 1 k8s k8s 268 Feb 2 16:54 k8s-worker-ah-03-csr.json
-rw-rw-r-- 1 k8s k8s 1513 Feb 2 16:54 k8s-worker-ah-02.pem
-rw------- 1 k8s k8s 1679 Feb 2 16:54 k8s-worker-ah-02-key.pem
-rw-r--r-- 1 k8s k8s 1082 Feb 2 16:54 k8s-worker-ah-02.csr
-rw-rw-r-- 1 k8s k8s 1513 Feb 2 16:54 k8s-worker-ah-03.pem
-rw------- 1 k8s k8s 1675 Feb 2 16:54 k8s-worker-ah-03-key.pem
-rw-r--r-- 1 k8s k8s 1082 Feb 2 16:54 k8s-worker-ah-03.csrThe Controller Manager Client Certificate
Generate the kube-controller-manager client certificate and private key:
{
cat > kube-controller-manager-csr.json <<EOF
{
"CN": "system:kube-controller-manager",
"key": {
"algo": "rsa",
"size": 2048
},
"names": [
{
"C": "IN",
"L": "Bangalore",
"O": "system:masters",
"OU": "Kubernetes from Scratch",
"ST": "Karnataka"
}
]
}
EOF
cfssl gencert \
-ca=ca.pem \
-ca-key=ca-key.pem \
-config=ca-config.json \
-profile=kubernetes \
kube-controller-manager-csr.json | cfssljson -bare kube-controller-manager
}Results:
$ ls -lrt kube-controller*
-rw-rw-r-- 1 k8s k8s 270 Feb 2 16:55 kube-controller-manager-csr.json
-rw-rw-r-- 1 k8s k8s 1472 Feb 2 16:55 kube-controller-manager.pem
-rw------- 1 k8s k8s 1675 Feb 2 16:55 kube-controller-manager-key.pem
-rw-r--r-- 1 k8s k8s 1086 Feb 2 16:55 kube-controller-manager.csrThe Kube Proxy Client Certificate
Generate the kube-proxy client certificate and private key:
{
cat > kube-proxy-csr.json <<EOF
{
"CN": "system:kube-proxy",
"key": {
"algo": "rsa",
"size": 2048
},
"names": [
{
"C": "IN",
"L": "Bangalore",
"O": "system:masters",
"OU": "Kubernetes from Scratch",
"ST": "Karnataka"
}
]
}
EOF
cfssl gencert \
-ca=ca.pem \
-ca-key=ca-key.pem \
-config=ca-config.json \
-profile=kubernetes \
kube-proxy-csr.json | cfssljson -bare kube-proxy
}Results:
$ ls -lrt kube-proxy*
-rw-rw-r-- 1 k8s k8s 257 Feb 2 16:55 kube-proxy-csr.json
-rw-rw-r-- 1 k8s k8s 1456 Feb 2 16:55 kube-proxy.pem
-rw------- 1 k8s k8s 1675 Feb 2 16:55 kube-proxy-key.pem
-rw-r--r-- 1 k8s k8s 1070 Feb 2 16:55 kube-proxy.csrThe Scheduler Client Certificate
Generate the kube-scheduler client certificate and private key:
{
cat > kube-scheduler-csr.json <<EOF
{
"CN": "system:kube-scheduler",
"key": {
"algo": "rsa",
"size": 2048
},
"names": [
{
"C": "IN",
"L": "Bangalore",
"O": "system:masters",
"OU": "Kubernetes from Scratch",
"ST": "Karnataka"
}
]
}
EOF
cfssl gencert \
-ca=ca.pem \
-ca-key=ca-key.pem \
-config=ca-config.json \
-profile=kubernetes \
kube-scheduler-csr.json | cfssljson -bare kube-scheduler
}Results:
$ ls -lrt kube-scheduler*
-rw-rw-r-- 1 k8s k8s 261 Feb 2 16:56 kube-scheduler-csr.json
-rw-rw-r-- 1 k8s k8s 1460 Feb 2 16:56 kube-scheduler.pem
-rw------- 1 k8s k8s 1679 Feb 2 16:56 kube-scheduler-key.pem
-rw-r--r-- 1 k8s k8s 1074 Feb 2 16:56 kube-scheduler.csrThe Kubernetes API Server Certificate
IP address will be included in the list of subject alternative names for the Kubernetes API Server certificate. This will ensure the certificate can be validated by remote clients.
Generate the Kubernetes API Server certificate and private key:
{
KUBERNETES_ADDRESS="$(grep k8s /etc/hosts |awk '{print $1}' | sed ':a;N;$!ba;s/\n/,/g'),172.168.0.1"
cat > kubernetes-csr.json <<EOF
{
"CN": "kubernetes",
"key": {
"algo": "rsa",
"size": 2048
},
"names": [
{
"C": "IN",
"L": "Bangalore",
"O": "system:masters",
"OU": "Kubernetes from Scratch",
"ST": "Karnataka"
}
]
}
EOF
cfssl gencert \
-ca=ca.pem \
-ca-key=ca-key.pem \
-config=ca-config.json \
-hostname=${KUBERNETES_ADDRESS},127.0.0.1,kubernetes.default \
-profile=kubernetes \
kubernetes-csr.json | cfssljson -bare kubernetes
}Results:
$ ls -lrt kubernetes*
-rw-rw-r-- 1 k8s k8s 240 Feb 2 17:01 kubernetes-csr.json
-rw-rw-r-- 1 k8s k8s 1501 Feb 2 17:01 kubernetes.pem
-rw------- 1 k8s k8s 1675 Feb 2 17:01 kubernetes-key.pem
-rw-r--r-- 1 k8s k8s 1045 Feb 2 17:01 kubernetes.csrThe Service Account Key Pair
The Kubernetes Controller Manager leverages a key pair to generate and sign service account tokens as describe in the managing service accounts documentation.
Generate the service-account certificate and private key:
{
cat > service-account-csr.json <<EOF
{
"CN": "service-accounts",
"key": {
"algo": "rsa",
"size": 2048
},
"names": [
{
"C": "IN",
"L": "Bangalore",
"O": "system:masters",
"OU": "Kubernetes from Scratch",
"ST": "Karnataka"
}
]
}
EOF
cfssl gencert \
-ca=ca.pem \
-ca-key=ca-key.pem \
-config=ca-config.json \
-profile=kubernetes \
service-account-csr.json | cfssljson -bare service-account
}Results:
$ ls -lrt service-account*
-rw-rw-r-- 1 k8s k8s 246 Feb 2 17:02 service-account-csr.json
-rw-rw-r-- 1 k8s k8s 1440 Feb 2 17:02 service-account.pem
-rw------- 1 k8s k8s 1679 Feb 2 17:02 service-account-key.pem
-rw-r--r-- 1 k8s k8s 1054 Feb 2 17:02 service-account.csrDistribute the Client and Server Certificates
Enable SSH key authentication from master node to all worker nodes to transfer files.
- Generate a key
$ ssh-keygen- Copy key to remote systems
$ for instance in $(grep k8s /etc/hosts |awk '{print $2}'); do (ssh-copy-id ${instance}); done- Copy the appropriate certificates and private keys to each worker instance:
$ for instance in $(grep k8s /etc/hosts |awk '{print $2}'); do
scp kubernetes-key.pem kubernetes.pem ca.pem ${instance}-key.pem ${instance}.pem ${instance}:~/
doneCopy the appropriate certificates and private keys to each controller instance:
$ for instance in $(grep master /etc/hosts |awk '{print $2}'); do
scp ca.pem ca-key.pem kubernetes-key.pem kubernetes.pem \
service-account-key.pem service-account.pem ${instance}:~/
done$ for instance in $(grep k8s /etc/hosts |awk '{print $2}'); do
scp /etc/hosts ${instance}:~/
doneThe
kube-proxy,kube-controller-manager,kube-scheduler, andkubeletclient certificates will be used to generate client authentication configuration files in the next lab.
Configuration Files
In this lab you will generate Kubernetes configuration files, also known as kubeconfigs, which enable Kubernetes clients to locate and authenticate to the Kubernetes API Servers.
Client Authentication Configs
In this section you will generate kubeconfig files for the controller manager, kubelet, kube-proxy, and scheduler clients and the admin user.
Kubernetes Public IP Address
Each kubeconfig requires a Kubernetes API Server to connect to. Set the KUBERNETES_PUBLIC_ADDRESS with the IP of master.
KUBERNETES_PUBLIC_ADDRESS=$(grep master /etc/hosts |awk '{print $1}')The kubelet Kubernetes Configuration File
When generating kubeconfig files for Kubelets the client certificate matching the Kubelet’s node name must be used. This will ensure Kubelets are properly authorized by the Kubernetes Node Authorizer.
Generate a kubeconfig file for each worker node:
$ for instance in $(grep k8s /etc/hosts |awk '{print $2}'); do
kubectl config set-cluster kubernetes-the-hard-way \
--certificate-authority=ca.pem \
--embed-certs=true \
--server=https://${KUBERNETES_PUBLIC_ADDRESS}:6443 \
--kubeconfig=${instance}.kubeconfig
kubectl config set-credentials system:node:${instance} \
--client-certificate=${instance}.pem \
--client-key=${instance}-key.pem \
--embed-certs=true \
--kubeconfig=${instance}.kubeconfig
kubectl config set-context default \
--cluster=kubernetes-the-hard-way \
--user=system:node:${instance} \
--kubeconfig=${instance}.kubeconfig
kubectl config use-context default --kubeconfig=${instance}.kubeconfig
doneResults:
$ ls -lrt *.kubeconfig
-rw------- 1 k8s k8s 6472 Feb 2 17:57 k8s-master-ah-01.kubeconfig
-rw------- 1 k8s k8s 6472 Feb 2 17:57 k8s-worker-ah-01.kubeconfig
-rw------- 1 k8s k8s 6472 Feb 2 17:57 k8s-worker-ah-02.kubeconfig
-rw------- 1 k8s k8s 6468 Feb 2 17:57 k8s-worker-ah-03.kubeconfigThe kube-proxy Kubernetes Configuration File
Generate a kubeconfig file for the kube-proxy service:
$ {
kubectl config set-cluster kubernetes-the-hard-way \
--certificate-authority=ca.pem \
--embed-certs=true \
--server=https://${KUBERNETES_PUBLIC_ADDRESS}:6443 \
--kubeconfig=kube-proxy.kubeconfig
kubectl config set-credentials system:kube-proxy \
--client-certificate=kube-proxy.pem \
--client-key=kube-proxy-key.pem \
--embed-certs=true \
--kubeconfig=kube-proxy.kubeconfig
kubectl config set-context default \
--cluster=kubernetes-the-hard-way \
--user=system:kube-proxy \
--kubeconfig=kube-proxy.kubeconfig
kubectl config use-context default --kubeconfig=kube-proxy.kubeconfig
}Results:
$ ls -lrt kube-proxy.kubeconfig
-rw------- 1 k8s k8s 6370 Feb 2 17:58 kube-proxy.kubeconfigThe kube-controller-manager Kubernetes Configuration File
Generate a kubeconfig file for the kube-controller-manager service:
$ {
kubectl config set-cluster kubernetes-the-hard-way \
--certificate-authority=ca.pem \
--embed-certs=true \
--server=https://127.0.0.1:6443 \
--kubeconfig=kube-controller-manager.kubeconfig
kubectl config set-credentials system:kube-controller-manager \
--client-certificate=kube-controller-manager.pem \
--client-key=kube-controller-manager-key.pem \
--embed-certs=true \
--kubeconfig=kube-controller-manager.kubeconfig
kubectl config set-context default \
--cluster=kubernetes-the-hard-way \
--user=system:kube-controller-manager \
--kubeconfig=kube-controller-manager.kubeconfig
kubectl config use-context default --kubeconfig=kube-controller-manager.kubeconfig
}Results:
~$ ls -lrt kube-controller-manager.kubeconfig
-rw------- 1 k8s k8s 6411 Feb 2 18:00 kube-controller-manager.kubeconfig
The kube-scheduler Kubernetes Configuration File
Generate a kubeconfig file for the kube-scheduler service:
$ {
kubectl config set-cluster kubernetes-the-hard-way \
--certificate-authority=ca.pem \
--embed-certs=true \
--server=https://127.0.0.1:6443 \
--kubeconfig=kube-scheduler.kubeconfig
kubectl config set-credentials system:kube-scheduler \
--client-certificate=kube-scheduler.pem \
--client-key=kube-scheduler-key.pem \
--embed-certs=true \
--kubeconfig=kube-scheduler.kubeconfig
kubectl config set-context default \
--cluster=kubernetes-the-hard-way \
--user=system:kube-scheduler \
--kubeconfig=kube-scheduler.kubeconfig
kubectl config use-context default --kubeconfig=kube-scheduler.kubeconfig
}Results:
$ ls -lrt kube-scheduler.kubeconfig
-rw------- 1 k8s k8s 6381 Feb 2 18:00 kube-scheduler.kubeconfigThe admin Kubernetes Configuration File
Generate a kubeconfig file for the admin user:
$ {
kubectl config set-cluster kubernetes-the-hard-way \
--certificate-authority=ca.pem \
--embed-certs=true \
--server=https://127.0.0.1:6443 \
--kubeconfig=admin.kubeconfig
kubectl config set-credentials admin \
--client-certificate=admin.pem \
--client-key=admin-key.pem \
--embed-certs=true \
--kubeconfig=admin.kubeconfig
kubectl config set-context default \
--cluster=kubernetes-the-hard-way \
--user=admin \
--kubeconfig=admin.kubeconfig
kubectl config use-context default --kubeconfig=admin.kubeconfig
}Results:
$ ls -lrt admin.kubeconfig
-rw------- 1 k8s k8s 6317 Feb 2 18:01 admin.kubeconfigDistribute the Kubernetes Configuration Files
Copy the appropriate kubelet and kube-proxy kubeconfig files to each worker instance:
$ for instance in $(grep k8s /etc/hosts |awk '{print $2}'); do
scp ${instance}.kubeconfig kube-proxy.kubeconfig ${instance}:~/
doneCopy the appropriate kube-controller-manager and kube-scheduler kubeconfig files to each controller instance:
$ for instance in $(grep master /etc/hosts |awk '{print $2}'); do
scp admin.kubeconfig kube-controller-manager.kubeconfig kube-scheduler.kubeconfig ${instance}:~/
doneEtcd Bootstrap
Bootstrapping the etcd Cluster
Kubernetes components are stateless and store cluster state in etcd. In this lab you will bootstrap a three node etcd cluster and configure it for high availability and secure remote access.
Prerequisites
The commands in this lab must be run on each worker instance:
Login to each controller instance using the k8s user. Example:
ssh k8s-worker-ah-02Running commands in parallel with tmux
tmux can be used to run commands on multiple compute instances at the same time.
Bootstrapping an etcd Cluster Member
Copy host file.
$ sudo cp hosts /etc/hostsDownload and Install the etcd Binaries.
Download the official etcd release binaries from the coreos/etcd GitHub project:
wget -q --show-progress --https-only --timestamping \
"https://github.com/coreos/etcd/releases/download/v3.3.9/etcd-v3.3.9-linux-amd64.tar.gz"Extract and install the etcd server and the etcdctl command line utility:
{
tar -xvf etcd-v3.3.9-linux-amd64.tar.gz
sudo mv etcd-v3.3.9-linux-amd64/etcd* /usr/local/bin/
}Configure the etcd Server
{
sudo mkdir -p /etc/etcd /var/lib/etcd
sudo cp ca.pem kubernetes-key.pem kubernetes.pem /etc/etcd/
}The instance internal IP address will be used to serve client requests and communicate with etcd cluster peers. Retrieve the internal IP address for the current compute instance:
INTERNAL_IP=$(grep -w $(hostname) /etc/hosts |awk '{print $1}')Each etcd member must have a unique name within an etcd cluster. Set the etcd name to match the hostname of the current compute instance:
ETCD_NAME=$(hostname -s)List of members
$ ETCD_MEMBERS=$(grep worker /etc/hosts |awk '{print $2"=https://"$1":2380"}' |sed ':a;N;$!ba;s/\n/,/g')Create the etcd.service systemd unit file:
cat <<EOF | sudo tee /etc/systemd/system/etcd.service
[Unit]
Description=etcd
Documentation=https://github.com/coreos
[Service]
ExecStart=/usr/local/bin/etcd \\
--name ${ETCD_NAME} \\
--cert-file=/etc/etcd/kubernetes.pem \\
--key-file=/etc/etcd/kubernetes-key.pem \\
--peer-cert-file=/etc/etcd/kubernetes.pem \\
--peer-key-file=/etc/etcd/kubernetes-key.pem \\
--trusted-ca-file=/etc/etcd/ca.pem \\
--peer-trusted-ca-file=/etc/etcd/ca.pem \\
--peer-client-cert-auth \\
--client-cert-auth \\
--initial-advertise-peer-urls https://${INTERNAL_IP}:2380 \\
--listen-peer-urls https://${INTERNAL_IP}:2380 \\
--listen-client-urls https://${INTERNAL_IP}:2379,https://127.0.0.1:2379 \\
--advertise-client-urls https://${INTERNAL_IP}:2379 \\
--initial-cluster-token etcd-cluster-0 \\
--initial-cluster ${ETCD_MEMBERS} \\
--initial-cluster-state new \\
--data-dir=/var/lib/etcd
Restart=on-failure
RestartSec=5
[Install]
WantedBy=multi-user.target
EOFStart the etcd Server
{
sudo systemctl daemon-reload
sudo systemctl enable etcd
sudo systemctl start etcd
}Remember to run the above commands on each controller node:
controller-01,controller-02, andcontroller-03.
Verification
List the etcd cluster members:
sudo ETCDCTL_API=3 etcdctl member list \
--endpoints=https://127.0.0.1:2379 \
--cacert=/etc/etcd/ca.pem \
--cert=/etc/etcd/kubernetes.pem \
--key=/etc/etcd/kubernetes-key.pemoutput
ff3c9dc8bc4ff6e, started, controller-01, https://192.168.78.201:2380, https://192.168.78.201:2379
adfbdba88b62084e, started, controller-02, https://192.168.78.202:2380, https://192.168.78.202:2379
b9a01cb565f3c5e8, started, controller-03, https://192.168.78.203:2380, https://192.168.78.203:2379Control Plane Setup
Bootstrapping the Kubernetes Control Plane
In this lab you will bootstrap the Kubernetes control plane across three compute instances and configure it for high availability. You will also create an external load balancer that exposes the Kubernetes API Servers to remote clients. The following components will be installed on each node: Kubernetes API Server, Scheduler, and Controller Manager.
Prerequisites
The commands in this lab must be run only on master node (eg: k8s-master-ah-01)
ssh k8s@k8s-master-ah-01Provision the Kubernetes Control Plane
Create the Kubernetes configuration directory:
$ sudo mkdir -p /etc/kubernetes/configDownload and Install the Kubernetes Controller Binaries
Download the official Kubernetes release binaries:
wget -q --show-progress --https-only --timestamping \
"https://storage.googleapis.com/kubernetes-release/release/v1.13.0/bin/linux/amd64/kube-apiserver" \
"https://storage.googleapis.com/kubernetes-release/release/v1.13.0/bin/linux/amd64/kube-controller-manager" \
"https://storage.googleapis.com/kubernetes-release/release/v1.13.0/bin/linux/amd64/kube-scheduler" \
"https://storage.googleapis.com/kubernetes-release/release/v1.13.0/bin/linux/amd64/kubectl"Install the Kubernetes binaries:
$ {
chmod +x kube-apiserver kube-controller-manager kube-scheduler kubectl
sudo mv kube-apiserver kube-controller-manager kube-scheduler kubectl /usr/local/bin/
}Configure the Kubernetes API Server
$ {
sudo mkdir -p /var/lib/kubernetes/
sudo cp ca.pem ca-key.pem kubernetes-key.pem kubernetes.pem \
service-account-key.pem service-account.pem \
/var/lib/kubernetes/
}The instance IP address will be used to advertise the API Server to members of the cluster. Retrieve the IP address for the current compute instance:
INTERNAL_IP=$(grep -w $(hostname) /etc/hosts |awk '{print $1}')Etcd servers
$ ETCD_MEMBERS=$(grep worker /etc/hosts |awk '{print "https://"$1":2379"}' |sed ':a;N;$!ba;s/\n/,/g')Create the kube-apiserver.service systemd unit file:
cat <<EOF | sudo tee /etc/systemd/system/kube-apiserver.service
[Unit]
Description=Kubernetes API Server
Documentation=https://github.com/kubernetes/kubernetes
[Service]
ExecStart=/usr/local/bin/kube-apiserver \\
--advertise-address=${INTERNAL_IP} \\
--allow-privileged=true \\
--apiserver-count=3 \\
--audit-log-maxage=30 \\
--audit-log-maxbackup=3 \\
--audit-log-maxsize=100 \\
--audit-log-path=/var/log/audit.log \\
--authorization-mode=Node,RBAC \\
--bind-address=0.0.0.0 \\
--client-ca-file=/var/lib/kubernetes/ca.pem \\
--enable-admission-plugins=Initializers,NamespaceLifecycle,NodeRestriction,LimitRanger,ServiceAccount,DefaultStorageClass,ResourceQuota \\
--enable-swagger-ui=true \\
--etcd-cafile=/var/lib/kubernetes/ca.pem \\
--etcd-certfile=/var/lib/kubernetes/kubernetes.pem \\
--etcd-keyfile=/var/lib/kubernetes/kubernetes-key.pem \\
--etcd-servers=${ETCD_MEMBERS} \\
--event-ttl=1h \\
--kubelet-certificate-authority=/var/lib/kubernetes/ca.pem \\
--kubelet-client-certificate=/var/lib/kubernetes/kubernetes.pem \\
--kubelet-client-key=/var/lib/kubernetes/kubernetes-key.pem \\
--kubelet-https=true \\
--runtime-config=api/all \\
--service-account-key-file=/var/lib/kubernetes/service-account.pem \\
--service-cluster-ip-range=172.168.0.0/16 \\
--service-node-port-range=30000-32767 \\
--tls-cert-file=/var/lib/kubernetes/kubernetes.pem \\
--tls-private-key-file=/var/lib/kubernetes/kubernetes-key.pem \\
--requestheader-client-ca-file=/var/lib/kubernetes/ca.pem \\
--v=2
Restart=on-failure
RestartSec=5
[Install]
WantedBy=multi-user.target
EOFConfigure the Kubernetes Controller Manager
Move the kube-controller-manager kubeconfig into place:
sudo mv kube-controller-manager.kubeconfig /var/lib/kubernetes/Create the kube-controller-manager.service systemd unit file:
cat <<EOF | sudo tee /etc/systemd/system/kube-controller-manager.service
[Unit]
Description=Kubernetes Controller Manager
Documentation=https://github.com/kubernetes/kubernetes
[Service]
ExecStart=/usr/local/bin/kube-controller-manager \\
--allocate-node-cidrs=true \\
--bind-address=0.0.0.0 \\
--cluster-cidr=10.10.0.0/16 \\
--cluster-name=kubernetes \\
--cluster-signing-cert-file=/var/lib/kubernetes/ca.pem \\
--cluster-signing-key-file=/var/lib/kubernetes/ca-key.pem \\
--kubeconfig=/var/lib/kubernetes/kube-controller-manager.kubeconfig \\
--leader-elect=true \\
--root-ca-file=/var/lib/kubernetes/ca.pem \\
--service-account-private-key-file=/var/lib/kubernetes/service-account-key.pem \\
--service-cluster-ip-range=172.168.0.0/16 \\
--use-service-account-credentials=true \\
--v=2
Restart=on-failure
RestartSec=5
[Install]
WantedBy=multi-user.target
EOFConfigure the Kubernetes Scheduler
Move the kube-scheduler kubeconfig into place:
sudo mv kube-scheduler.kubeconfig /var/lib/kubernetes/Create the kube-scheduler.yaml configuration file:
cat <<EOF | sudo tee /etc/kubernetes/config/kube-scheduler.yaml >/dev/null
apiVersion: kubescheduler.config.k8s.io/v1alpha1
kind: KubeSchedulerConfiguration
clientConnection:
kubeconfig: "/var/lib/kubernetes/kube-scheduler.kubeconfig"
leaderElection:
leaderElect: true
EOFCreate the kube-scheduler.service systemd unit file:
cat <<EOF | sudo tee /etc/systemd/system/kube-scheduler.service
[Unit]
Description=Kubernetes Scheduler
Documentation=https://github.com/kubernetes/kubernetes
[Service]
ExecStart=/usr/local/bin/kube-scheduler \\
--config=/etc/kubernetes/config/kube-scheduler.yaml \\
--v=2
Restart=on-failure
RestartSec=5
[Install]
WantedBy=multi-user.target
EOFStart the Controller Services
{
sudo systemctl daemon-reload
sudo systemctl enable kube-apiserver kube-controller-manager kube-scheduler
sudo systemctl start kube-apiserver kube-controller-manager kube-scheduler
}Allow up to 10 seconds for the Kubernetes API Server to fully initialize.
Verification
kubectl get componentstatuses --kubeconfig admin.kubeconfigNAME STATUS MESSAGE ERROR
controller-manager Healthy ok
scheduler Healthy ok
etcd-0 Healthy {"health":"true"}
etcd-2 Healthy {"health":"true"}
etcd-1 Healthy {"health":"true"} RBAC for Kubelet Authorization
In this section you will configure RBAC permissions to allow the Kubernetes API Server to access the Kubelet API on each worker node. Access to the Kubelet API is required for retrieving metrics, logs, and executing commands in pods.
This tutorial sets the Kubelet
--authorization-modeflag toWebhook. Webhook mode uses the SubjectAccessReview API to determine authorization.
Create the system:kube-apiserver-to-kubelet ClusterRole with permissions to access the Kubelet API and perform most common tasks associated with managing pods:
cat <<EOF | kubectl apply --kubeconfig admin.kubeconfig -f -
apiVersion: rbac.authorization.k8s.io/v1beta1
kind: ClusterRole
metadata:
annotations:
rbac.authorization.kubernetes.io/autoupdate: "true"
labels:
kubernetes.io/bootstrapping: rbac-defaults
name: system:kube-apiserver-to-kubelet
rules:
- apiGroups:
- ""
resources:
- nodes/proxy
- nodes/stats
- nodes/log
- nodes/spec
- nodes/metrics
verbs:
- "*"
EOFThe Kubernetes API Server authenticates to the Kubelet as the kubernetes user using the client certificate as defined by the --kubelet-client-certificate flag.
Bind the system:kube-apiserver-to-kubelet ClusterRole to the kubernetes user:
cat <<EOF | kubectl apply --kubeconfig admin.kubeconfig -f -
apiVersion: rbac.authorization.k8s.io/v1beta1
kind: ClusterRoleBinding
metadata:
name: system:kube-apiserver
namespace: ""
roleRef:
apiGroup: rbac.authorization.k8s.io
kind: ClusterRole
name: system:kube-apiserver-to-kubelet
subjects:
- apiGroup: rbac.authorization.k8s.io
kind: User
name: kubernetes
EOFVerification
Make a HTTP request for the Kubernetes version info:
curl --cacert /var/lib/kubernetes/ca.pem https://$(grep master /etc/hosts |awk '{print $1}'):6443/versionoutput
{
"major": "1",
"minor": "13",
"gitVersion": "v1.13.0",
"gitCommit": "ddf47ac13c1a9483ea035a79cd7c10005ff21a6d",
"gitTreeState": "clean",
"buildDate": "2018-12-03T20:56:12Z",
"goVersion": "go1.11.2",
"compiler": "gc",
"platform": "linux/amd64"
}Configure kubectl
Execute this small script to copy the admin.kubeconfig config file to ~/.kube/config
if [ -d ~/.kube ]
then
echo "Directory .kube exist. Copying config file"
if [ -f ~/.kube/config ]
then
cp ~/admin.kubeconfig ~/.kube/config
else
echo "Directory .kube dosn't exist, so creating and then copying config file"
mkdir ~/.kube
cp ~/admin.kubeconfig ~/.kube/config
fi
fiWorker Plane Setup
Bootstrapping worker nodes
In this lab , we will bootstrap three worker nodes. The following components will be installed on each node.
- Docker
- Kubelet
- Kube-proxy
- Calico Network Plugin
- CoreDNS
Docker
Instructions are here
Once docker is installed , execute below steps to make docker ready for kubelet integration.
$ sudo vi /lib/systemd/system/docker.serviceDisable iptables, default bridge network and masquerading on docker
ExecStart=/usr/bin/dockerd -H fd:// --bridge=none --iptables=false --ip-masq=falseCleanup all docker specific networking from worker nodes
$ sudo iptables -t nat -F
$ sudo ip link set docker0 down
$ sudo ip link delete docker0Reload and then stop docker (we will start it later)
$ sudo systemctl daemon-reload
$ sudo systemctl stop dockerDownload and configure Prerequisites
Install few binaries which are needed for proper networking
$ {
sudo apt-get update
sudo apt-get -y install socat conntrack ipset
}Download kuberctl, kube-proxy and kubelet
$ wget -q --show-progress --https-only --timestamping \
https://storage.googleapis.com/kubernetes-release/release/v1.13.0/bin/linux/amd64/kubectl \
https://storage.googleapis.com/kubernetes-release/release/v1.13.0/bin/linux/amd64/kube-proxy \
https://storage.googleapis.com/kubernetes-release/release/v1.13.0/bin/linux/amd64/kubeletCreate needed directories
$ sudo mkdir -p \
/var/lib/kubelet \
/var/lib/kube-proxy \
/var/lib/kubernetesProvide execution permission and move to one of the shell $PATH
$ chmod +x kubectl kube-proxy kubelet
$ sudo mv kubectl kube-proxy kubelet /usr/local/bin/Kubelet configuration
Move certificates and configuration files to the path created earlier
$ {
sudo mv ${HOSTNAME}-key.pem ${HOSTNAME}.pem /var/lib/kubelet/
sudo mv ${HOSTNAME}.kubeconfig /var/lib/kubelet/kubeconfig
sudo mv ca.pem /var/lib/kubernetes/
}Create kubelet configuration
$ cat <<EOF | sudo tee /var/lib/kubelet/kubelet-config.yaml
kind: KubeletConfiguration
apiVersion: kubelet.config.k8s.io/v1beta1
authentication:
anonymous:
enabled: false
webhook:
enabled: true
x509:
clientCAFile: "/var/lib/kubernetes/ca.pem"
authorization:
mode: Webhook
clusterDomain: "cluster.local"
clusterDNS:
- "172.168.0.2"
podCIDR: "${POD_CIDR}"
resolvConf: "/run/resolvconf/resolv.conf"
runtimeRequestTimeout: "15m"
tlsCertFile: "/var/lib/kubelet/${HOSTNAME}.pem"
tlsPrivateKeyFile: "/var/lib/kubelet/${HOSTNAME}-key.pem"
EOFCreate systemd unit file for kubelet
$ cat <<EOF | sudo tee /etc/systemd/system/kubelet.service
[Unit]
Description=Kubernetes Kubelet
Documentation=https://github.com/kubernetes/kubernetes
After=containerd.service
Requires=containerd.service
[Service]
ExecStart=/usr/local/bin/kubelet \\
--config=/var/lib/kubelet/kubelet-config.yaml \\
--image-pull-progress-deadline=2m \\
--kubeconfig=/var/lib/kubelet/kubeconfig \\
--network-plugin=cni \\
--register-node=true \\
--v=2
Restart=on-failure
RestartSec=5
[Install]
WantedBy=multi-user.target
EOFKubernetes Proxy configuration
$ sudo mv kube-proxy.kubeconfig /var/lib/kube-proxy/kubeconfig$ cat <<EOF | sudo tee /var/lib/kube-proxy/kube-proxy-config.yaml
kind: KubeProxyConfiguration
apiVersion: kubeproxy.config.k8s.io/v1alpha1
clientConnection:
kubeconfig: "/var/lib/kube-proxy/kubeconfig"
mode: "iptables"
clusterCIDR: "10.10.0.0/16"
EOF$ cat <<EOF | sudo tee /etc/systemd/system/kube-proxy.service
[Unit]
Description=Kubernetes Kube Proxy
Documentation=https://github.com/kubernetes/kubernetes
[Service]
ExecStart=/usr/local/bin/kube-proxy \\
--config=/var/lib/kube-proxy/kube-proxy-config.yaml
Restart=on-failure
RestartSec=5
[Install]
WantedBy=multi-user.target
EOFService startup
$ {
sudo systemctl daemon-reload
sudo systemctl enable docker kubelet kube-proxy
sudo systemctl start docker kubelet kube-proxy
}Calico CNI deployment
Download deployment yaml.
$ curl \
https://docs.projectcalico.org/v3.5/getting-started/kubernetes/installation/hosted/kubernetes-datastore/calico-networking/1.7/calico.yaml \
-OModify Pod cidr pool as below
$ vi calico.yaml- name: CALICO_IPV4POOL_CIDR
value: "10.10.0.0/16"Create deployment
$ kubectl apply -f calico.yamlCoreDNS deployment
Download and apply prebuilt CoreDNS yaml
$ kubectl apply -f https://raw.githubusercontent.com/ansilh/kubernetes-the-hardway-virtualbox/master/config/coredns.yamlVerification
$ kubectl cluster-infoOutput
Kubernetes master is running at http://localhost:8080
CoreDNS is running at http://localhost:8080/api/v1/namespaces/kube-system/services/kube-dns:dns/proxy$ kubectl get componentstatusOutput
NAME STATUS MESSAGE ERROR
controller-manager Healthy ok
scheduler Healthy ok
etcd-0 Healthy {"health":"true"}
etcd-2 Healthy {"health":"true"}
etcd-1 Healthy {"health":"true"}$ kubectl get nodesOutput
NAME STATUS ROLES AGE VERSION
k8s-worker-ah-01 Ready <none> 47m v1.13.0
k8s-worker-ah-02 Ready <none> 47m v1.13.0
k8s-worker-ah-03 Ready <none> 47m v1.13.0$ kubectl get pods -n kube-systemOutput
NAME READY STATUS RESTARTS AGE
calico-node-8ztcq 1/1 Running 0 21m
calico-node-hb7gt 1/1 Running 0 21m
calico-node-mjkfn 1/1 Running 0 21m
coredns-69cbb76ff8-kw8ls 1/1 Running 0 20m
coredns-69cbb76ff8-vb7rz 1/1 Running 0 20mChapter 17
Persistent Volumes
In this session , we will discuss about Persistent volumes and Persistent volume claims.
Subsections of Persistent Volumes
Introduction
Persistent Volumes and Related components
The PersistentVolume subsystem provides an API for users and administrators that abstracts details of how storage is provided from how it is consumed.
To do this we introduce two new API resources: PersistentVolume and PersistentVolumeClaim
A PersistentVolume (PV) is a piece of storage in the cluster that has been provisioned by an administrator.
It is a resource in the cluster just like a node is a cluster resource.
PVs are volume plugins like Volumes, but have a lifecycle independent of any individual pod that uses the PV.
This API object captures the details of the implementation of the storage, be that NFS, iSCSI, or a cloud-provider-specific storage system.
A PersistentVolumeClaim (PVC) is a request for storage by a user.
It is similar to a pod. Pods consume node resources and PVCs consume PV resources.
Pods can request specific levels of resources (CPU and Memory).
Claims can request specific size and access modes (e.g., can be mounted once read/write or many times read-only).
A StorageClass provides a way for administrators to describe the “classes” of storage they offer.
Different classes might map to quality-of-service levels, or to backup policies, or to arbitrary policies determined by the cluster administrators.
Kubernetes itself is unopinionated about what classes represent. This concept is sometimes called “profiles” in other storage systems.
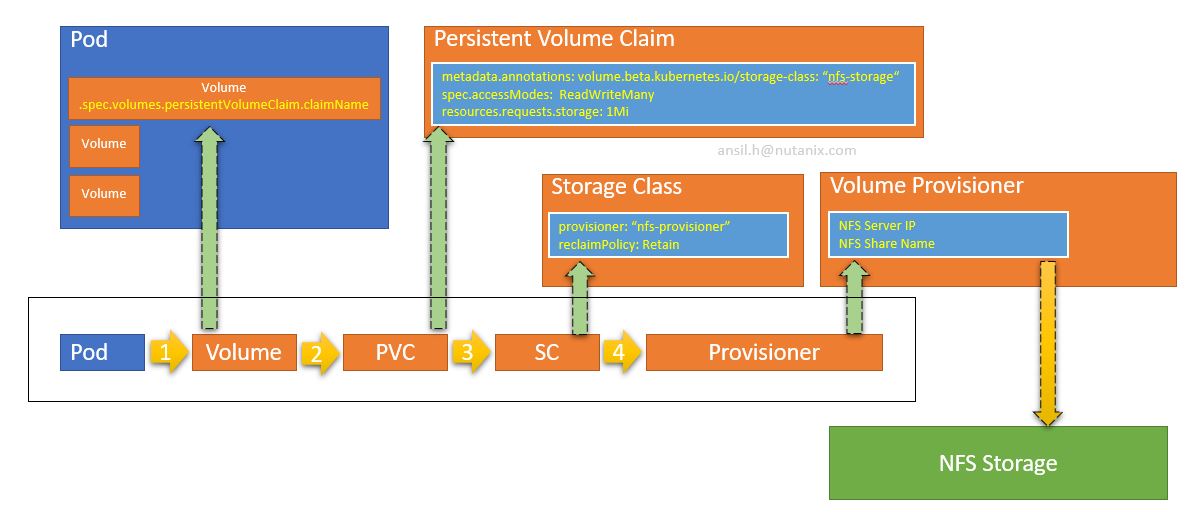 Lets follow a basic example outlined below
https://kubernetes.io/docs/tasks/configure-pod-container/configure-persistent-volume-storage/
Lets follow a basic example outlined below
https://kubernetes.io/docs/tasks/configure-pod-container/configure-persistent-volume-storage/
iSCSI Volume Provisioner
Dynamic Volume Provisioner with targetd
Setup targetd iscsi server on CentOS 7
Create a VM with two disks (50GB each)
Install CentOS 7 with minimal ISO with default option. Select only first disk for installation
Disable SELinux
# grep disabled /etc/sysconfig/selinuxOutput
SELINUX=disabled- Disable firewall
systemctl disable firewalld
systemctl stop firewalld- If yo are not rebooting the OS now , then make sure to disable SELinux using setenforce
setenforce 0- Install
taregtd
yum install targetd- Create a volume group for
targetd
vgcreate vg-targetd /dev/sdb- Enable targetd RPC access.
vi /etc/target/targetd.yamlpassword: nutanix
# defaults below; uncomment and edit
# if using a thin pool, use <volume group name>/<thin pool name>
# e.g vg-targetd/pool
pool_name: vg-targetd
user: admin
ssl: false
target_name: iqn.2003-01.org.linux-iscsi.k8straining:targetd- Start and enable targetd
systemctl start targetd
systemctl enable targetd
systemctl status targetdOutput
● target.service - Restore LIO kernel target configuration
Loaded: loaded (/usr/lib/systemd/system/target.service; enabled; vendor preset: disabled)
Active: active (exited) since Wed 2019-02-06 13:12:58 EST; 10s ago
Main PID: 15795 (code=exited, status=0/SUCCESS)
Feb 06 13:12:58 iscsi.k8straining.com systemd[1]: Starting Restore LIO kernel target configuration...
Feb 06 13:12:58 iscsi.k8straining.com target[15795]: No saved config file at /etc/target/saveconfig.json, ok, exiting
Feb 06 13:12:58 iscsi.k8straining.com systemd[1]: Started Restore LIO kernel target configuration.
Worker nodes
On each worker nodes
Make sure the iqn is present
$ sudo vi /etc/iscsi/initiatorname.iscsi$ sudo systemctl status iscsid
$ sudo systemctl restart iscsidDownload and modify storage provisioner yaml on Master node
$ kubectl create secret generic targetd-account --from-literal=username=admin --from-literal=password=nutanixwget https://raw.githubusercontent.com/ansilh/kubernetes-the-hardway-virtualbox/master/config/iscsi-provisioner-d.yamlvi iscsi-provisioner-d.yamlModify TARGETD_ADDRESS to the targetd server address.
Download and modify PersistentVolumeClaim and StorageClass
wget https://raw.githubusercontent.com/ansilh/kubernetes-the-hardway-virtualbox/master/config/iscsi-provisioner-pvc.yamlwget https://raw.githubusercontent.com/ansilh/kubernetes-the-hardway-virtualbox/master/config/iscsi-provisioner-class.yamlvi iscsi-provisioner-class.yamltargetPortal -> 10.136.102.168
iqn -> iqn.2003-01.org.linux-iscsi.k8straining:targetd
initiators -> iqn.1993-08.org.debian:01:k8s-worker-ah-01,iqn.1993-08.org.debian:01:k8s-worker-ah-02,iqn.1993-08.org.debian:01:k8s-worker-ah-03Apply all configuration
$ kubectl create -f iscsi-provisioner-d.yaml -f iscsi-provisioner-pvc.yaml -f iscsi-provisioner-class.yaml$ kubectl get allNAME READY STATUS RESTARTS AGE
pod/iscsi-provisioner-6c977f78d4-gxb2x 1/1 Running 0 33s
pod/nginx-deployment-76bf4969df-d74ff 1/1 Running 0 147m
pod/nginx-deployment-76bf4969df-rfgfj 1/1 Running 0 147m
pod/nginx-deployment-76bf4969df-v4pq5 1/1 Running 0 147m
NAME TYPE CLUSTER-IP EXTERNAL-IP PORT(S) AGE
service/kubernetes ClusterIP 172.168.0.1 <none> 443/TCP 4d3h
NAME READY UP-TO-DATE AVAILABLE AGE
deployment.apps/iscsi-provisioner 1/1 1 1 33s
deployment.apps/nginx-deployment 3/3 3 3 3h50m
NAME DESIRED CURRENT READY AGE
replicaset.apps/iscsi-provisioner-6c977f78d4 1 1 1 33s
replicaset.apps/nginx-deployment-76bf4969df 3 3 3 3h50m
replicaset.apps/nginx-deployment-779fcd779f 0 0 0 155m$ kubectl get pvcOutput
NAME STATUS VOLUME CAPACITY ACCESS MODES STORAGECLASS AGE
myclaim Bound pvc-2a484a72-2a3e-11e9-aa2d-506b8db54343 100Mi RWO iscsi-targetd-vg-targetd 4sOn iscsi server
# targetcli lsWarning: Could not load preferences file /root/.targetcli/prefs.bin.
o- / ......................................................................................................................... [...]
o- backstores .............................................................................................................. [...]
| o- block .................................................................................................. [Storage Objects: 1]
| | o- vg-targetd:pvc-2a484a72-2a3e-11e9-aa2d-506b8db54343 [/dev/vg-targetd/pvc-2a484a72-2a3e-11e9-aa2d-506b8db54343 (100.0MiB) write-thru activated]
| | o- alua ................................................................................................... [ALUA Groups: 1]
| | o- default_tg_pt_gp ....................................................................... [ALUA state: Active/optimized]
| o- fileio ................................................................................................. [Storage Objects: 0]
| o- pscsi .................................................................................................. [Storage Objects: 0]
| o- ramdisk ................................................................................................ [Storage Objects: 0]
o- iscsi ............................................................................................................ [Targets: 1]
| o- iqn.2003-01.org.linux-iscsi.k8straining:targetd ................................................................... [TPGs: 1]
| o- tpg1 ............................................................................................... [no-gen-acls, no-auth]
| o- acls .......................................................................................................... [ACLs: 3]
| | o- iqn.1993-08.org.debian:01:k8s-worker-ah-01 ........................................................... [Mapped LUNs: 1]
| | | o- mapped_lun0 ................................... [lun0 block/vg-targetd:pvc-2a484a72-2a3e-11e9-aa2d-506b8db54343 (rw)]
| | o- iqn.1993-08.org.debian:01:k8s-worker-ah-02 ........................................................... [Mapped LUNs: 1]
| | | o- mapped_lun0 ................................... [lun0 block/vg-targetd:pvc-2a484a72-2a3e-11e9-aa2d-506b8db54343 (rw)]
| | o- iqn.1993-08.org.debian:01:k8s-worker-ah-03 ........................................................... [Mapped LUNs: 1]
| | o- mapped_lun0 ................................... [lun0 block/vg-targetd:pvc-2a484a72-2a3e-11e9-aa2d-506b8db54343 (rw)]
| o- luns .......................................................................................................... [LUNs: 1]
| | o- lun0 [block/vg-targetd:pvc-2a484a72-2a3e-11e9-aa2d-506b8db54343 (/dev/vg-targetd/pvc-2a484a72-2a3e-11e9-aa2d-506b8db54343) (default_tg_pt_gp)]
| o- portals .................................................................................................... [Portals: 1]
| o- 0.0.0.0:3260 ..................................................................................................... [OK]
o- loopback ......................................................................................................... [Targets: 0]lvs LV VG Attr LSize Pool Origin Data% Meta% Move Log Cpy%Sync Convert
home centos -wi-ao---- <41.12g
root centos -wi-ao---- 50.00g
swap centos -wi-ao---- <7.88g
pvc-2a484a72-2a3e-11e9-aa2d-506b8db54343 vg-targetd -wi-ao---- 100.00mMore details can be found in below URLs
https://github.com/kubernetes-incubator/external-storage/tree/master/iscsi/targetd https://github.com/kubernetes-incubator/external-storage/tree/master/iscsi/targetd/kubernetes
NFS Volume Provisioner
Setup an NFS server
In this setup we are assuming that the firewall and SELinux were disabled.
- Install NFS client tools
$ sudo yum install nfs-utils- Create a share directory
$ sudo mkdir /share- Edit exports file and add entry to share the directory
$ sudo vi /etc/exports/share *(rw,sync,no_root_squash,no_all_squash)- Restart NFS server
$ sudo systemctl restart nfs-serverDeploy NFS volume provisioner
- Create a deployment file using below spec and make sure to modify
<NFS_SERVER_IP>
apiVersion: v1
kind: ServiceAccount
metadata:
name: nfs-client-provisioner
---
kind: Deployment
apiVersion: extensions/v1beta1
metadata:
name: nfs-client-provisioner
spec:
replicas: 1
strategy:
type: Recreate
template:
metadata:
labels:
app: nfs-client-provisioner
spec:
serviceAccountName: nfs-client-provisioner
containers:
- name: nfs-client-provisioner
image: quay.io/external_storage/nfs-client-provisioner:latest
volumeMounts:
- name: nfs-client-root
mountPath: /persistentvolumes
env:
- name: PROVISIONER_NAME
value: fuseim.pri/ifs
- name: NFS_SERVER
value: <NFS_SERVER_IP> <<<----- Replace this with NFS server IP
- name: NFS_PATH
value: /share
volumes:
- name: nfs-client-root
nfs:
server: <NFS_SERVER_IP> <<<----- Replace this with NFS server IP
path: /ifs/kubernetes- Create a Storage Class
apiVersion: storage.k8s.io/v1
kind: StorageClass
metadata:
name: managed-nfs-storage
provisioner: fuseim.pri/ifs # or choose another name, must match deployment's env PROVISIONER_NAME'
parameters:
archiveOnDelete: "false"- Create Needed RBAC rules
kind: ServiceAccount
apiVersion: v1
metadata:
name: nfs-client-provisioner
---
kind: ClusterRole
apiVersion: rbac.authorization.k8s.io/v1
metadata:
name: nfs-client-provisioner-runner
rules:
- apiGroups: [""]
resources: ["persistentvolumes"]
verbs: ["get", "list", "watch", "create", "delete"]
- apiGroups: [""]
resources: ["persistentvolumeclaims"]
verbs: ["get", "list", "watch", "update"]
- apiGroups: ["storage.k8s.io"]
resources: ["storageclasses"]
verbs: ["get", "list", "watch"]
- apiGroups: [""]
resources: ["events"]
verbs: ["create", "update", "patch"]
---
kind: ClusterRoleBinding
apiVersion: rbac.authorization.k8s.io/v1
metadata:
name: run-nfs-client-provisioner
subjects:
- kind: ServiceAccount
name: nfs-client-provisioner
namespace: default
roleRef:
kind: ClusterRole
name: nfs-client-provisioner-runner
apiGroup: rbac.authorization.k8s.io
---
kind: Role
apiVersion: rbac.authorization.k8s.io/v1
metadata:
name: leader-locking-nfs-client-provisioner
rules:
- apiGroups: [""]
resources: ["endpoints"]
verbs: ["get", "list", "watch", "create", "update", "patch"]
---
kind: RoleBinding
apiVersion: rbac.authorization.k8s.io/v1
metadata:
name: leader-locking-nfs-client-provisioner
subjects:
- kind: ServiceAccount
name: nfs-client-provisioner
# replace with namespace where provisioner is deployed
namespace: default
roleRef:
kind: Role
name: leader-locking-nfs-client-provisioner
apiGroup: rbac.authorization.k8s.io- Sample claim
kind: PersistentVolumeClaim
apiVersion: v1
metadata:
name: test-claim
annotations:
volume.beta.kubernetes.io/storage-class: "managed-nfs-storage"
spec:
accessModes:
- ReadWriteMany
resources:
requests:
storage: 1Mi- A test pod to claim the volume
kind: Pod
apiVersion: v1
metadata:
name: test-pod
spec:
containers:
- name: test-pod
image: gcr.io/google_containers/busybox:1.24
command:
- "/bin/sh"
args:
- "-c"
- "touch /mnt/SUCCESS && sleep 1000 || exit 1"
volumeMounts:
- name: nfs-pvc
mountPath: "/mnt"
restartPolicy: "Never"
volumes:
- name: nfs-pvc
persistentVolumeClaim:
claimName: test-claim The Pod will execute a sleep command for 1000 seconds. You can login to the Pod and verify the volume mount.
Chapter 18
TLS Bootstrapping
In this session , we will discuss about how a node can join a cluster using TLS bootstrapping.
Subsections of TLS Bootstrapping
TLS bootstrapping with token file
Workflow

Create a Token
$ head -c 16 /dev/urandom | od -An -t x | tr -d ' 'Output
12c12e7eb3a9c3f9255bb74529c6768e$ echo 12c12e7eb3a9c3f9255bb74529c6768e,kubelet-bootstrap,10001,\"system:bootstrappers\" |sudo tee -a /etc/kubernetes/config/bootstrap-token.conf12c12e7eb3a9c3f9255bb74529c6768e,kubelet-bootstrap,10001,"system:bootstrappers"Create a token auth file
$ cat /etc/kubernetes/config/bootstrap-token.conf12c12e7eb3a9c3f9255bb74529c6768e,kubelet-bootstrap,10001,"system:bootstrappers"Add below flags to API server
--enable-bootstrap-token-auth=true \
--token-auth-file=/etc/kubernetes/config/bootstrap-token.conf \Add RBAC for Node TLS bootstrapping and certificate auto renewal.
cat <<EOF | kubectl create -f -
kind: ClusterRoleBinding
apiVersion: rbac.authorization.k8s.io/v1
metadata:
name: create-csrs-for-bootstrapping
subjects:
- kind: Group
name: system:bootstrappers
apiGroup: rbac.authorization.k8s.io
roleRef:
kind: ClusterRole
name: system:node-bootstrapper
apiGroup: rbac.authorization.k8s.io
EOFcat <<EOF | kubectl create -f -
kind: ClusterRoleBinding
apiVersion: rbac.authorization.k8s.io/v1
metadata:
name: auto-approve-csrs-for-group
subjects:
- kind: Group
name: system:bootstrappers
apiGroup: rbac.authorization.k8s.io
roleRef:
kind: ClusterRole
name: system:certificates.k8s.io:certificatesigningrequests:nodeclient
apiGroup: rbac.authorization.k8s.io
EOFcat <<EOF | kubectl create -f -
kind: ClusterRoleBinding
apiVersion: rbac.authorization.k8s.io/v1
metadata:
name: auto-approve-renewals-for-nodes
subjects:
- kind: Group
name: system:nodes
apiGroup: rbac.authorization.k8s.io
roleRef:
kind: ClusterRole
name: system:certificates.k8s.io:certificatesigningrequests:selfnodeclient
apiGroup: rbac.authorization.k8s.io
EOFCreate a bootstrap-kubeconfig which can be used by kubelet
TOKEN=$(awk -F "," '{print $1}' /etc/kubernetes/config/bootstrap-token.conf)
KUBERNETES_PUBLIC_ADDRESS=$(grep master /etc/hosts |awk '{print $1}')kubectl config --kubeconfig=bootstrap-kubeconfig set-cluster bootstrap --embed-certs=true --server=https://${KUBERNETES_PUBLIC_ADDRESS}:6443 --certificate-authority=ca.pemkubectl config --kubeconfig=bootstrap-kubeconfig set-credentials kubelet-bootstrap --token=${TOKEN}kubectl config --kubeconfig=bootstrap-kubeconfig set-context bootstrap --user=kubelet-bootstrap --cluster=bootstrapkubectl config --kubeconfig=bootstrap-kubeconfig use-context bootstrapCopy bootstrap-kubeconfig to worker node
Kubelet configuration
- Turnoff swap
$ sudo swapoff /dev/dm-1 ##<--- select appropriate swap device based on your OS configInstall and start docker service
Once docker is installed , execute below steps to make docker ready for
kubeletintegration.
$ sudo vi /lib/systemd/system/docker.service- Disable iptables, default bridge network and masquerading on docker
ExecStart=/usr/bin/dockerd -H fd:// --bridge=none --iptables=false --ip-masq=false- Cleanup all docker specific networking from worker nodes
$ sudo iptables -t nat -F
$ sudo ip link set docker0 down
$ sudo ip link delete docker0- Restart docker
$ sudo systemctl restart docker- Move bootstrap config file to
/var/lib/kubelet/
$ mkdir /var/lib/kubelet/
$ sudo mv bootstrap-kubeconfig /var/lib/kubelet/ $ cat <<EOF |sudo tee /etc/systemd/system/kubelet.service
[Unit]
Description=Kubernetes Kubelet
Documentation=https://github.com/kubernetes/kubernetes
After=containerd.service
Requires=containerd.service
[Service]
ExecStart=/usr/local/bin/kubelet \
--bootstrap-kubeconfig=/var/lib/kubelet/bootstrap-kubeconfig \
--cert-dir=/var/lib/kubelet/ \
--kubeconfig=/var/lib/kubelet/kubeconfig \
--rotate-certificates=true \
--runtime-cgroups=/systemd/system.slice \
--kubelet-cgroups=/systemd/system.slice
Restart=on-failure
RestartSec=5
[Install]
WantedBy=multi-user.target
EOF- Reload and start the kubelet service
$ sudo systemctl daemon-reload
$ sudo systemctl start kubeletNow execute kubectl get nodes and see if the node is listed there.
You may configure kube-proxy as a DaemonSet so that it will automatically start after node registration completion.
TLS bootstrapping with bootstrap-token
Introduction
Bootstrap tokens are a simple bearer token that is meant to be used when creating new clusters or joining new nodes to an existing cluster. It was built to support kubeadm, but can be used in other contexts for users that wish to start clusters without kubeadm. It is also built to work, via RBAC policy, with the Kubelet TLS Bootstrapping system.
You can read more about bootstrap tokens here
Bootstrap Tokens take the form of abcdef.0123456789abcdef. More formally, they must match the regular expression [a-z0-9]{6}.[a-z0-9]{16}
In this session , we will join a worker node to the cluster using bootstrap tokens.
Kubeadm uses bootstrap token to join a node to cluster.
Implementation Flow of Kubeadm is as follows.
- kubeadm connects to the API server address specified over TLS. As we don’t yet have a root certificate to trust, this is an insecure connection and the server certificate is not validated. kubeadm provides no authentication credentials at all.
Implementation note: the API server doesn’t have to expose a new and special insecure HTTP endpoint.
(D)DoS concern: Before this flow is secure to use/enable publicly (when not bootstrapping), the API Server must support rate-limiting. There are a couple of ways rate-limiting can be implemented to work for this use-case, but defining the rate-limiting flow in detail here is out of scope. One simple idea is limiting unauthenticated requests to come from clients in RFC1918 ranges.
- kubeadm requests a ConfigMap containing the kubeconfig file defined above.
This ConfigMap exists at a well known URL: https://
/api/v1/namespaces/kube-public/configmaps/cluster-info
This ConfigMap is really public. Users don’t need to authenticate to read this ConfigMap. In fact, the client MUST NOT use a bearer token here as we don’t trust this endpoint yet.
The API server returns the ConfigMap with the kubeconfig contents as normal Extra data items on that ConfigMap contains JWS signatures. kubeadm finds the correct signature based on the token-id part of the token. (Described below).
kubeadm verifies the JWS and can now trust the server. Further communication is simpler as the CA certificate in the kubeconfig file can be trusted.
You may read more about the proposal here
API server
To support bootstrap token based discovery and to join nodes to cluster ; we need to make sure below flags are in place on API server.
--client-ca-file=/var/lib/kubernetes/ca.pem
--enable-bootstrap-token-auth=trueIf not present , then add these flags to /etc/systemd/system/kube-apiserver.service unit file.
Controller
make sure below flags are in place on kube-controller-manager .
--controllers=*,bootstrapsigner,tokencleaner
--experimental-cluster-signing-duration=8760h0m0s
--cluster-signing-cert-file=/var/lib/kubernetes/ca.pem
--cluster-signing-key-file=/var/lib/kubernetes/ca-key.pemIf not present , then add these flags to /etc/systemd/system/kube-controller-manager.service unit file.
- Reload and restart API server and Controller unit files
{
sudo systemctl daemon-reload
sudo systemctl restart kube-apiserver.service
sudo systemctl restart kube-controller-manager.service
}RBAC Permission to enable certificate signign
- To allow kubelet to create CSR
cat <<EOF | kubectl create -f -
kind: ClusterRoleBinding
apiVersion: rbac.authorization.k8s.io/v1
metadata:
name: create-csrs-for-bootstrapping
subjects:
- kind: Group
name: system:bootstrappers
apiGroup: rbac.authorization.k8s.io
roleRef:
kind: ClusterRole
name: system:node-bootstrapper
apiGroup: rbac.authorization.k8s.io
EOF- CSR auto signing for bootstrapper
cat <<EOF | kubectl create -f -
kind: ClusterRoleBinding
apiVersion: rbac.authorization.k8s.io/v1
metadata:
name: auto-approve-csrs-for-group
subjects:
- kind: Group
name: system:bootstrappers
apiGroup: rbac.authorization.k8s.io
roleRef:
kind: ClusterRole
name: system:certificates.k8s.io:certificatesigningrequests:nodeclient
apiGroup: rbac.authorization.k8s.io
EOF- Certificates self renewal
cat <<EOF | kubectl create -f -
kind: ClusterRoleBinding
apiVersion: rbac.authorization.k8s.io/v1
metadata:
name: auto-approve-renewals-for-nodes
subjects:
- kind: Group
name: system:nodes
apiGroup: rbac.authorization.k8s.io
roleRef:
kind: ClusterRole
name: system:certificates.k8s.io:certificatesigningrequests:selfnodeclient
apiGroup: rbac.authorization.k8s.io
EOFCreate bootstrap token
$ echo $(openssl rand -hex 3).$(openssl rand -hex 8)Output
80a6ee.fd219151288b08d8
$ vi bootstrap-token.yamlapiVersion: v1
kind: Secret
metadata:
# Name MUST be of form "bootstrap-token-<token id>"
name: bootstrap-token-80a6ee
namespace: kube-system
# Type MUST be 'bootstrap.kubernetes.io/token'
type: bootstrap.kubernetes.io/token
stringData:
# Human readable description. Optional.
description: "The default bootstrap token."
# Token ID and secret. Required.
token-id: 80a6ee
token-secret: fd219151288b08d8
# Expiration. Optional.
expiration: 2019-12-05T12:00:00Z
# Allowed usages.
usage-bootstrap-authentication: "true"
usage-bootstrap-signing: "true"
# Extra groups to authenticate the token as. Must start with "system:bootstrappers:"
auth-extra-groups: system:bootstrappers:worker,system:bootstrappers:ingress$ kubectl create -f bootstrap-token.yamlCreate cluster-info for clients which will be downloaded if needed by client
KUBERNETES_MASTER=$(awk '/master/{print $1;exit}' /etc/hosts)$ kubectl config set-cluster bootstrap \
--kubeconfig=bootstrap-kubeconfig-public \
--server=https://${KUBERNETES_MASTER}:6443 \
--certificate-authority=ca.pem \
--embed-certs=true$ kubectl -n kube-public create configmap cluster-info \
--from-file=kubeconfig=bootstrap-kubeconfig-public$ kubectl -n kube-public get configmap cluster-info -o yaml- RBAC to allow anonymous users to access the
cluster-infoConfigMap
$ kubectl create role anonymous-for-cluster-info --resource=configmaps --resource-name=cluster-info --namespace=kube-public --verb=get,list,watch
$ kubectl create rolebinding anonymous-for-cluster-info-binding --role=anonymous-for-cluster-info --user=system:anonymous --namespace=kube-publicCreate bootstrap-kubeconfig for worker nodes
$ kubectl config set-cluster bootstrap \
--kubeconfig=bootstrap-kubeconfig \
--server=https://${KUBERNETES_MASTER}:6443 \
--certificate-authority=ca.pem \
--embed-certs=true$ kubectl config set-credentials kubelet-bootstrap \
--kubeconfig=bootstrap-kubeconfig \
--token=80a6ee.fd219151288b08d8$ kubectl config set-context bootstrap \
--kubeconfig=bootstrap-kubeconfig \
--user=kubelet-bootstrap \
--cluster=bootstrap$ kubectl config --kubeconfig=bootstrap-kubeconfig use-context bootstrapCopy the bootstrap-kubeconfig to worker node and then execute below steps from worker node.
Kubelet configuration
- Turnoff swap
$ sudo swapoff /dev/dm-1 ##<--- select appropriate swap device based on your OS configInstall and start docker service
Once docker is installed , execute below steps to make docker ready for
kubeletintegration.
$ sudo vi /lib/systemd/system/docker.service- Disable iptables, default bridge network and masquerading on docker
ExecStart=/usr/bin/dockerd -H fd:// --bridge=none --iptables=false --ip-masq=false- Cleanup all docker specific networking from worker nodes
$ sudo iptables -t nat -F
$ sudo ip link set docker0 down
$ sudo ip link delete docker0- Restart docker
$ sudo systemctl restart docker- Move bootstrap config file to
/var/lib/kubelet/
$ mkdir /var/lib/kubelet/
$ sudo mv bootstrap-kubeconfig /var/lib/kubelet/ - Create a systemd untit file and add necessary flags.
$ cat <<EOF |sudo tee /etc/systemd/system/kubelet.service
[Unit]
Description=Kubernetes Kubelet
Documentation=https://github.com/kubernetes/kubernetes
After=containerd.service
Requires=containerd.service
[Service]
ExecStart=/usr/local/bin/kubelet \
--bootstrap-kubeconfig=/var/lib/kubelet/bootstrap-kubeconfig \
--cert-dir=/var/lib/kubelet/ \
--kubeconfig=/var/lib/kubelet/kubeconfig \
--rotate-certificates=true \
--runtime-cgroups=/systemd/system.slice \
--kubelet-cgroups=/systemd/system.slice
Restart=on-failure
RestartSec=5
[Install]
WantedBy=multi-user.target
EOF- Reload and start the kubelet service
$ sudo systemctl daemon-reload
$ sudo systemctl start kubeletNow execute kubectl get nodes and see if the node is listed there.
You may configure kube-proxy as a DaemonSet so that it will automatically start after node registration completion.
Chapter 19
Security
Subsections of Security
Security Context
Configure a Security Context for a Pod or Container
A security context defines privilege and access control settings for a Pod or Container. Security context settings include:
Discretionary Access Control: Permission to access an object, like a file, is based on user ID (UID) and group ID (GID).
Security Enhanced Linux (SELinux): Objects are assigned security labels.
Running as privileged or unprivileged.
Linux Capabilities: Give a process some privileges, but not all the privileges of the root user.
AppArmor: Use program profiles to restrict the capabilities of individual programs.
Seccomp: Filter a process’s system calls.
AllowPrivilegeEscalation: Controls whether a process can gain more privileges than its parent process. This bool directly controls whether the no_new_privs flag gets set on the container process. AllowPrivilegeEscalation is true always when the container is: 1) run as Privileged OR 2) has CAP_SYS_ADMIN
cat <<EOF >secure-debugger.yaml
apiVersion: v1
kind: Pod
metadata:
labels:
run: secure-debugger
name: secure-debugger
spec:
volumes:
- name: sec-vol
emptyDir: {}
securityContext:
runAsUser: 1000
fsGroup: 2000
containers:
- image: ansilh/debug-tools
name: secure-debugger
volumeMounts:
- name: sec-vol
mountPath: /data/sec
securityContext:
allowPrivilegeEscalation: false
EOF Note
fsGroup: Volumes that support ownership management are modified to be owned and writable by the GID specified in fsGroup
$ kubectl create -f secure-debugger.yaml$ kubectl exec -it secure-debugger -- /bin/sh
/ $ id
uid=1000 gid=0(root) groups=2000
/ $ ls -ld /data/sec/
drwxrwsrwx 2 root 2000 4096 Feb 26 17:54 /data/sec/
/ $ cd /data/sec/
/data/sec $ touch test_file
/data/sec $ ls -lrt
total 0
-rw-r--r-- 1 1000 2000 0 Feb 26 17:54 test_file
/data/sec $To apply capabilities , we can use below in each containers.
securityContext:
capabilities:
add: ["NET_ADMIN", "SYS_TIME"]You may read more about capabilities here
Note
Read more
Pod Security Policy
A Pod Security Policy is a cluster-level resource that controls security sensitive aspects of the pod specification. The PodSecurityPolicy objects define a set of conditions that a pod must run with in order to be accepted into the system, as well as defaults for the related fields.
Pod security policy control is implemented as an optional (but recommended) admission controller. If PSP is not enabled , then enable it in API server using admission-controller flag.
When a PodSecurityPolicy resource is created, it does nothing. In order to use it, the requesting user or target pod’s ServiceAccount must be authorized to use the policy, by allowing the use verb on the policy.
i.e.;
- A
Rolehave to be created first with resourcePodSecurityPolicyin a namespace - A
RoleBindinghave to be created from theServiceAccountto theRolein a namespace - Then create a object using
kubectl --as=<serviceaccount> -n <namespace> ..
An example PSP is below.
apiVersion: policy/v1beta1
kind: PodSecurityPolicy
metadata:
name: example
spec:
privileged: false # Don't allow privileged pods!
# The rest fills in some required fields.
seLinux:
rule: RunAsAny
supplementalGroups:
rule: RunAsAny
runAsUser:
rule: RunAsAny
fsGroup:
rule: RunAsAny
volumes:
- '*'A well documented example is in official documentation
Chapter 20
ELK Stack
Subsections of ELK Stack
Elastic Search
We will create volumes with hostpath for testing purposes. In production , we will use PVs from a volume provisioner or we will use dynamic volume provisioning
- Create volumes according to the number of nodes
cat <<EOF >es-volumes-manual.yaml
---
kind: PersistentVolume
apiVersion: v1
metadata:
name: pv-001
labels:
type: local
spec:
storageClassName: manual
capacity:
storage: 50Gi
accessModes:
- ReadWriteOnce
hostPath:
path: "/tmp/data01"
---
kind: PersistentVolume
apiVersion: v1
metadata:
name: pv-002
labels:
type: local
spec:
storageClassName: manual
capacity:
storage: 50Gi
accessModes:
- ReadWriteOnce
hostPath:
path: "/tmp/data02"
---
kind: PersistentVolume
apiVersion: v1
metadata:
name: pv-003
labels:
type: local
spec:
storageClassName: manual
capacity:
storage: 50Gi
accessModes:
- ReadWriteOnce
hostPath:
path: "/tmp/data03"
---
EOF$ kubectl create -f es-volumes-manual.yaml$ kubectl get pvOutput
NAME CAPACITY ACCESS MODES RECLAIM POLICY STATUS CLAIM STORAGECLASS REASON AGE
pv-001 50Gi RWO Retain Available manual 8s
pv-002 50Gi RWO Retain Available manual 8s
pv-003 50Gi RWO Retain Available manual 8s
Create a namespace
cat <<EOF >kube-logging.yaml
kind: Namespace
apiVersion: v1
metadata:
name: kube-logging
EOFkubectl create -f kube-logging.yaml- Create a headless service
cat <<EOF >es-service.yaml
kind: Service
apiVersion: v1
metadata:
name: elasticsearch
namespace: kube-logging
labels:
app: elasticsearch
spec:
selector:
app: elasticsearch
clusterIP: None
ports:
- port: 9200
name: rest
- port: 9300
name: inter-node
EOFkubectl create -f es-service.yamlCreate stateful set
cat <<EOF >es_statefulset.yaml
apiVersion: apps/v1
kind: StatefulSet
metadata:
name: es-cluster
namespace: kube-logging
spec:
serviceName: elasticsearch
replicas: 3
selector:
matchLabels:
app: elasticsearch
template:
metadata:
labels:
app: elasticsearch
spec:
containers:
- name: elasticsearch
image: docker.elastic.co/elasticsearch/elasticsearch-oss:6.4.3
resources:
limits:
cpu: 1000m
requests:
cpu: 100m
ports:
- containerPort: 9200
name: rest
protocol: TCP
- containerPort: 9300
name: inter-node
protocol: TCP
volumeMounts:
- name: data
mountPath: /usr/share/elasticsearch/data
env:
- name: cluster.name
value: k8s-logs
- name: node.name
valueFrom:
fieldRef:
fieldPath: metadata.name
- name: discovery.zen.ping.unicast.hosts
value: "es-cluster-0.elasticsearch,es-cluster-1.elasticsearch,es-cluster-2.elasticsearch"
- name: discovery.zen.minimum_master_nodes
value: "2"
- name: ES_JAVA_OPTS
value: "-Xms512m -Xmx512m"
initContainers:
- name: fix-permissions
image: busybox
command: ["sh", "-c", "chown -R 1000:1000 /usr/share/elasticsearch/data"]
securityContext:
privileged: true
volumeMounts:
- name: data
mountPath: /usr/share/elasticsearch/data
- name: increase-vm-max-map
image: busybox
command: ["sysctl", "-w", "vm.max_map_count=262144"]
securityContext:
privileged: true
- name: increase-fd-ulimit
image: busybox
command: ["sh", "-c", "ulimit -n 65536"]
securityContext:
privileged: true
volumeClaimTemplates:
- metadata:
name: data
labels:
app: elasticsearch
spec:
accessModes: [ "ReadWriteOnce" ]
storageClassName: manual
resources:
requests:
storage: 50Gi
EOFkubectl create -f es_statefulset.yaml- Montor StatefulSet rollout status
kubectl rollout status sts/es-cluster --namespace=kube-logging- Verify elastic search cluster by checking the state
Forward the pod port 9200 to localhost port 9200
$ kubectl port-forward es-cluster-0 9200:9200 --namespace=kube-loggingExecute curl command to see the cluster state.
Here , master node is 'J0ZQqGI0QTqljoLxh5O3-A' , which is es-cluster-0
curl http://localhost:9200/_cluster/state?pretty
{
"cluster_name" : "k8s-logs",
"compressed_size_in_bytes" : 358,
"cluster_uuid" : "ahM0thu1RSKQ5CXqZOdPHA",
"version" : 3,
"state_uuid" : "vDwLQHzJSGixU2AItNY1KA",
"master_node" : "J0ZQqGI0QTqljoLxh5O3-A",
"blocks" : { },
"nodes" : {
"jZdz75kSSSWDpkIHYoRFIA" : {
"name" : "es-cluster-1",
"ephemeral_id" : "flfl4-TURLS_yTUOlZsx5g",
"transport_address" : "10.10.151.186:9300",
"attributes" : { }
},
"J0ZQqGI0QTqljoLxh5O3-A" : {
"name" : "es-cluster-0",
"ephemeral_id" : "qXcnM2V1Tcqbw1cWLKDkSg",
"transport_address" : "10.10.118.123:9300",
"attributes" : { }
},
"pqGu-mcNQS-OksmiJfCUJA" : {
"name" : "es-cluster-2",
"ephemeral_id" : "X0RtmusQS7KM5LOy9wSF3Q",
"transport_address" : "10.10.36.224:9300",
"attributes" : { }
}
},
snippned..Kibana
cat <<EOF >kibana.yaml
apiVersion: v1
kind: Service
metadata:
name: kibana
namespace: kube-logging
labels:
app: kibana
spec:
ports:
- port: 5601
selector:
app: kibana
---
apiVersion: apps/v1
kind: Deployment
metadata:
name: kibana
namespace: kube-logging
labels:
app: kibana
spec:
replicas: 1
selector:
matchLabels:
app: kibana
template:
metadata:
labels:
app: kibana
spec:
containers:
- name: kibana
image: docker.elastic.co/kibana/kibana-oss:6.4.3
resources:
limits:
cpu: 1000m
requests:
cpu: 100m
env:
- name: ELASTICSEARCH_URL
value: http://elasticsearch:9200
ports:
- containerPort: 5601
EOFkubectl create -f kibana.yamlkubectl rollout status deployment/kibana --namespace=kube-loggingOutput
Waiting for deployment "kibana" rollout to finish: 0 of 1 updated replicas are available...
deployment "kibana" successfully rolled out
$ kubectl get pods --namespace=kube-loggingOutput
NAME READY STATUS RESTARTS AGE
es-cluster-0 1/1 Running 0 21m
es-cluster-1 1/1 Running 0 20m
es-cluster-2 1/1 Running 0 19m
kibana-87b7b8cdd-djbl4 1/1 Running 0 72s$ kubectl port-forward kibana-87b7b8cdd-djbl4 5601:5601 --namespace=kube-loggingYou may use PuTTY tunneling to access the 127.0.0.1:5601 port or you can use ssh command tunneling if you are using Mac or Linux
After accessing the URL http://localhost:5601 via browser , you will see the Kibana web interface
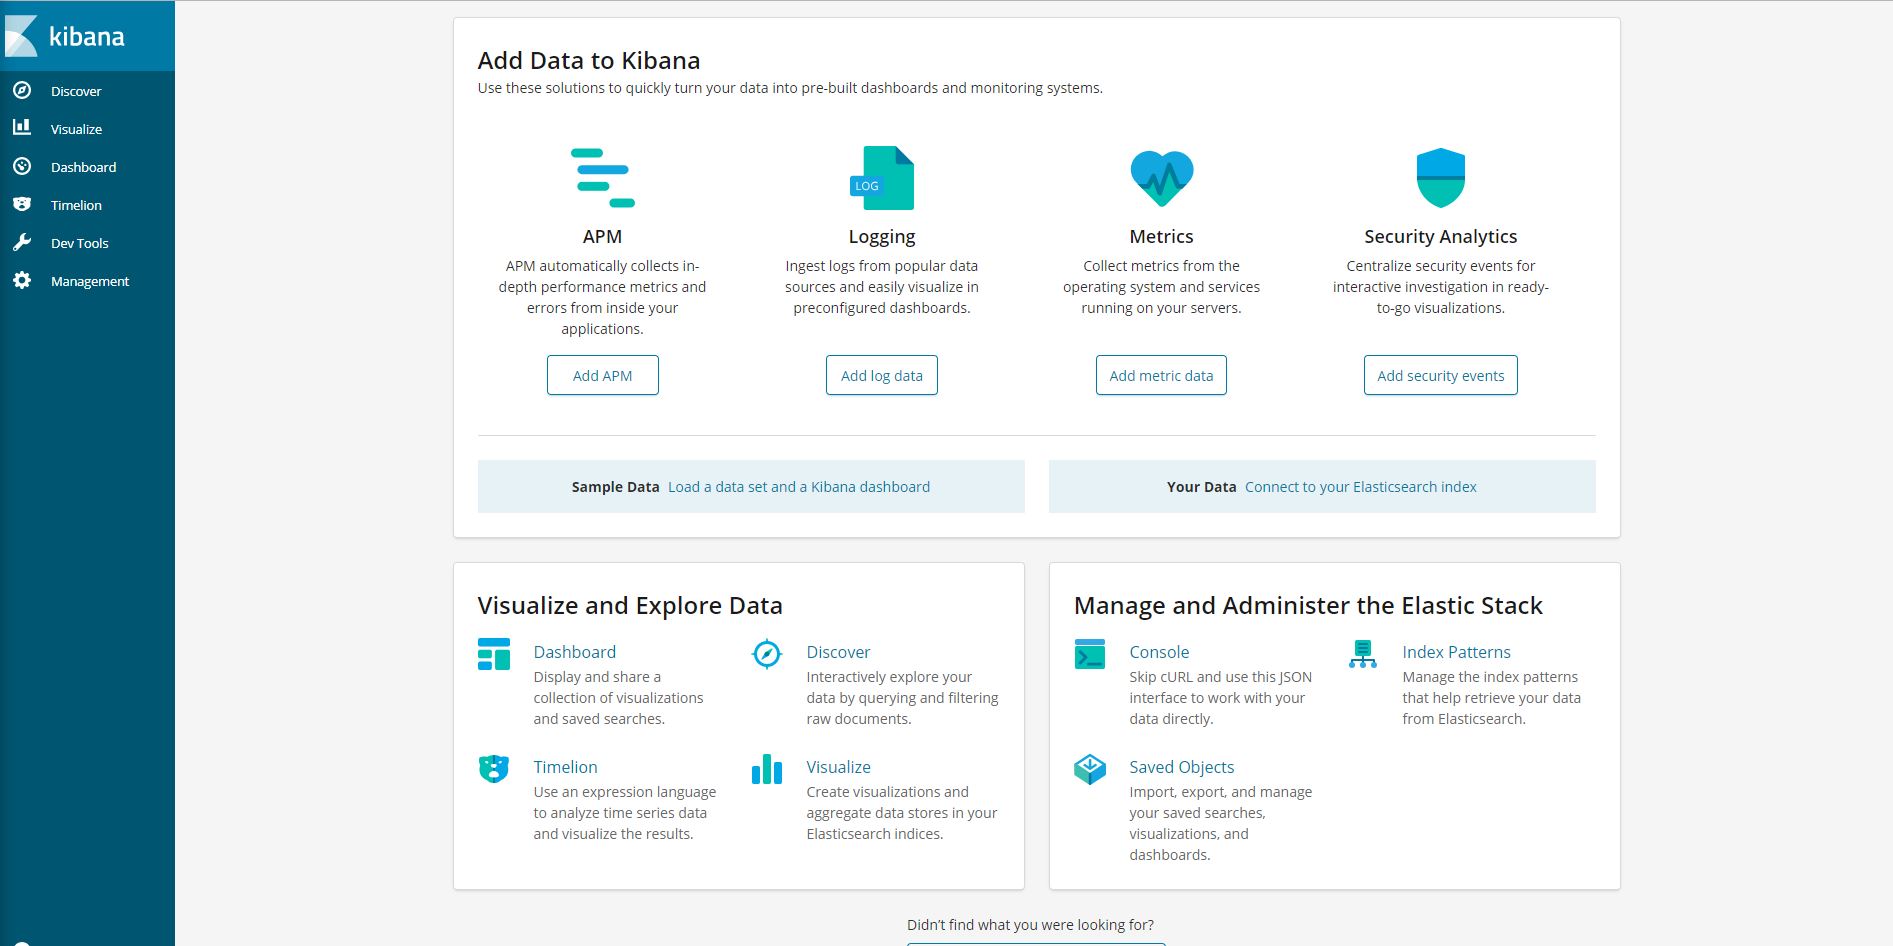
Send logs via Fluent-bit
cat <<EOF >fluent-bit-service-account.yaml
apiVersion: v1
kind: ServiceAccount
metadata:
name: fluent-bit
namespace: kube-logging
EOF$ kubectl create -f fluent-bit-service-account.yamlOutput
serviceaccount/fluent-bit createdcat <<EOF >fluent-bit-role.yaml
apiVersion: rbac.authorization.k8s.io/v1beta1
kind: ClusterRole
metadata:
name: fluent-bit-read
rules:
- apiGroups: [""]
resources:
- namespaces
- pods
verbs:
- get
- list
- watch
EOF$ kubectl create -f fluent-bit-role.yamlOutput
clusterrole.rbac.authorization.k8s.io/fluent-bit-read createdcat <<EOF >fluent-bit-role-binding.yaml
apiVersion: rbac.authorization.k8s.io/v1beta1
kind: ClusterRoleBinding
metadata:
name: fluent-bit-read
roleRef:
apiGroup: rbac.authorization.k8s.io
kind: ClusterRole
name: fluent-bit-read
subjects:
- kind: ServiceAccount
name: fluent-bit
namespace: kube-logging
EOF$ kubectl create -f fluent-bit-role-binding.yamlOutput
clusterrolebinding.rbac.authorization.k8s.io/fluent-bit-read createdcat <<EOF >fluent-bit-configmap.yaml
apiVersion: v1
kind: ConfigMap
metadata:
name: fluent-bit-config
namespace: kube-logging
labels:
k8s-app: fluent-bit
data:
# Configuration files: server, input, filters and output
# ======================================================
fluent-bit.conf: |
[SERVICE]
Flush 1
Log_Level info
Daemon off
Parsers_File parsers.conf
HTTP_Server On
HTTP_Listen 0.0.0.0
HTTP_Port 2020
@INCLUDE input-kubernetes.conf
@INCLUDE filter-kubernetes.conf
@INCLUDE output-elasticsearch.conf
input-kubernetes.conf: |
[INPUT]
Name tail
Tag kube.*
Path /var/log/containers/*.log
Parser docker
DB /var/log/flb_kube.db
Mem_Buf_Limit 5MB
Skip_Long_Lines On
Refresh_Interval 10
filter-kubernetes.conf: |
[FILTER]
Name kubernetes
Match kube.*
Kube_URL https://kubernetes.default:443
Merge_Log On
K8S-Logging.Parser On
output-elasticsearch.conf: |
[OUTPUT]
Name es
Match *
Host \${FLUENT_ELASTICSEARCH_HOST}
Port \${FLUENT_ELASTICSEARCH_PORT}
Logstash_Format On
Retry_Limit False
parsers.conf: |
[PARSER]
Name apache
Format regex
Regex ^(?<host>[^ ]*) [^ ]* (?<user>[^ ]*) \[(?<time>[^\]]*)\] "(?<method>\S+)(?: +(?<path>[^\"]*?)(?: +\S*)?)?" (?<code>[^ ]*) (?<size>[^ ]*)(?: "(?<referer>[^\"]*)" "(?<agent>[^\"]*)")?$
Time_Key time
Time_Format %d/%b/%Y:%H:%M:%S %z
[PARSER]
Name apache2
Format regex
Regex ^(?<host>[^ ]*) [^ ]* (?<user>[^ ]*) \[(?<time>[^\]]*)\] "(?<method>\S+)(?: +(?<path>[^ ]*) +\S*)?" (?<code>[^ ]*) (?<size>[^ ]*)(?: "(?<referer>[^\"]*)" "(?<agent>[^\"]*)")?$
Time_Key time
Time_Format %d/%b/%Y:%H:%M:%S %z
[PARSER]
Name apache_error
Format regex
Regex ^\[[^ ]* (?<time>[^\]]*)\] \[(?<level>[^\]]*)\](?: \[pid (?<pid>[^\]]*)\])?( \[client (?<client>[^\]]*)\])? (?<message>.*)$
[PARSER]
Name nginx
Format regex
Regex ^(?<remote>[^ ]*) (?<host>[^ ]*) (?<user>[^ ]*) \[(?<time>[^\]]*)\] "(?<method>\S+)(?: +(?<path>[^\"]*?)(?: +\S*)?)?" (?<code>[^ ]*) (?<size>[^ ]*)(?: "(?<referer>[^\"]*)" "(?<agent>[^\"]*)")?$
Time_Key time
Time_Format %d/%b/%Y:%H:%M:%S %z
[PARSER]
Name json
Format json
Time_Key time
Time_Format %d/%b/%Y:%H:%M:%S %z
[PARSER]
Name docker
Format json
Time_Key time
Time_Format %Y-%m-%dT%H:%M:%S.%L
Time_Keep On
# Command | Decoder | Field | Optional Action
# =============|==================|=================
Decode_Field_As escaped log
[PARSER]
Name syslog
Format regex
Regex ^\<(?<pri>[0-9]+)\>(?<time>[^ ]* {1,2}[^ ]* [^ ]*) (?<host>[^ ]*) (?<ident>[a-zA-Z0-9_\/\.\-]*)(?:\[(?<pid>[0-9]+)\])?(?:[^\:]*\:)? *(?<message>.*)$
Time_Key time
Time_Format %b %d %H:%M:%S
EOF$ kubectl create -f fluent-bit-configmap.yamlOutput
configmap/fluent-bit-config createdcat <<EOF >fluent-bit-ds.yaml
apiVersion: extensions/v1beta1
kind: DaemonSet
metadata:
name: fluent-bit
namespace: kube-logging
labels:
k8s-app: fluent-bit-logging
version: v1
kubernetes.io/cluster-service: "true"
spec:
template:
metadata:
labels:
k8s-app: fluent-bit-logging
version: v1
kubernetes.io/cluster-service: "true"
annotations:
prometheus.io/scrape: "true"
prometheus.io/port: "2020"
prometheus.io/path: /api/v1/metrics/prometheus
spec:
containers:
- name: fluent-bit
image: fluent/fluent-bit:1.0.4
imagePullPolicy: Always
ports:
- containerPort: 2020
env:
- name: FLUENT_ELASTICSEARCH_HOST
value: "elasticsearch"
- name: FLUENT_ELASTICSEARCH_PORT
value: "9200"
volumeMounts:
- name: varlog
mountPath: /var/log
- name: varlibdockercontainers
mountPath: /var/lib/docker/containers
readOnly: true
- name: fluent-bit-config
mountPath: /fluent-bit/etc/
terminationGracePeriodSeconds: 10
volumes:
- name: varlog
hostPath:
path: /var/log
- name: varlibdockercontainers
hostPath:
path: /var/lib/docker/containers
- name: fluent-bit-config
configMap:
name: fluent-bit-config
serviceAccountName: fluent-bit
tolerations:
- key: node-role.kubernetes.io/master
operator: Exists
effect: NoSchedule
EOF$ kubectl create -f fluent-bit-ds.yamlOutput
daemonset.extensions/fluent-bit createdChapter 21
Helm

The package manager for kubernetes and much more..
Helm is the best way to find, share, and use software built for kubernetes.
Read this post before adopting Helm
Also read Helm 3 design proposal
Subsections of Helm
Installation
Download Helm binaries
- Go to
https://github.com/helm/helm/releases - Copy download location from
Installation and Upgradingsection.
$ wget https://storage.googleapis.com/kubernetes-helm/helm-v2.13.0-linux-amd64.tar.gzExtract tarball
$ tar -xvf helm-v2.13.0-linux-amd64.tar.gzConfigure Helm client.
$ sudo mv linux-amd64/helm /usr/local/bin/helm
$ helm versionOutput
Client: &version.Version{SemVer:"v2.13.0", GitCommit:"79d07943b03aea2b76c12644b4b54733bc5958d6", GitTreeState:"clean"}
Error: could not find tillerHelm Server side configuration - Tiller
cat <<EOF >tiller-rbac.yaml
apiVersion: v1
kind: ServiceAccount
metadata:
name: tiller
namespace: kube-system
---
apiVersion: rbac.authorization.k8s.io/v1
kind: ClusterRoleBinding
metadata:
name: tiller
roleRef:
apiGroup: rbac.authorization.k8s.io
kind: ClusterRole
name: cluster-admin
subjects:
- kind: ServiceAccount
name: tiller
namespace: kube-system
EOF$ kubectl create -f tiller-rbac.yaml$ helm init --service-account tillerOutput
Creating /home/k8s/.helm
Creating /home/k8s/.helm/repository
Creating /home/k8s/.helm/repository/cache
Creating /home/k8s/.helm/repository/local
Creating /home/k8s/.helm/plugins
Creating /home/k8s/.helm/starters
Creating /home/k8s/.helm/cache/archive
Creating /home/k8s/.helm/repository/repositories.yaml
Adding stable repo with URL: https://kubernetes-charts.storage.googleapis.com
Adding local repo with URL: http://127.0.0.1:8879/charts
$HELM_HOME has been configured at /home/k8s/.helm.
Tiller (the Helm server-side component) has been installed into your Kubernetes Cluster.
Please note: by default, Tiller is deployed with an insecure 'allow unauthenticated users' policy.
To prevent this, run `helm init` with the --tiller-tls-verify flag.
For more information on securing your installation see: https://docs.helm.sh/using_helm/#securing-your-helm-installation
Happy Helming!$ kubectl get pods -n kube-system |grep tillerOutput
tiller-deploy-5b7c66d59c-8t7pc 1/1 Running 0 36sA Minimal Package
In this demo , we will create an Nginx deployment with one replica. This demo is like more or less applying a deployment yaml . But in upcoming sessions we will see how we can leverage helm to customize the deployment without modifying yaml specs.
Create a demo helm-nginx-pkg package
$ mkdir helm-nginx-pkg- Create a
templatesdirectory.
$ mkdir helm-nginx-pkg/templatesCreate a deployment yaml inside templates diretory.
$ kubectl run nginx-deployment --image=nginx:1.9.10 --dry-run -o yaml >helm-nginx-pkg/templates/nginx-deployment.yamlCreate a Chart.yaml (https://helm.sh/docs/developing_charts/#the-chart-yaml-file)
cat <<EOF >helm-nginx-pkg/Chart.yaml
apiVersion: v1
name: nginx-deployment
version: 1
description: Demo Helm chart to deploy Nginx
maintainers:
- name: "Ansil H"
email: "ansilh@gmail.com"
url: "https://ansilh.com"
EOFinspect the chart and see the details of package.
$ helm inspect chart ./helm-nginx-pkg/apiVersion: v1
description: Demo Helm chart to deploy Nginx
maintainers:
- email: ansilh@gmail.com
name: Ansil H
url: https://ansilh.com
name: nginx-deployment
version: "1"Dry-run install to see everything works or not
$ helm install ./helm-nginx-pkg --debug --dry-runOutput
[debug] Created tunnel using local port: '43945'
[debug] SERVER: "127.0.0.1:43945"
[debug] Original chart version: ""
[debug] CHART PATH: /home/k8s/helm-nginx-pkg
NAME: alliterating-crab
REVISION: 1
RELEASED: Fri Mar 15 14:13:59 2019
CHART: nginx-deployment-1
USER-SUPPLIED VALUES:
{}
COMPUTED VALUES:
{}
HOOKS:
MANIFEST:
---
# Source: nginx-deployment/templates/nginx-deployment.yaml
apiVersion: apps/v1
kind: Deployment
metadata:
creationTimestamp: null
labels:
run: nginx-deployment
name: nginx-deployment
spec:
replicas: 1
selector:
matchLabels:
run: nginx-deployment
strategy: {}
template:
metadata:
creationTimestamp: null
labels:
run: nginx-deployment
spec:
containers:
- image: nginx:1.9.10
name: nginx-deployment
resources: {}
status: {}To verify nothing is created as part of dry-run
$ helm lsInstall package
$ helm install ./helm-nginx-pkgOutput
NAME: filled-toad
LAST DEPLOYED: Fri Mar 15 14:15:50 2019
NAMESPACE: default
STATUS: DEPLOYED
RESOURCES:
==> v1/Deployment
NAME READY UP-TO-DATE AVAILABLE AGE
nginx-deployment 0/1 0 0 0s
==> v1/Pod(related)
NAME READY STATUS RESTARTS AGE
nginx-deployment-64f767964b-qj9t9 0/1 Pending 0 0s
$ kubectl get pods
NAME READY STATUS RESTARTS AGE
nginx-deployment-64f767964b-qj9t9 1/1 Running 0 16sList deployed charts
$ helm lsOutput
NAME REVISION UPDATED STATUS CHART APP VERSION NAMESPACE
filled-toad 1 Fri Mar 15 14:15:50 2019 DEPLOYED nginx-deployment-1 default
$ kubectl get podsOutput
NAME READY STATUS RESTARTS AGE
nginx-deployment-64f767964b-drfcc 1/1 Running 0 21sLint
Linting
Helm lint will help to correct and standardize the package format
$ helm lint ./helm-nginx-pkg/==> Linting ./helm-nginx-pkg/
[ERROR] Chart.yaml: directory name (helm-nginx-pkg) and chart name (nginx-deployment) must be the same
[INFO] Chart.yaml: icon is recommended
[INFO] values.yaml: file does not exist
Error: 1 chart(s) linted, 1 chart(s) failedLets correct the errors
$ mv helm-nginx-pkg nginx-deployment- Add an icon path (we will see where its used later)
cat <<EOF >>nginx-deployment/Chart.yaml
icon: "https://img.icons8.com/nolan/64/000000/linux.png"
EOF- Create
values.yaml(we will see the use of this file later)
$ touch nginx-deployment/values.yaml- Lint the package again
$ helm lint ./nginx-deploymentOutput
==> Linting ./nginx-deployment
Lint OK
1 chart(s) linted, no failuresThis time we see a perfect “OK”
Upgrade
Deployment
Modify values file with below content
cat <<EOF >nginx-deployment/values.yaml
replicaCount: 2
image:
repository: "nginx"
tag: "1.14"
EOFModify deployment template
$ vi nginx-deployment/templates/nginx-deployment.yamlapiVersion: apps/v1
kind: Deployment
metadata:
creationTimestamp: null
labels:
run: nginx-deployment
name: nginx-deployment
spec:
replicas: {{ .Values.replicaCount }} # <-- This is value is referred from values.yaml `replicaCount` field
selector:
matchLabels:
run: nginx-deployment
strategy: {}
template:
metadata:
creationTimestamp: null
labels:
run: nginx-deployment
spec:
containers:
- image: {{ .Values.image.repository }}:{{ .Values.image.tag }} # <-- this is self explanatory :)
name: nginx-deployment
resources: {}
status: {}Lint the chart to make sure everything good.
$ helm lint ./nginx-deployment/Output
==> Linting ./nginx-deployment/
Lint OK
1 chart(s) linted, no failures- The
REVISIONis1as of now.
$ helm lsNAME REVISION UPDATED STATUS CHART APP VERSION NAMESPACE
ungaged-possum 1 Fri Mar 15 16:41:28 2019 DEPLOYED nginx-deployment-1 defaultExecute a dry-run
$ helm upgrade ungaged-possum ./nginx-deployment/ --dry-run --debugOutput
[debug] Created tunnel using local port: '43533'
[debug] SERVER: "127.0.0.1:43533"
REVISION: 2
RELEASED: Fri Mar 15 18:17:19 2019
CHART: nginx-deployment-1
USER-SUPPLIED VALUES:
{}
COMPUTED VALUES:
image:
repository: nginx
tag: "1.14"
replicaCount: 2
HOOKS:
MANIFEST:
---
# Source: nginx-deployment/templates/nginx-deployment.yaml
apiVersion: apps/v1
kind: Deployment
metadata:
creationTimestamp: null
labels:
run: nginx-deployment
name: nginx-deployment
spec:
replicas: 2
selector:
matchLabels:
run: nginx-deployment
strategy: {}
template:
metadata:
creationTimestamp: null
labels:
run: nginx-deployment
spec:
containers:
- image: nginx:1.14
name: nginx-deployment
resources: {}
status: {}
Release "ungaged-possum" has been upgraded. Happy Helming!
LAST DEPLOYED: Fri Mar 15 16:41:28 2019
NAMESPACE: default
STATUS: DEPLOYED
RESOURCES:
==> v1/Deployment
NAME READY UP-TO-DATE AVAILABLE AGE
nginx-deployment 1/1 1 1 95m
==> v1/Pod(related)
NAME READY STATUS RESTARTS AGE
nginx-deployment-64f767964b-drfcc 1/1 Running 0 95mUpgrade package
$ helm upgrade ungaged-possum ./nginx-deployment/Output
Release "ungaged-possum" has been upgraded. Happy Helming!
LAST DEPLOYED: Fri Mar 15 18:17:52 2019
NAMESPACE: default
STATUS: DEPLOYED
RESOURCES:
==> v1/Deployment
NAME READY UP-TO-DATE AVAILABLE AGE
nginx-deployment 1/2 1 1 96m
==> v1/Pod(related)
NAME READY STATUS RESTARTS AGE
nginx-deployment-64f767964b-drfcc 1/1 Running 0 96mVerify the number of Pods after upgarde.
$ kubectl get podsOutput
NAME READY STATUS RESTARTS AGE
nginx-deployment-d5d56dcf9-6cxvk 1/1 Running 0 7s
nginx-deployment-d5d56dcf9-8r868 1/1 Running 0 20sVerify the new Nginx version
$ kubectl exec nginx-deployment-d5d56dcf9-6cxvk -- nginx -vOutput
nginx version: nginx/1.14.2$ helm lsOutput
NAME REVISION UPDATED STATUS CHART APP VERSION NAMESPACE
ungaged-possum 2 Fri Mar 15 18:17:52 2019 DEPLOYED nginx-deployment-1 defaultCheck the helm upgrade history
$ helm history ungaged-possumOutput
REVISION UPDATED STATUS CHART DESCRIPTION
1 Fri Mar 15 16:41:28 2019 SUPERSEDED nginx-deployment-1 Install complete
2 Fri Mar 15 18:17:52 2019 DEPLOYED nginx-deployment-1 Upgrade completeCheck the changes happened between revisions
$ sdiff <(helm get ungaged-possum --revision=1) <(helm get ungaged-possum --revision=2) Note
Output on right hand side shows the changed values.| Indicates changes in line.> Indicates inserted lines.
REVISION: 1 | REVISION: 2
RELEASED: Fri Mar 15 16:41:28 2019 | RELEASED: Fri Mar 15 18:17:52 2019
CHART: nginx-deployment-1 CHART: nginx-deployment-1
USER-SUPPLIED VALUES: USER-SUPPLIED VALUES:
{} {}
COMPUTED VALUES: COMPUTED VALUES:
{} | image:
> repository: nginx
> tag: "1.14"
> replicaCount: 2
HOOKS: HOOKS:
MANIFEST: MANIFEST:
--- ---
# Source: nginx-deployment/templates/nginx-deployment.yaml # Source: nginx-deployment/templates/nginx-deployment.yaml
apiVersion: apps/v1 apiVersion: apps/v1
kind: Deployment kind: Deployment
metadata: metadata:
creationTimestamp: null creationTimestamp: null
labels: labels:
run: nginx-deployment run: nginx-deployment
name: nginx-deployment name: nginx-deployment
spec: spec:
replicas: 1 | replicas: 2
selector: selector:
matchLabels: matchLabels:
run: nginx-deployment run: nginx-deployment
strategy: {} strategy: {}
template: template:
metadata: metadata:
creationTimestamp: null creationTimestamp: null
labels: labels:
run: nginx-deployment run: nginx-deployment
spec: spec:
containers: containers:
- image: nginx:1.9.10 | - image: nginx:1.14
name: nginx-deployment name: nginx-deployment
resources: {} resources: {}
status: {} status: {}Rollback
List revisions
$ helm listOutput
NAME REVISION UPDATED STATUS CHART APP VERSION NAMESPACE
ungaged-possum 2 Fri Mar 15 18:17:52 2019 DEPLOYED nginx-deployment-1 defaultRollback to revision 1
$ helm rollback ungaged-possum 1Output
Rollback was a success! Happy Helming!
List the revision after rollback
$ helm listOutput
NAME REVISION UPDATED STATUS CHART APP VERSION NAMESPACE
ungaged-possum 3 Sat Mar 16 10:14:47 2019 DEPLOYED nginx-deployment-1 defaultVerify rollback
$ kubectl get podsOutput
NAME READY STATUS RESTARTS AGE
nginx-deployment-64f767964b-trx7h 1/1 Running 0 44s$ kubectl exec nginx-deployment-64f767964b-trx7h -- nginx -vOutput
nginx version: nginx/1.9.10Examine the changes between active revision and previous one.
$ sdiff <(helm get ungaged-possum --revision=2) <(helm get ungaged-possum --revision=3)Output
REVISION: 2 | REVISION: 3
RELEASED: Fri Mar 15 18:17:52 2019 | RELEASED: Sat Mar 16 10:14:47 2019
CHART: nginx-deployment-1 CHART: nginx-deployment-1
USER-SUPPLIED VALUES: USER-SUPPLIED VALUES:
{} {}
COMPUTED VALUES: COMPUTED VALUES:
image: | {}
repository: nginx <
tag: "1.14" <
replicaCount: 2 <
HOOKS: HOOKS:
MANIFEST: MANIFEST:
--- ---
# Source: nginx-deployment/templates/nginx-deployment.yaml # Source: nginx-deployment/templates/nginx-deployment.yaml
apiVersion: apps/v1 apiVersion: apps/v1
kind: Deployment kind: Deployment
metadata: metadata:
creationTimestamp: null creationTimestamp: null
labels: labels:
run: nginx-deployment run: nginx-deployment
name: nginx-deployment name: nginx-deployment
spec: spec:
replicas: 2 | replicas: 1
selector: selector:
matchLabels: matchLabels:
run: nginx-deployment run: nginx-deployment
strategy: {} strategy: {}
template: template:
metadata: metadata:
creationTimestamp: null creationTimestamp: null
labels: labels:
run: nginx-deployment run: nginx-deployment
spec: spec:
containers: containers:
- image: nginx:1.14 | - image: nginx:1.9.10
name: nginx-deployment name: nginx-deployment
resources: {} resources: {}
status: {} status: {}In earlier sections , we have notices that there is no change in chart. Its recommended to change the chart version based on the changes you make
$ vi nginx-deployment/Chart.yamlChange revision from 1 to 2
version: 2Helm Create
With create command , we can create a standard helm directory/file structure which can be modified for our package.
$ helm create mychart$ tree mychart/mychart/
├── Chart.yaml # A YAML file containing information about the chart.
├── charts # A directory containing any charts upon which this chart depends.
├── templates # A directory of templates that, when combined with values, will generate valid Kubernetes manifest files.
│ ├── NOTES.txt # A plain text file containing short usage notes.
│ ├── _helpers.tpl # Also called "partials" that can be embedded into existing files while a Chart is being installed.
│ ├── deployment.yaml # A deployment spec
│ ├── ingress.yaml # An ingress spec
│ ├── service.yaml # An service spec
│ └── tests
│ └── test-connection.yaml # A pod definition , that can be executed to test the Chart(https://github.com/helm/helm/blob/master/docs/chart_tests.md)
└── values.yaml # The default configuration values for this chart
3 directories, 8 filesKubeapps
Kubeapps is a web-based UI for deploying and managing applications in Kubernetes clusters
Kubeapps Installation
- List present repos
$ helm repo listNAME URL
stable https://kubernetes-charts.storage.googleapis.com
local http://127.0.0.1:8879/charts
- Add bitnami repo
$ helm repo add bitnami https://charts.bitnami.com/bitnami“bitnami” has been added to your repositories
$ helm repo listNAME URL
stable https://kubernetes-charts.storage.googleapis.com
local http://127.0.0.1:8879/charts
bitnami https://charts.bitnami.com/bitnami- Install Kubeapps
$ helm install --name kubeapps --namespace kubeapps bitnami/kubeappsIf it fails with below error , execute install one more time
Error: unable to recognize "": no matches for kind "AppRepository" in version "kubeapps.com/v1alpha1"
NAME: kubeapps
LAST DEPLOYED: Sat Mar 16 11:00:08 2019
NAMESPACE: kubeapps
STATUS: DEPLOYED
RESOURCES:
==> v1/ConfigMap
NAME DATA AGE
kubeapps-frontend-config 1 0s
kubeapps-internal-dashboard-config 2 0s
==> v1/Pod(related)
NAME READY STATUS RESTARTS AGE
kubeapps-6b59fbd4c5-8ggdr 0/1 Pending 0 0s
kubeapps-6b59fbd4c5-pbt4h 0/1 Pending 0 0s
kubeapps-internal-apprepository-controller-59bff895fb-tjdtb 0/1 ContainerCreating 0 0s
kubeapps-internal-chartsvc-5cc9c456fc-7r24x 0/1 Pending 0 0s
kubeapps-internal-chartsvc-5cc9c456fc-rzgzx 0/1 Pending 0 0s
kubeapps-internal-dashboard-6b54cd94fc-bm2st 0/1 Pending 0 0s
kubeapps-internal-dashboard-6b54cd94fc-zskq5 0/1 Pending 0 0s
kubeapps-internal-tiller-proxy-d584c568c-spf8m 0/1 Pending 0 0s
kubeapps-internal-tiller-proxy-d584c568c-z2skv 0/1 Pending 0 0s
kubeapps-mongodb-8694b4b9f6-jqxw2 0/1 ContainerCreating 0 0s
==> v1/Service
NAME TYPE CLUSTER-IP EXTERNAL-IP PORT(S) AGE
kubeapps ClusterIP 172.168.130.35 <none> 80/TCP 0s
kubeapps-internal-chartsvc ClusterIP 172.168.155.89 <none> 8080/TCP 0s
kubeapps-internal-dashboard ClusterIP 172.168.201.176 <none> 8080/TCP 0s
kubeapps-internal-tiller-proxy ClusterIP 172.168.20.4 <none> 8080/TCP 0s
kubeapps-mongodb ClusterIP 172.168.84.95 <none> 27017/TCP 0s
==> v1/ServiceAccount
NAME SECRETS AGE
kubeapps-internal-apprepository-controller 1 0s
kubeapps-internal-tiller-proxy 1 0s
==> v1beta1/Deployment
NAME READY UP-TO-DATE AVAILABLE AGE
kubeapps-mongodb 0/1 1 0 0s
==> v1beta1/Role
NAME AGE
kubeapps-internal-apprepository-controller 0s
kubeapps-internal-tiller-proxy 0s
kubeapps-repositories-read 0s
kubeapps-repositories-write 0s
==> v1beta1/RoleBinding
NAME AGE
kubeapps-internal-apprepository-controller 0s
kubeapps-internal-tiller-proxy 0s
==> v1beta2/Deployment
NAME READY UP-TO-DATE AVAILABLE AGE
kubeapps 0/2 0 0 0s
kubeapps-internal-apprepository-controller 0/1 1 0 0s
kubeapps-internal-chartsvc 0/2 0 0 0s
kubeapps-internal-dashboard 0/2 0 0 0s
kubeapps-internal-tiller-proxy 0/2 0 0 0s
NOTES:
** Please be patient while the chart is being deployed **
Tip:
Watch the deployment status using the command: kubectl get pods -w --namespace kubeapps
Kubeapps can be accessed via port 80 on the following DNS name from within your cluster:
kubeapps.kubeapps.svc.cluster.local
To access Kubeapps from outside your K8s cluster, follow the steps below:
1. Get the Kubeapps URL by running these commands:
echo "Kubeapps URL: http://127.0.0.1:8080"
export POD_NAME=$(kubectl get pods --namespace kubeapps -l "app=kubeapps" -o jsonpath="{.items[0].metadata.name}")
kubectl port-forward --namespace kubeapps $POD_NAME 8080:8080
2. Open a browser and access Kubeapps using the obtained URL.- Make sure everything is no failed objects in
kubeappsnamespace.
$ kubectl get all --namespace=kubeappsNAME READY STATUS RESTARTS AGE
pod/apprepo-sync-bitnami-9f266-6ds4l 0/1 Completed 0 54s
pod/apprepo-sync-incubator-p6fjk-q7hv2 0/1 Completed 0 54s
pod/apprepo-sync-stable-79l58-mqrmg 1/1 Running 0 54s
pod/apprepo-sync-svc-cat-725kn-kxvg6 0/1 Completed 0 54s
pod/kubeapps-6b59fbd4c5-8ggdr 1/1 Running 0 2m15s
pod/kubeapps-6b59fbd4c5-pbt4h 1/1 Running 0 2m15s
pod/kubeapps-internal-apprepository-controller-59bff895fb-tjdtb 1/1 Running 0 2m15s
pod/kubeapps-internal-chartsvc-5cc9c456fc-7r24x 1/1 Running 0 2m15s
pod/kubeapps-internal-chartsvc-5cc9c456fc-rzgzx 1/1 Running 0 2m15s
pod/kubeapps-internal-dashboard-6b54cd94fc-bm2st 1/1 Running 0 2m15s
pod/kubeapps-internal-dashboard-6b54cd94fc-zskq5 1/1 Running 0 2m15s
pod/kubeapps-internal-tiller-proxy-d584c568c-spf8m 1/1 Running 0 2m15s
pod/kubeapps-internal-tiller-proxy-d584c568c-z2skv 1/1 Running 0 2m15s
pod/kubeapps-mongodb-8694b4b9f6-jqxw2 1/1 Running 0 2m15s
NAME TYPE CLUSTER-IP EXTERNAL-IP PORT(S) AGE
service/kubeapps ClusterIP 172.168.130.35 <none> 80/TCP 2m15s
service/kubeapps-internal-chartsvc ClusterIP 172.168.155.89 <none> 8080/TCP 2m15s
service/kubeapps-internal-dashboard ClusterIP 172.168.201.176 <none> 8080/TCP 2m15s
service/kubeapps-internal-tiller-proxy ClusterIP 172.168.20.4 <none> 8080/TCP 2m15s
service/kubeapps-mongodb ClusterIP 172.168.84.95 <none> 27017/TCP 2m15s
NAME READY UP-TO-DATE AVAILABLE AGE
deployment.apps/kubeapps 2/2 2 2 2m15s
deployment.apps/kubeapps-internal-apprepository-controller 1/1 1 1 2m15s
deployment.apps/kubeapps-internal-chartsvc 2/2 2 2 2m15s
deployment.apps/kubeapps-internal-dashboard 2/2 2 2 2m15s
deployment.apps/kubeapps-internal-tiller-proxy 2/2 2 2 2m15s
deployment.apps/kubeapps-mongodb 1/1 1 1 2m15s
NAME DESIRED CURRENT READY AGE
replicaset.apps/kubeapps-6b59fbd4c5 2 2 2 2m15s
replicaset.apps/kubeapps-internal-apprepository-controller-59bff895fb 1 1 1 2m15s
replicaset.apps/kubeapps-internal-chartsvc-5cc9c456fc 2 2 2 2m15s
replicaset.apps/kubeapps-internal-dashboard-6b54cd94fc 2 2 2 2m15s
replicaset.apps/kubeapps-internal-tiller-proxy-d584c568c 2 2 2 2m15s
replicaset.apps/kubeapps-mongodb-8694b4b9f6 1 1 1 2m15s
NAME COMPLETIONS DURATION AGE
job.batch/apprepo-sync-bitnami-9f266 1/1 53s 54s
job.batch/apprepo-sync-incubator-p6fjk 1/1 54s 54s
job.batch/apprepo-sync-stable-79l58 0/1 54s 54s
job.batch/apprepo-sync-svc-cat-725kn 1/1 13s 54s
NAME SCHEDULE SUSPEND ACTIVE LAST SCHEDULE AGE
cronjob.batch/apprepo-sync-bitnami 0 * * * * False 0 <none> 54s
cronjob.batch/apprepo-sync-incubator 0 * * * * False 0 <none> 54s
cronjob.batch/apprepo-sync-stable 0 * * * * False 0 <none> 54s
cronjob.batch/apprepo-sync-svc-cat 0 * * * * False 0 <none> 54s- Access Kubeapps dashboard (My API server’s insecure port is listening on 8080 port , so I had to use 8081 for port-forwarding)
$ export POD_NAME=$(kubectl get pods --namespace kubeapps -l "app=kubeapps" -o jsonpath="{.items[0].metadata.name}")
$ kubectl port-forward --namespace kubeapps $POD_NAME 8080:8081- Start an tunnel to 127.0.0.1:8081 using SSH via the host
- Access Web GUI
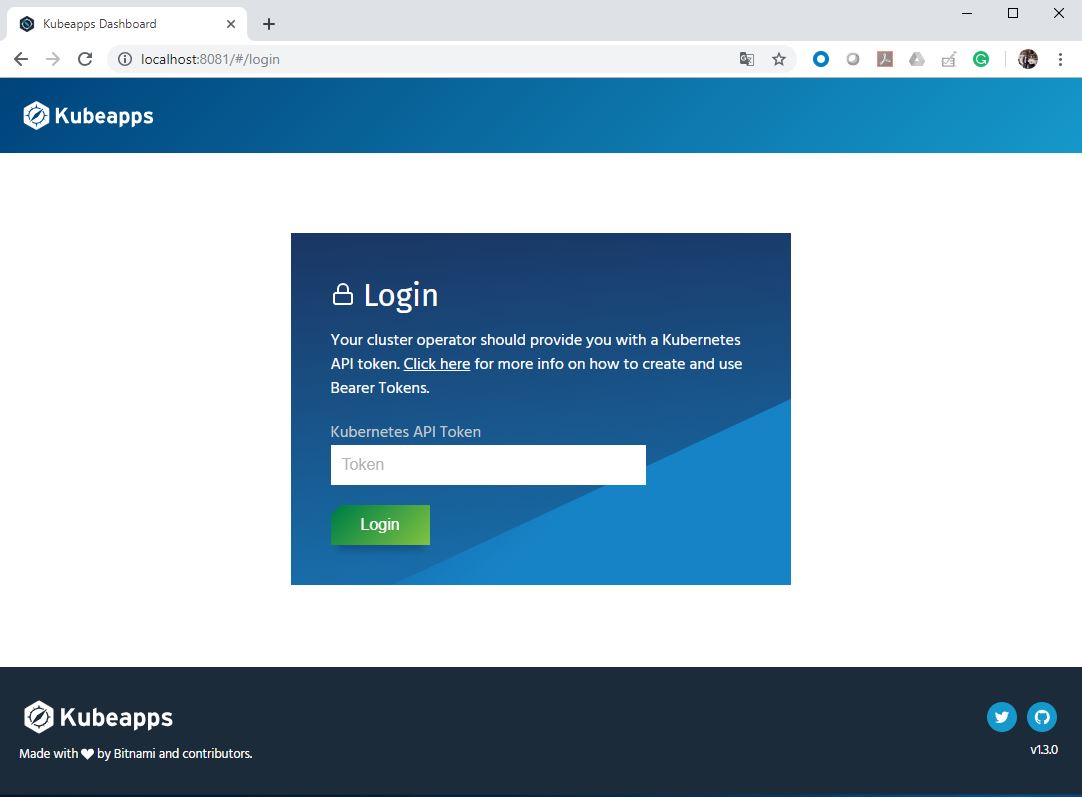
- Create a service account for Kubeapps login
$ kubectl create serviceaccount kubeapps-operator
$ kubectl create clusterrolebinding kubeapps-operator --clusterrole=cluster-admin --serviceaccount=default:kubeapps-operator- Retrieve token
$ kubectl get secret $(kubectl get serviceaccount kubeapps-operator -o jsonpath='{.secrets[].name}') -o jsonpath='{.data.token}' | base64 --decode- Use this token to login
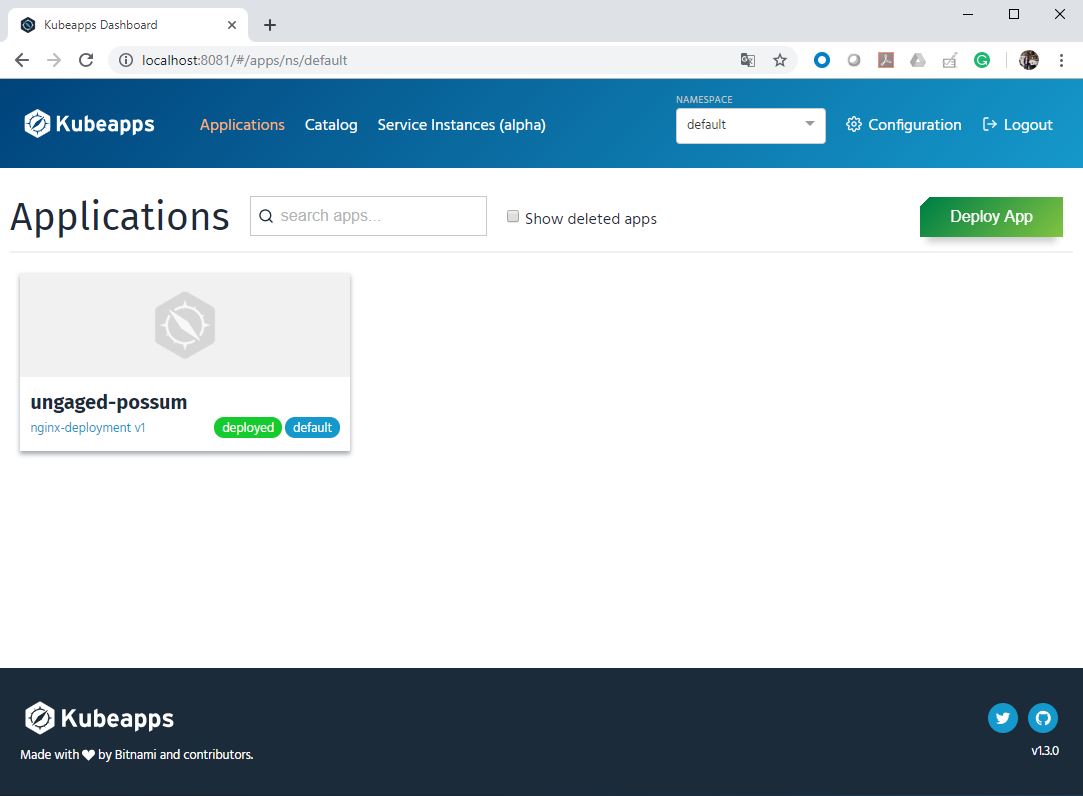
- Click on
Catalogto see all Helm charts from upstream repositories.
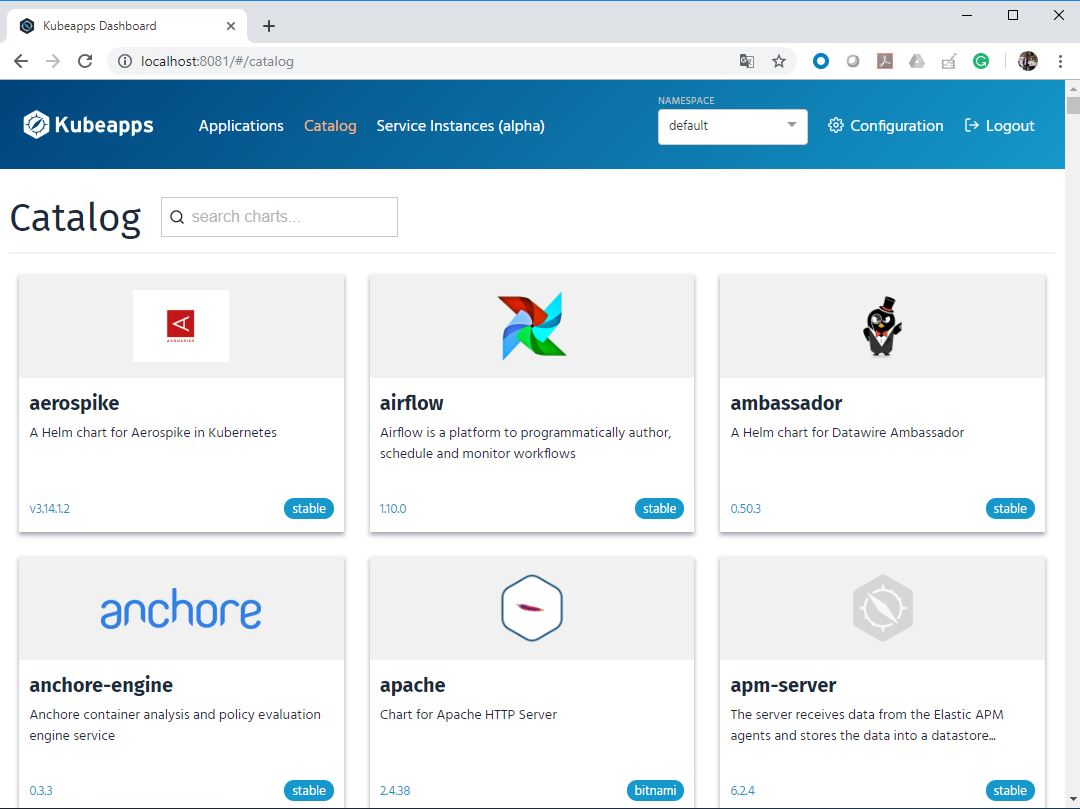
ChartMuseum

We will also upload the nginx-deployment helm package that we have created in earlier session to our local repository.
- Download and configure chartmuseum
$ curl -LO https://s3.amazonaws.com/chartmuseum/release/latest/bin/linux/amd64/chartmuseum Info
We will be using /{HOME}/chartstorage directory to store the packages
$ chmod +x ./chartmuseum
$ sudo mv ./chartmuseum /usr/local/bin
$ mkdir ./chartstorage- Create a systemd service file.
cat <<EOF | sudo tee /etc/systemd/system/chartmuseum.service
[Unit]
Description=Helm Chartmuseum
Documentation=https://chartmuseum.com/
[Service]
ExecStart=/usr/local/bin/chartmuseum \\
--debug \\
--port=8090 \\
--storage="local" \\
--storage-local-rootdir="/home/${USER}/chartstorage/"
Restart=on-failure
RestartSec=5
[Install]
WantedBy=multi-user.target
EOF
- Start chartmuseum
$ sudo systemctl daemon-reload
$ sudo systemctl start chartmuseum
$ sudo systemctl enable chartmuseumOutput
Created symlink from /etc/systemd/system/multi-user.target.wants/chartmuseum.service to /etc/systemd/system/chartmuseum.service.
- Package our Helm chart
$ cd nginx-deployment/
$ helm package .Output
Successfully packaged chart and saved it to: /home/ubuntu/nginx-deployment/nginx-deployment-2.tgz
- Upload package to ChartMuseum
The URL IP is the IP of system which the chartmuseum service is running.
$ curl -L --data-binary "@/home/ubuntu/nginx-deployment/nginx-deployment-2.tgz" 192.168.31.20:8090/api/charts- Also add the repository to helm
$ helm repo add chartmuseum http://192.168.31.20:8090- Add repo to Kubeapps
Click Configuration -> App Repositories -> Add App Repository
Fill Name and URL , then click Install Repo
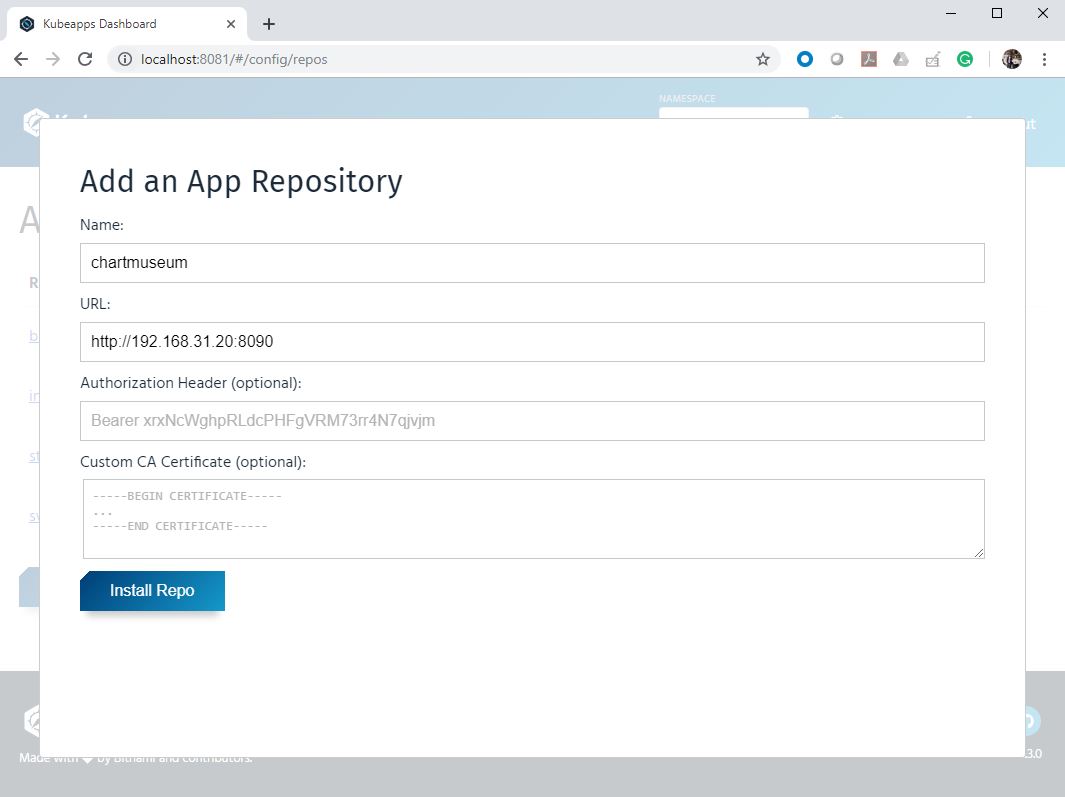
- Repo will appear in the list after addition
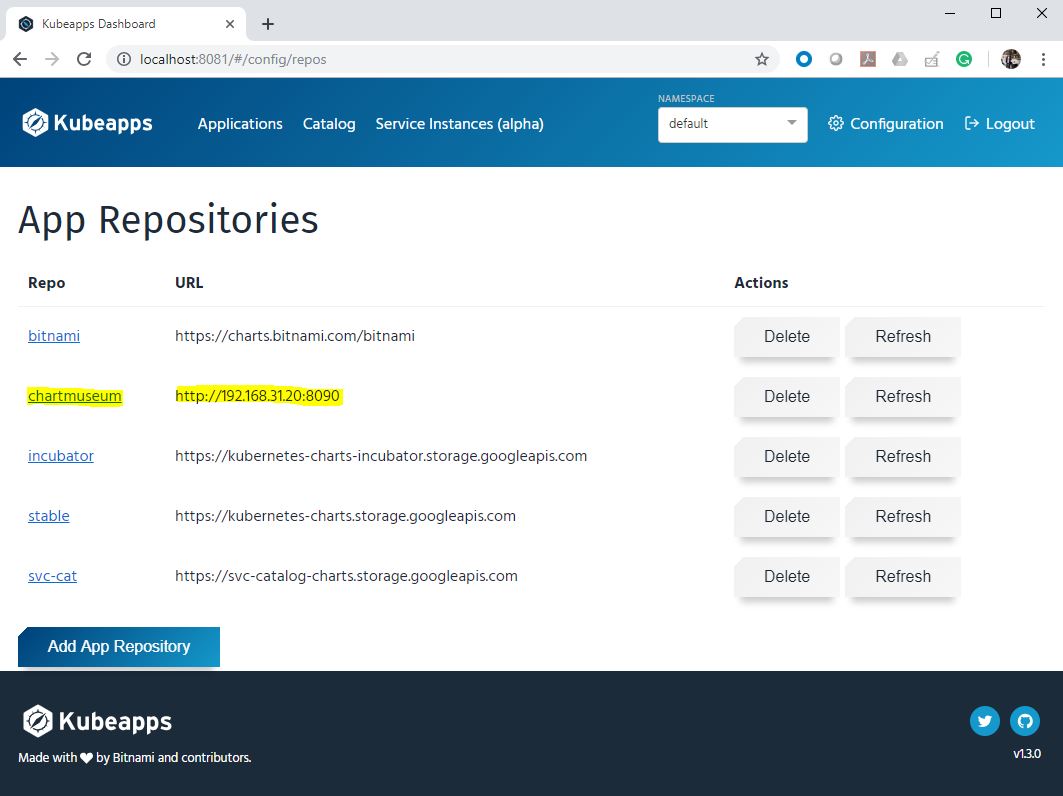
- View the Helm packages which is hosted in ChartMuseum
Click Catalog and search nginx-deployment
Remember , we have added an icon in our Chart.yaml file . You can see the same icon in deployment.
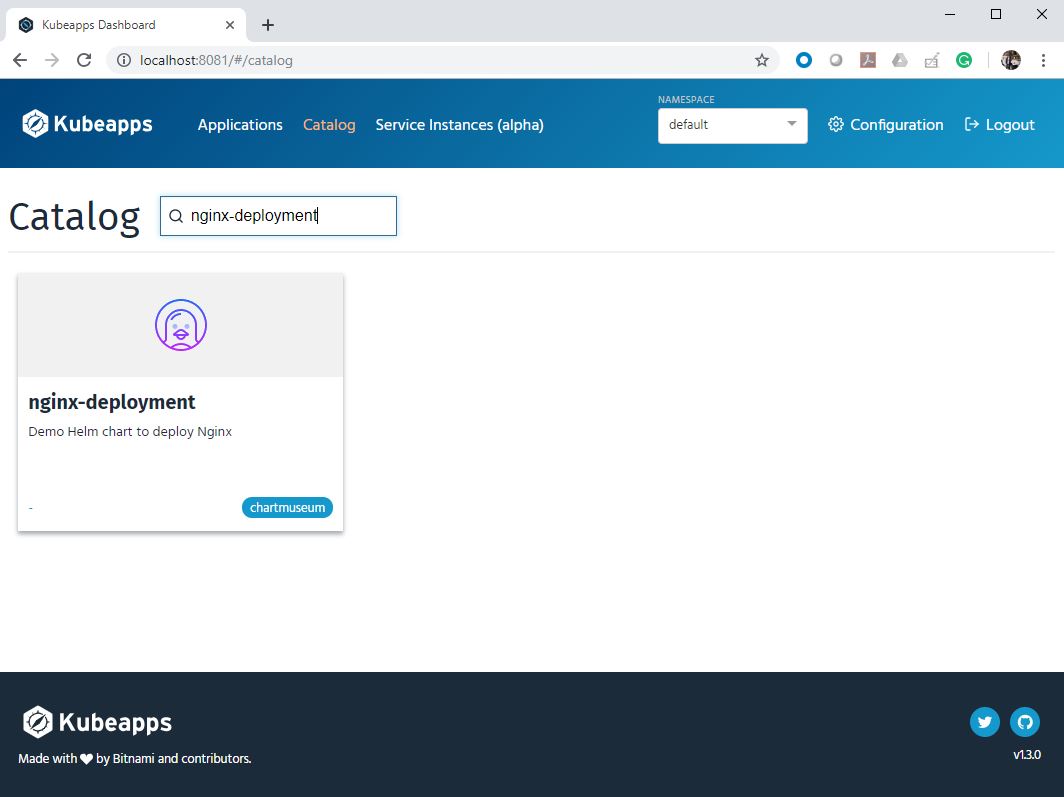
ChartMuseum UI
Earlier we used curl command to upload our first helm package.
In this session , we will configure a UI for our local repository so that we can add/delete packages easily.
- Set
CHART_MUSESUM_URLvariable to the local repo URL.
CHART_MUSESUM_URL=http://192.168.31.20:8090- Create a deployment and service for UI.
cat <<EOF >chartmuseum-ui.yaml
apiVersion: v1
kind: Service
metadata:
creationTimestamp: null
name: chartmuseum-ui
spec:
ports:
- port: 80
protocol: TCP
targetPort: 8080
selector:
run: chartmuseum-ui
type: LoadBalancer
---
apiVersion: apps/v1
kind: Deployment
metadata:
creationTimestamp: null
labels:
run: chartmuseum-ui
name: chartmuseum-ui
spec:
replicas: 1
selector:
matchLabels:
run: chartmuseum-ui
strategy: {}
template:
metadata:
creationTimestamp: null
labels:
run: chartmuseum-ui
spec:
containers:
- env:
- name: CHART_MUSESUM_URL
value: ${CHART_MUSESUM_URL}
image: idobry/chartmuseumui:latest
name: chartmuseum-ui
ports:
- containerPort: 8080
EOF- Apply the spec to
kubeappsnamespace
$ kubectl create -f chartmuseum-ui.yaml --namespace=kubeapps- Verify everything is in good state. (We may have to wait for few minutes while downloading the container image)
$ kubectl get all --namespace=kubeapps |grep chartmuseum-uiOutput
pod/chartmuseum-ui-57b6d8f7dc-nbwwt 1/1 Running 0 99s
service/chartmuseum-ui LoadBalancer 172.168.85.102 192.168.31.202 80:30640/TCP 99s
deployment.apps/chartmuseum-ui 1/1 1 1 99s
replicaset.apps/chartmuseum-ui-57b6d8f7dc
- Now we can access the UI using cluster IP and add or delete Helm packages to our local repository.
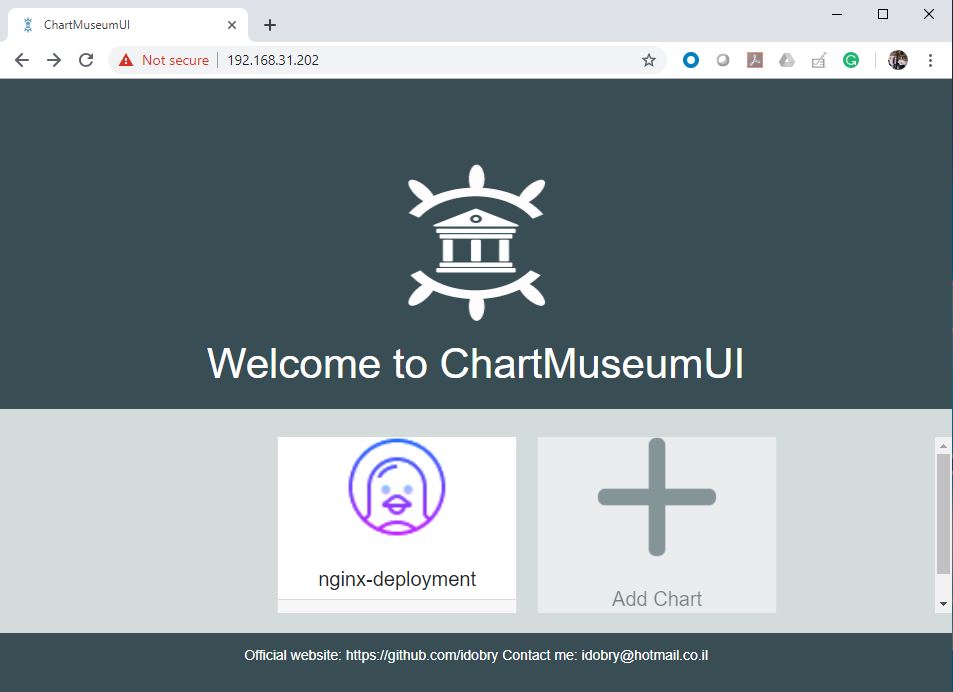
Chapter 22
Security
We will see two Statefulset examples in this session
Subsections of Security
Nginx
HeadLess service
For headless Services that do not define selectors, the endpoints controller does not create Endpoints records. However, the DNS system will create entries This will help application to do discovery of active pods
apiVersion: v1
kind: Service
metadata:
name: nginx
labels:
app: nginx
spec:
ports:
- port: 80
name: web
clusterIP: None
selector:
app: nginxOrdinal Index
Ordinal index starts from 0 to N-1 where N is the number of replicas in spec
Start/Stop order
For a StatefulSet with N replicas, when Pods are being deployed, they are created sequentially, in order from {0..N-1}
Nginx StatefulSet
apiVersion: apps/v1
kind: StatefulSet
metadata:
name: web
spec:
serviceName: "nginx"
replicas: 2
selector:
matchLabels:
app: nginx
template:
metadata:
labels:
app: nginx
spec:
containers:
- name: nginx
image: k8s.gcr.io/nginx-slim:0.8
ports:
- containerPort: 80
name: web
volumeMounts:
- name: www
mountPath: /usr/share/nginx/html
volumeClaimTemplates:
- metadata:
name: www
spec:
accessModes: [ "ReadWriteOnce" ]
resources:
requests:
storage: 1Gi
storageClassName: iscsi-targetd-vg-targetdBasics
https://kubernetes.io/docs/tutorials/stateful-application/basic-stateful-set/
Cassandra
Example
https://kubernetes.io/docs/tutorials/stateful-application/cassandra/
Testing cassandra
Chapter 23
Harbor Private Registry
In this session we will deploy and configure a private registry usng Harbor
Subsections of Harbor Private Registry
Setup Harbor
All container images that we used in the previous examples were downloaded from Docker Hub which is a public registry.
But in production environments , we have to use private image registry so that we will have better control of images and its security.
In this session , we will deploy a private registry using Harbor
Students needs to deploy this in a separate Ubuntu 16.04 LTS VM (4GB memmory + 2vCPUs). If you are attending live session , then instructor will provide private registry URL and credentials.
In this lab , we use below IP/FQDN. Make sure to create necessary DNS entries or /etc/hosts entries to use the registry once configured.
IP Address : 10.136.102.79
FQDN: k8s-harbor-registry.linxlabs.com
Install Docker
$ curl -fsSL https://download.docker.com/linux/ubuntu/gpg | sudo apt-key add -
$ sudo add-apt-repository "deb [arch=amd64] https://download.docker.com/linux/ubuntu $(lsb_release -cs) stable"
$ sudo apt-get update
$ sudo apt-get install -y docker-ce
Verify Docker service state
$ sudo systemctl status docker --no-pager --lines 0
Example output
● docker.service - Docker Application Container Engine
Loaded: loaded (/lib/systemd/system/docker.service; enabled; vendor preset: enabled)
Active: active (running) since Fri 2020-04-10 20:49:29 IST; 2min 27s ago
Docs: https://docs.docker.com
Main PID: 4315 (dockerd)
CGroup: /system.slice/docker.service
└─4315 /usr/bin/dockerd -H fd:// --containerd=/run/containerd/containerd.sock
Download docker-compose binary
$ sudo curl -L "https://github.com/docker/compose/releases/download/1.25.5/docker-compose-$(uname -s)-$(uname -m)" -o /usr/local/bin/docker-compose
$ sudo chmod +x /usr/local/bin/docker-compose
$ sudo ln -s /usr/local/bin/docker-compose /usr/bin/docker-compose
Setup Certificates
Create a staging directory first
mkdir ~/harbor_certs/
cd ~/harbor_certs/
Create CA
openssl genrsa -out ca.key 4096
openssl req -x509 -new -nodes -sha512 -days 3650 \
-subj "/C=IN/ST=Kerala/L=Kollam/O=demo/OU=Personal/CN=ca.linxlabs.com" \
-key ca.key \
-out ca.crt
Create SSL extension file
cat > v3.ext <<-EOF
authorityKeyIdentifier=keyid,issuer
basicConstraints=CA:FALSE
keyUsage = digitalSignature, nonRepudiation, keyEncipherment, dataEncipherment
extendedKeyUsage = serverAuth
subjectAltName = @alt_names
[alt_names]
DNS.1=linxlabs.com
DNS.2=k8s-harbor-registry.linxlabs.com
DNS.3=k8s-harbor-registry
EOF
Create a Ceertificate Signing Request(CSR) for Harbor’s nginx service
$ openssl genrsa -out server.key 4096
$ openssl req -sha512 -new \
-subj "/C=IN/ST=Kerala/L=Kollam/O=demo/OU=Personal/CN=k8s-harbor-registry.linxlabs.com" \
-key k8s-harbor-registry.linxlabs.com.key \
-out k8s-harbor-registry.linxlabs.com.csrGenerate and Sign Certificates
$ openssl x509 -req -sha512 -days 3650 \
-extfile v3.ext \
-CA ca.crt -CAkey ca.key -CAcreateserial \
-in k8s-harbor-registry.linxlabs.com.csr \
-out k8s-harbor-registry.linxlabs.com.crtAfter signing , we will get output like below
Signature ok
subject=/C=IN/ST=Kerala/L=Kollam/O=demo/OU=Personal/CN=k8s-harbor-registry.linxlabs.com
Getting CA Private Key
Create certificate directory for harbor
$ sudo mkdir -p /data/cert/
$ sudo cp k8s-harbor-registry.linxlabs.com.crt k8s-harbor-registry.linxlabs.com.key /data/cert/Download Harbor offline installer.
$ sudo curl https://storage.googleapis.com/harbor-releases/release-1.7.0/harbor-offline-installer-v1.7.1.tgz -O$ tar -xvf harbor-offline-installer-v1.7.1.tgzConfigure Harbor.
$ cd harbor
$ sed -i 's/hostname: reg.mydomain.com/hostname: k8s-harbor-registry.linxlabs.com/' harbor.yml
$ sed -i 's@ certificate: /your/certificate/path@ certificate: /data/cert/k8s-harbor-registry.linxlabs.com.crt@' harbor.yml
$ sed -i 's@ private_key: /your/private/key/path@ private_key: /data/cert/k8s-harbor-registry.linxlabs.com.key@' harbor.yml$ grep k8s-harbor harbor.yml
hostname: k8s-harbor-registry.linxlabs.com
certificate: /data/cert/k8s-harbor-registry.linxlabs.com.crt
certificate: /data/cert/k8s-harbor-registry.linxlabs.com.keyInstall Harbor & Start Harbor.
$ sudo ./install.sh --with-notary --with-clair --with-chartmuseumAfter successful installation , we will get below output.
[Step 5]: starting Harbor ...
Creating network "harbor_harbor" with the default driver
Creating network "harbor_harbor-clair" with the default driver
Creating network "harbor_harbor-notary" with the default driver
Creating network "harbor_harbor-chartmuseum" with the default driver
Creating network "harbor_notary-sig" with the default driver
Creating harbor-log ... done
Creating redis ... done
Creating registry ... done
Creating registryctl ... done
Creating chartmuseum ... done
Creating harbor-portal ... done
Creating harbor-db ... done
Creating notary-signer ... done
Creating clair ... done
Creating harbor-core ... done
Creating notary-server ... done
Creating nginx ... done
Creating harbor-jobservice ... done
Creating clair-adapter ... done
✔ ----Harbor has been installed and started successfully.----Also , you can use docker-compose to verify the health of containers
$ sudo docker-compose ps
Name Command State Ports
---------------------------------------------------------------------------------------------------------------------------------------
chartmuseum ./docker-entrypoint.sh Up (healthy) 9999/tcp
clair ./docker-entrypoint.sh Up (healthy) 6060/tcp, 6061/tcp
clair-adapter /clair-adapter/clair-adapter Up (healthy) 8080/tcp
harbor-core /harbor/harbor_core Up (healthy)
harbor-db /docker-entrypoint.sh Up (healthy) 5432/tcp
harbor-jobservice /harbor/harbor_jobservice ... Up (healthy)
harbor-log /bin/sh -c /usr/local/bin/ ... Up (healthy) 127.0.0.1:1514->10514/tcp
harbor-portal nginx -g daemon off; Up (healthy) 8080/tcp
nginx nginx -g daemon off; Up (healthy) 0.0.0.0:4443->4443/tcp, 0.0.0.0:80->8080/tcp, 0.0.0.0:443->8443/tcp
notary-server /bin/sh -c migrate-patch - ... Up
notary-signer /bin/sh -c migrate-patch - ... Up
redis redis-server /etc/redis.conf Up (healthy) 6379/tcp
registry /home/harbor/entrypoint.sh Up (healthy) 5000/tcp
registryctl /home/harbor/start.sh Up (healthy)Now , you will be able to access Harbor UI using URL “https://k8s-harbor-registry.linxlabs.com” (Need DNS entry/host file entry) or use the IP of the VM “https://10.136.102.79”
Default username & password is admin/Harbor12345
Configure Harbor
In this session , we will create a new user and then we will add that user to the default public project on Harbor.
Create user
Administration -> Users -> + NEW USER
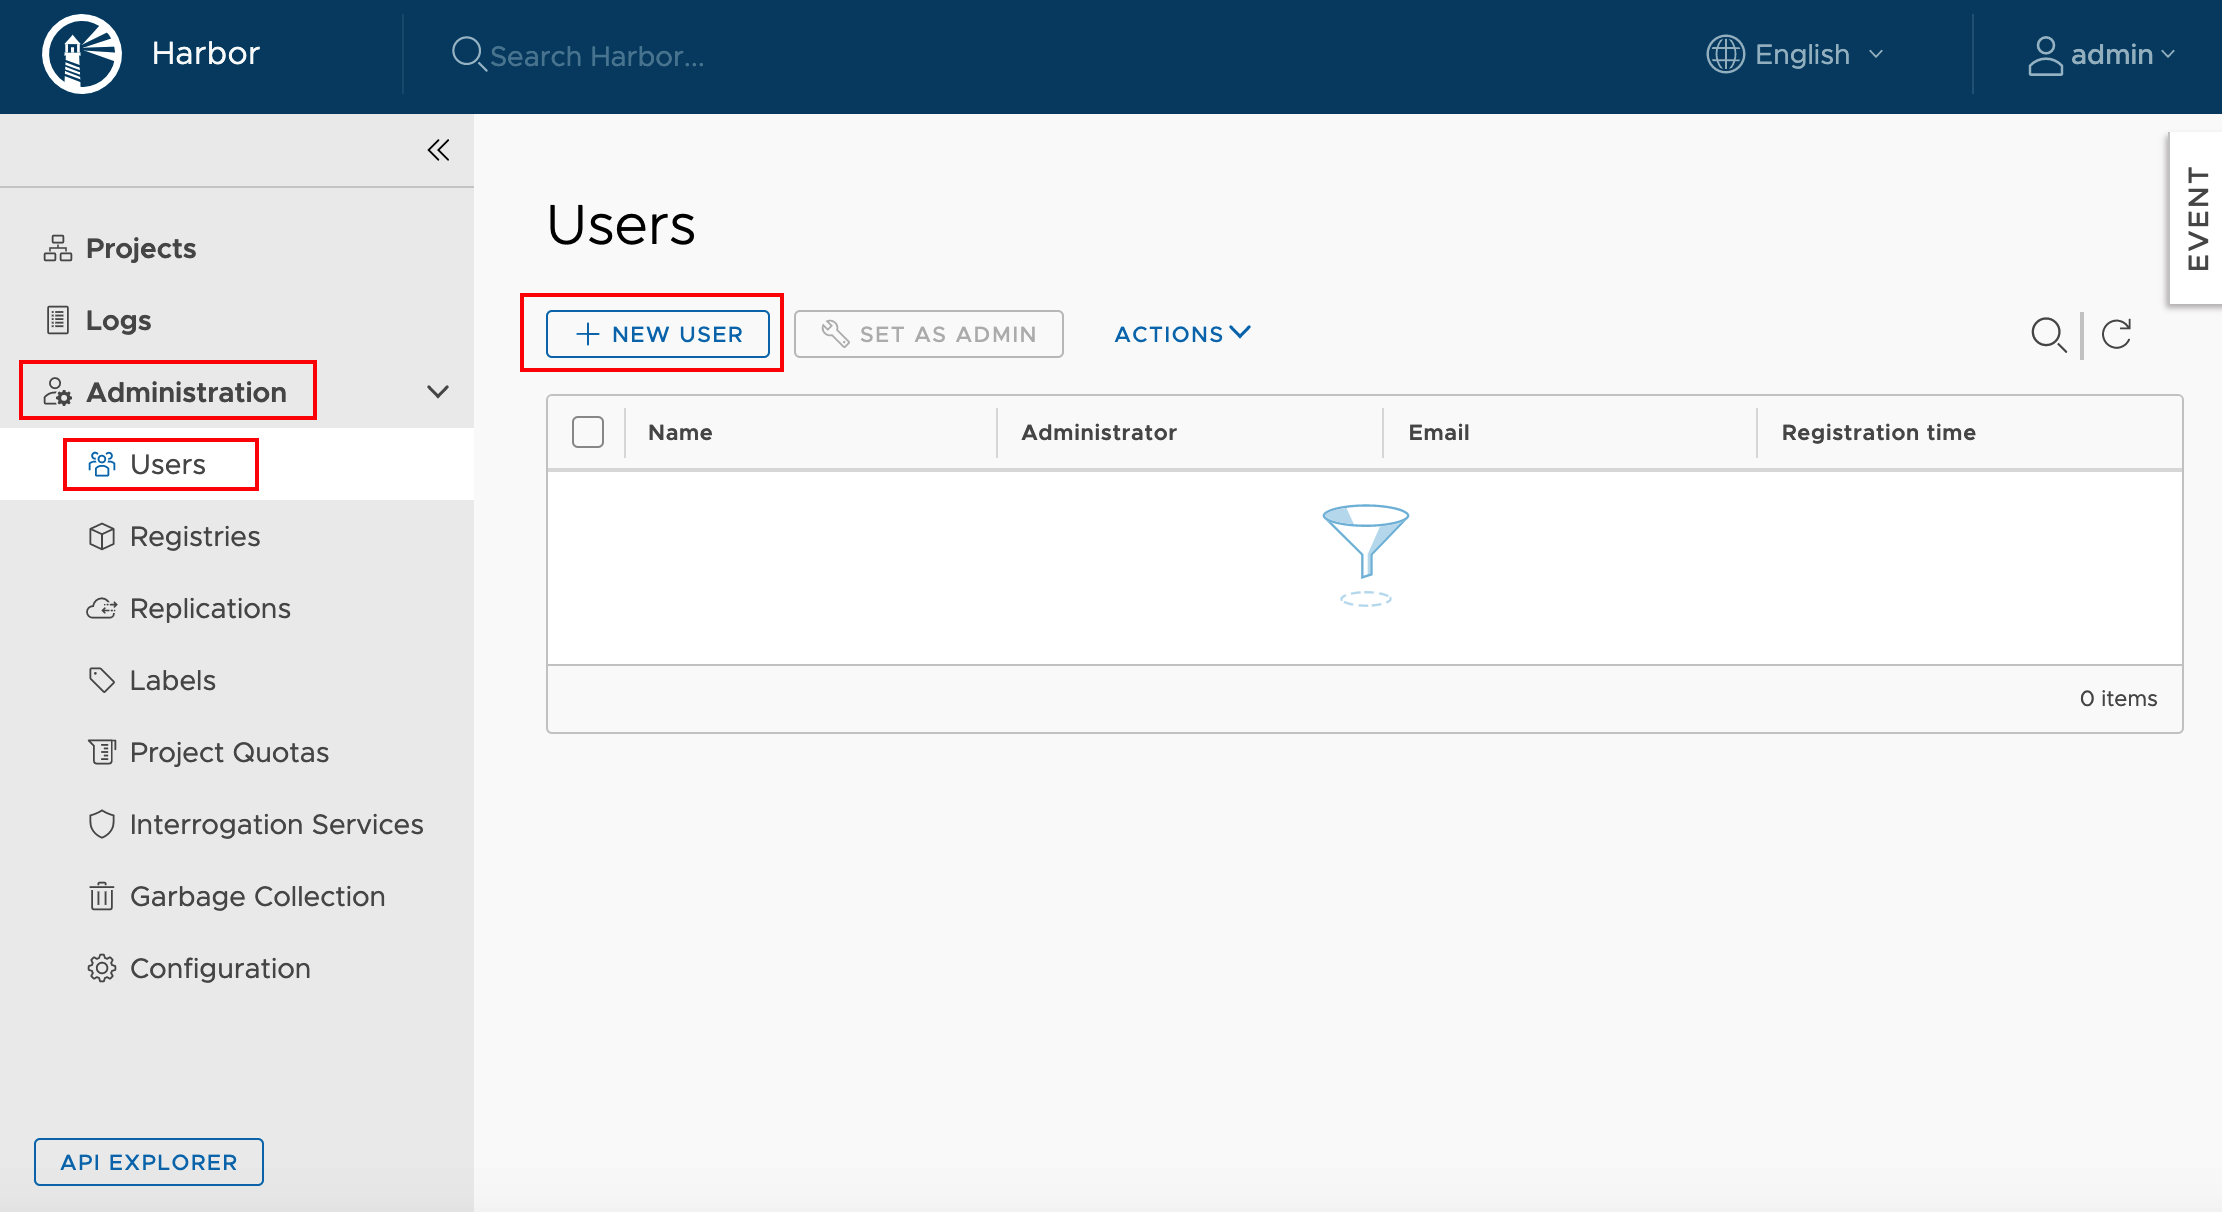 Fill the user details and set password for the account.
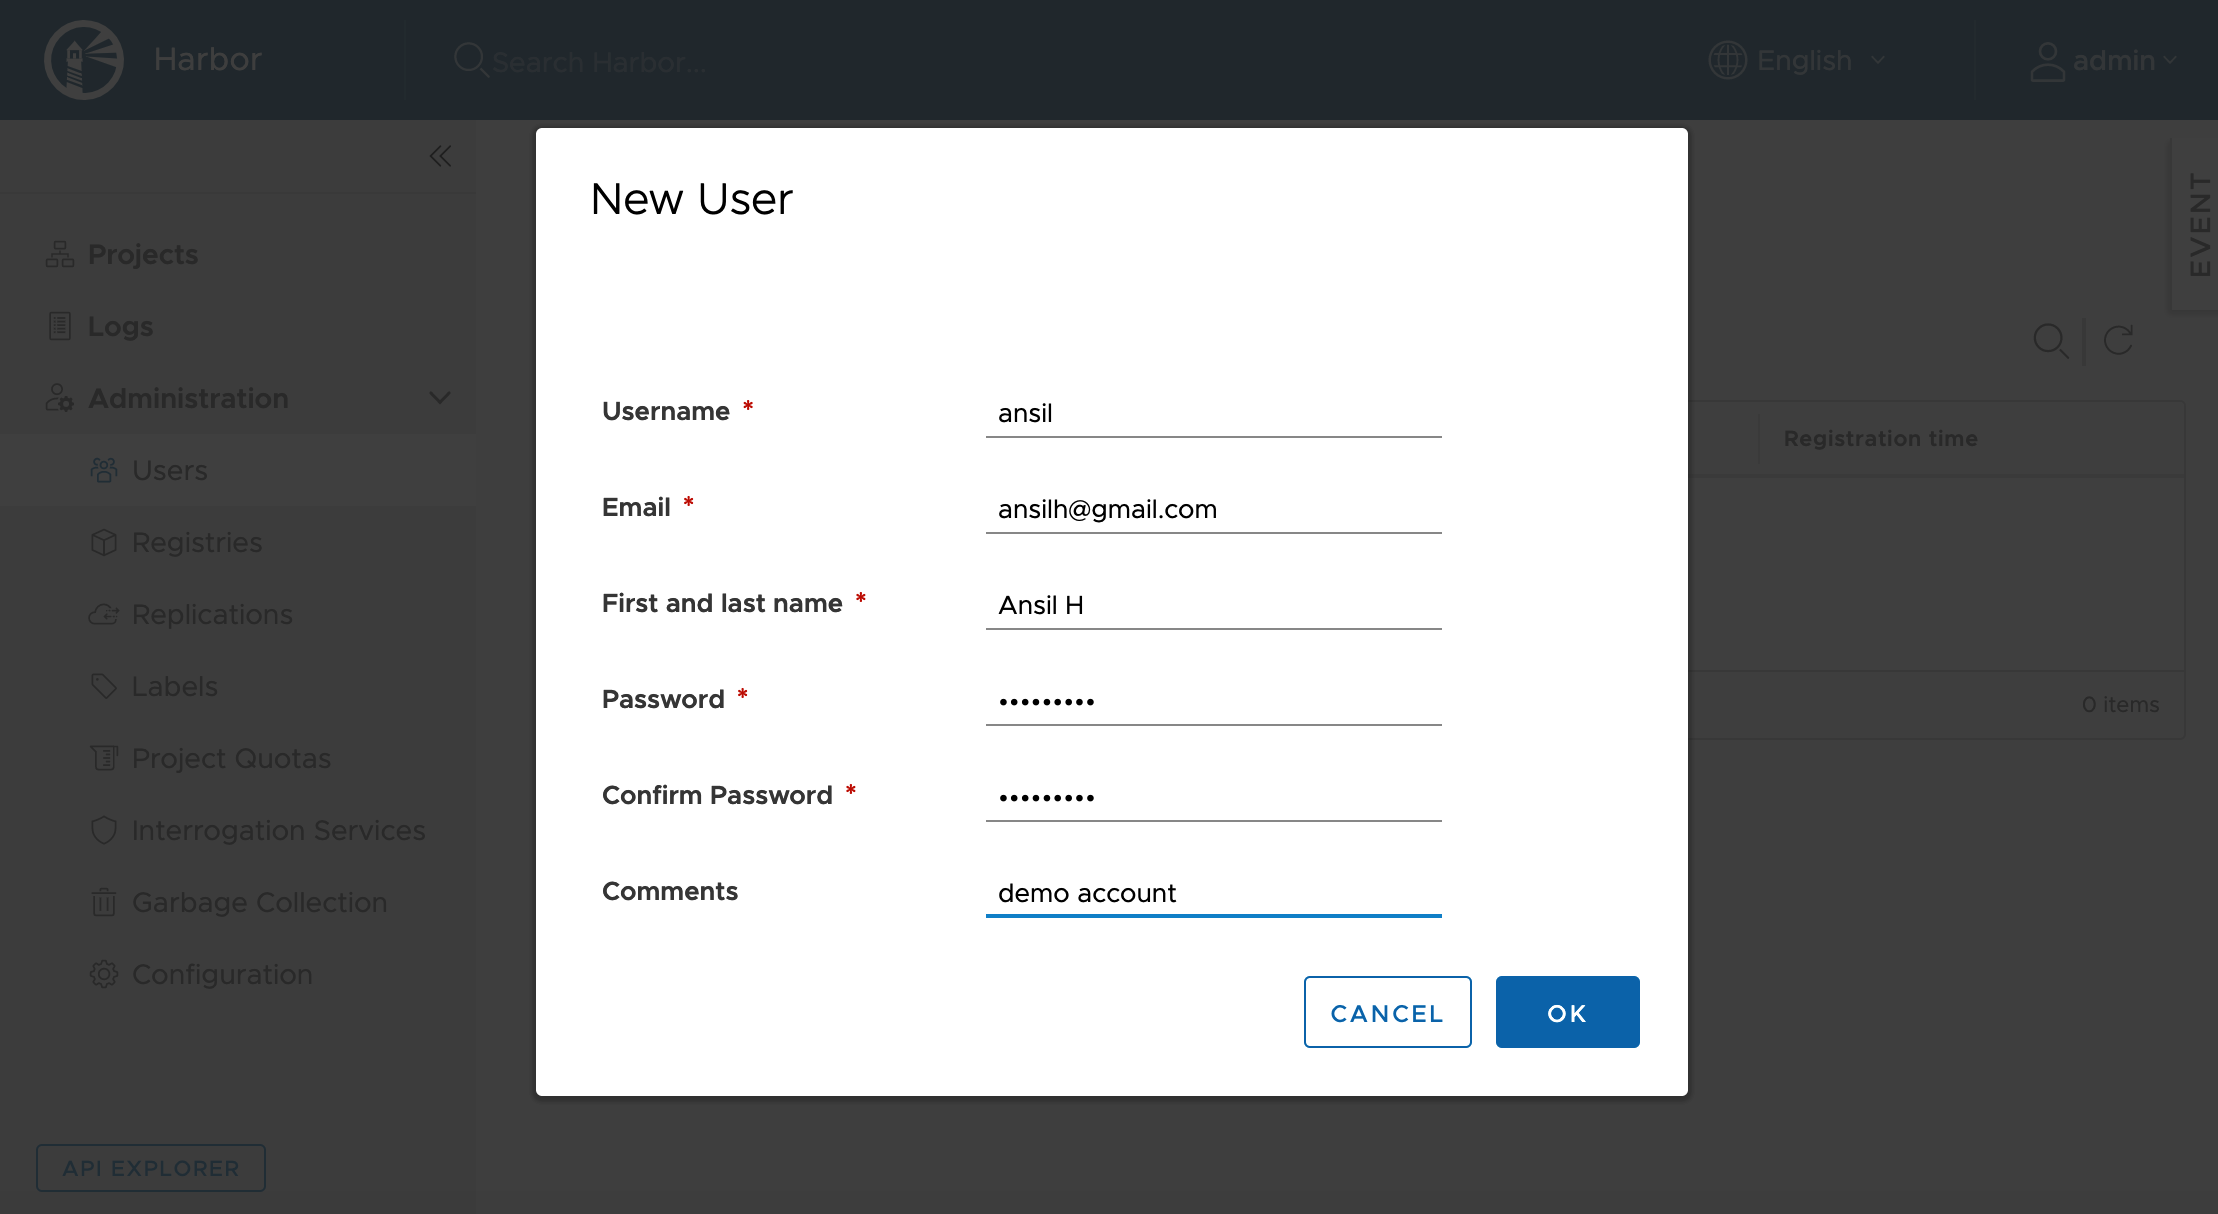 User will be listed after creation

Add user to the library project.
Projects -> library
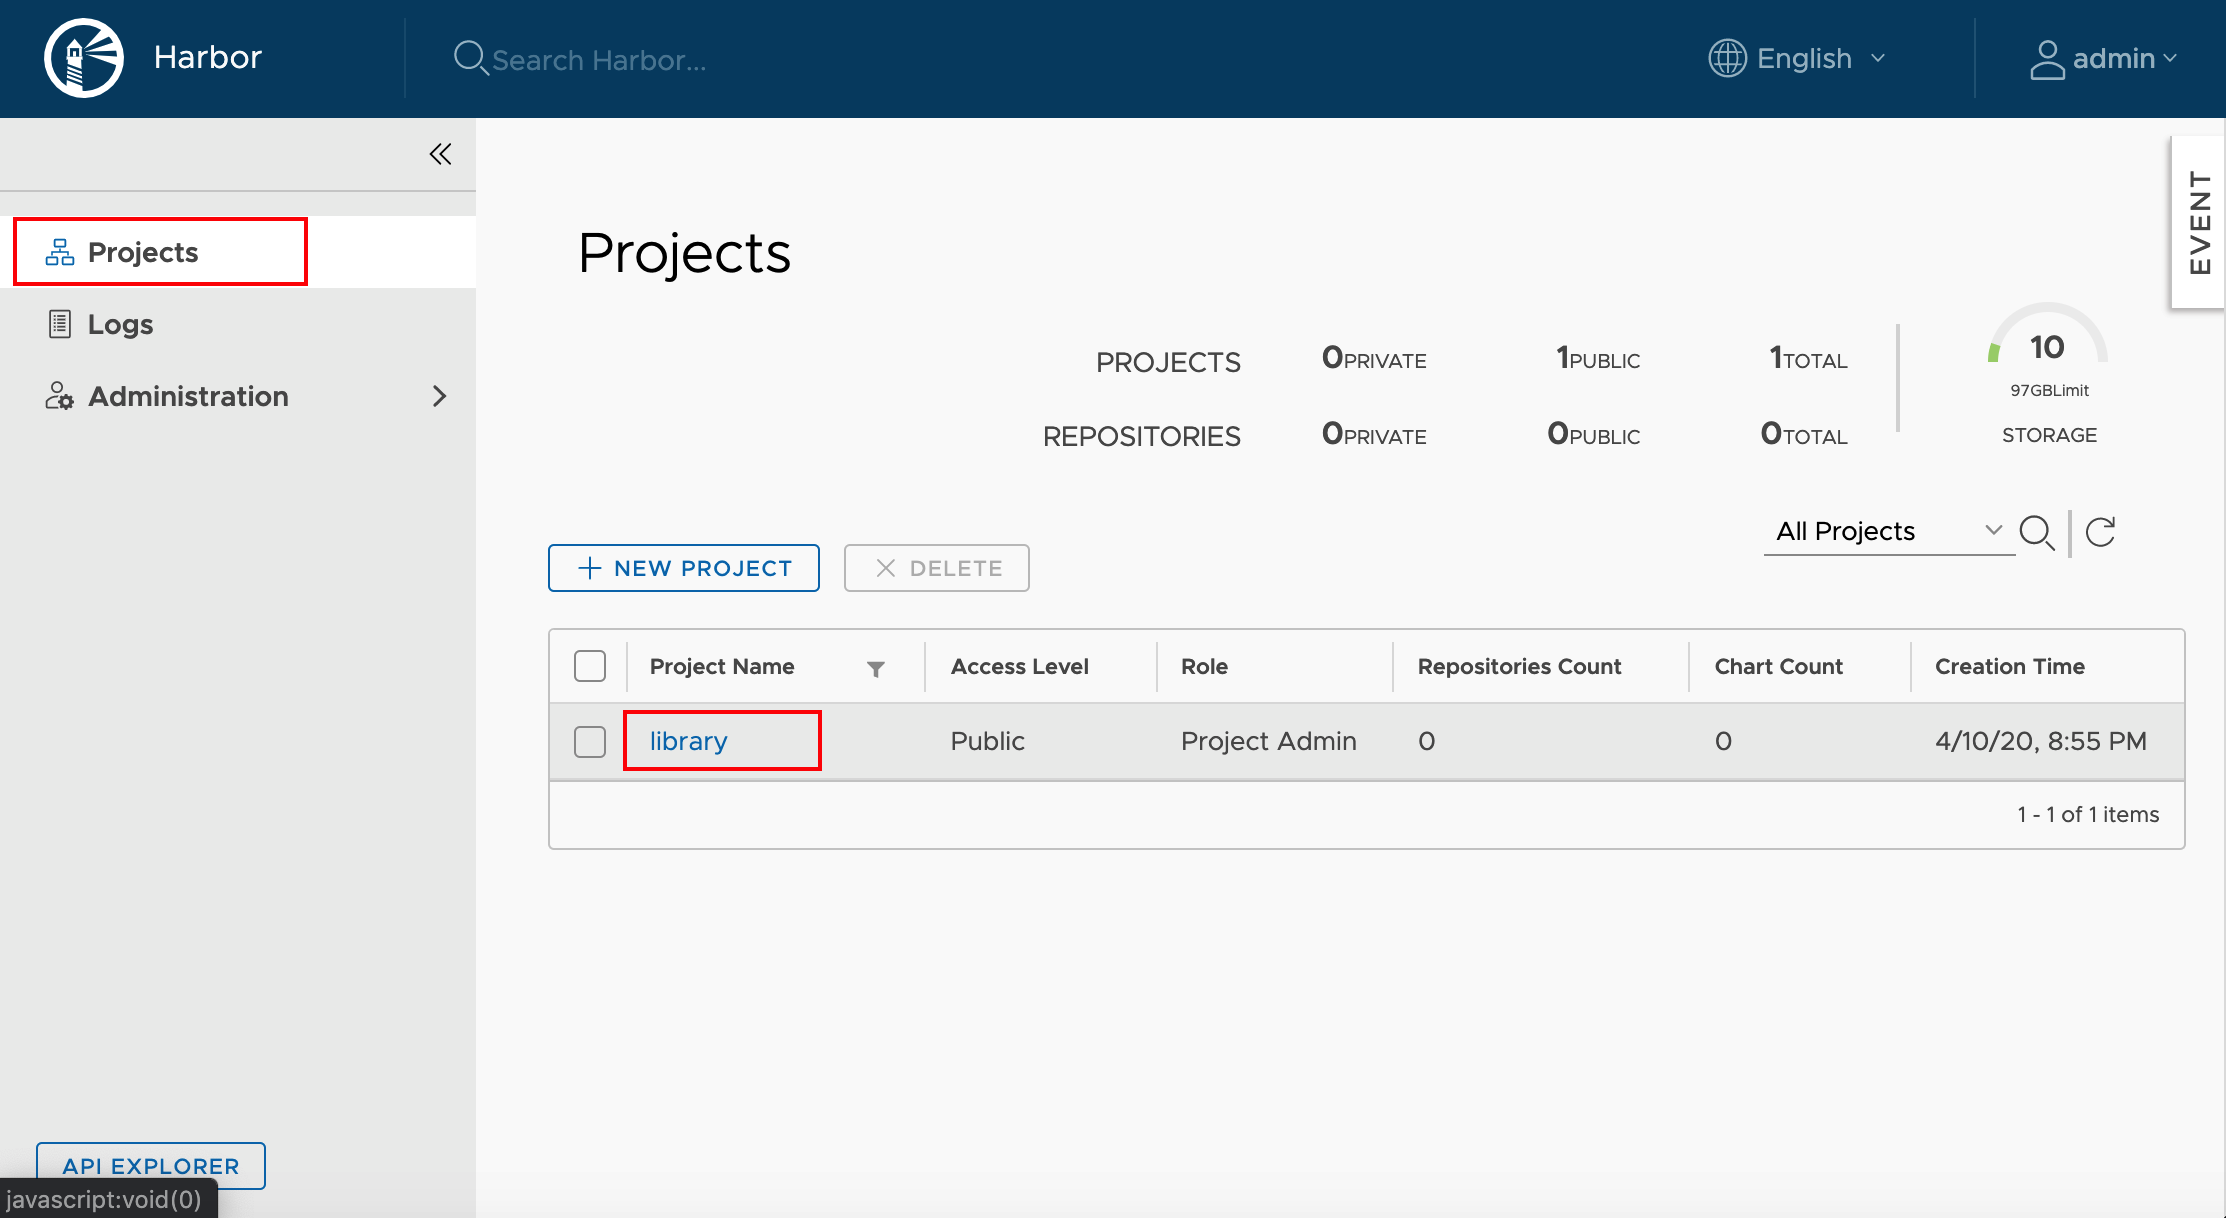
Members -> + USER
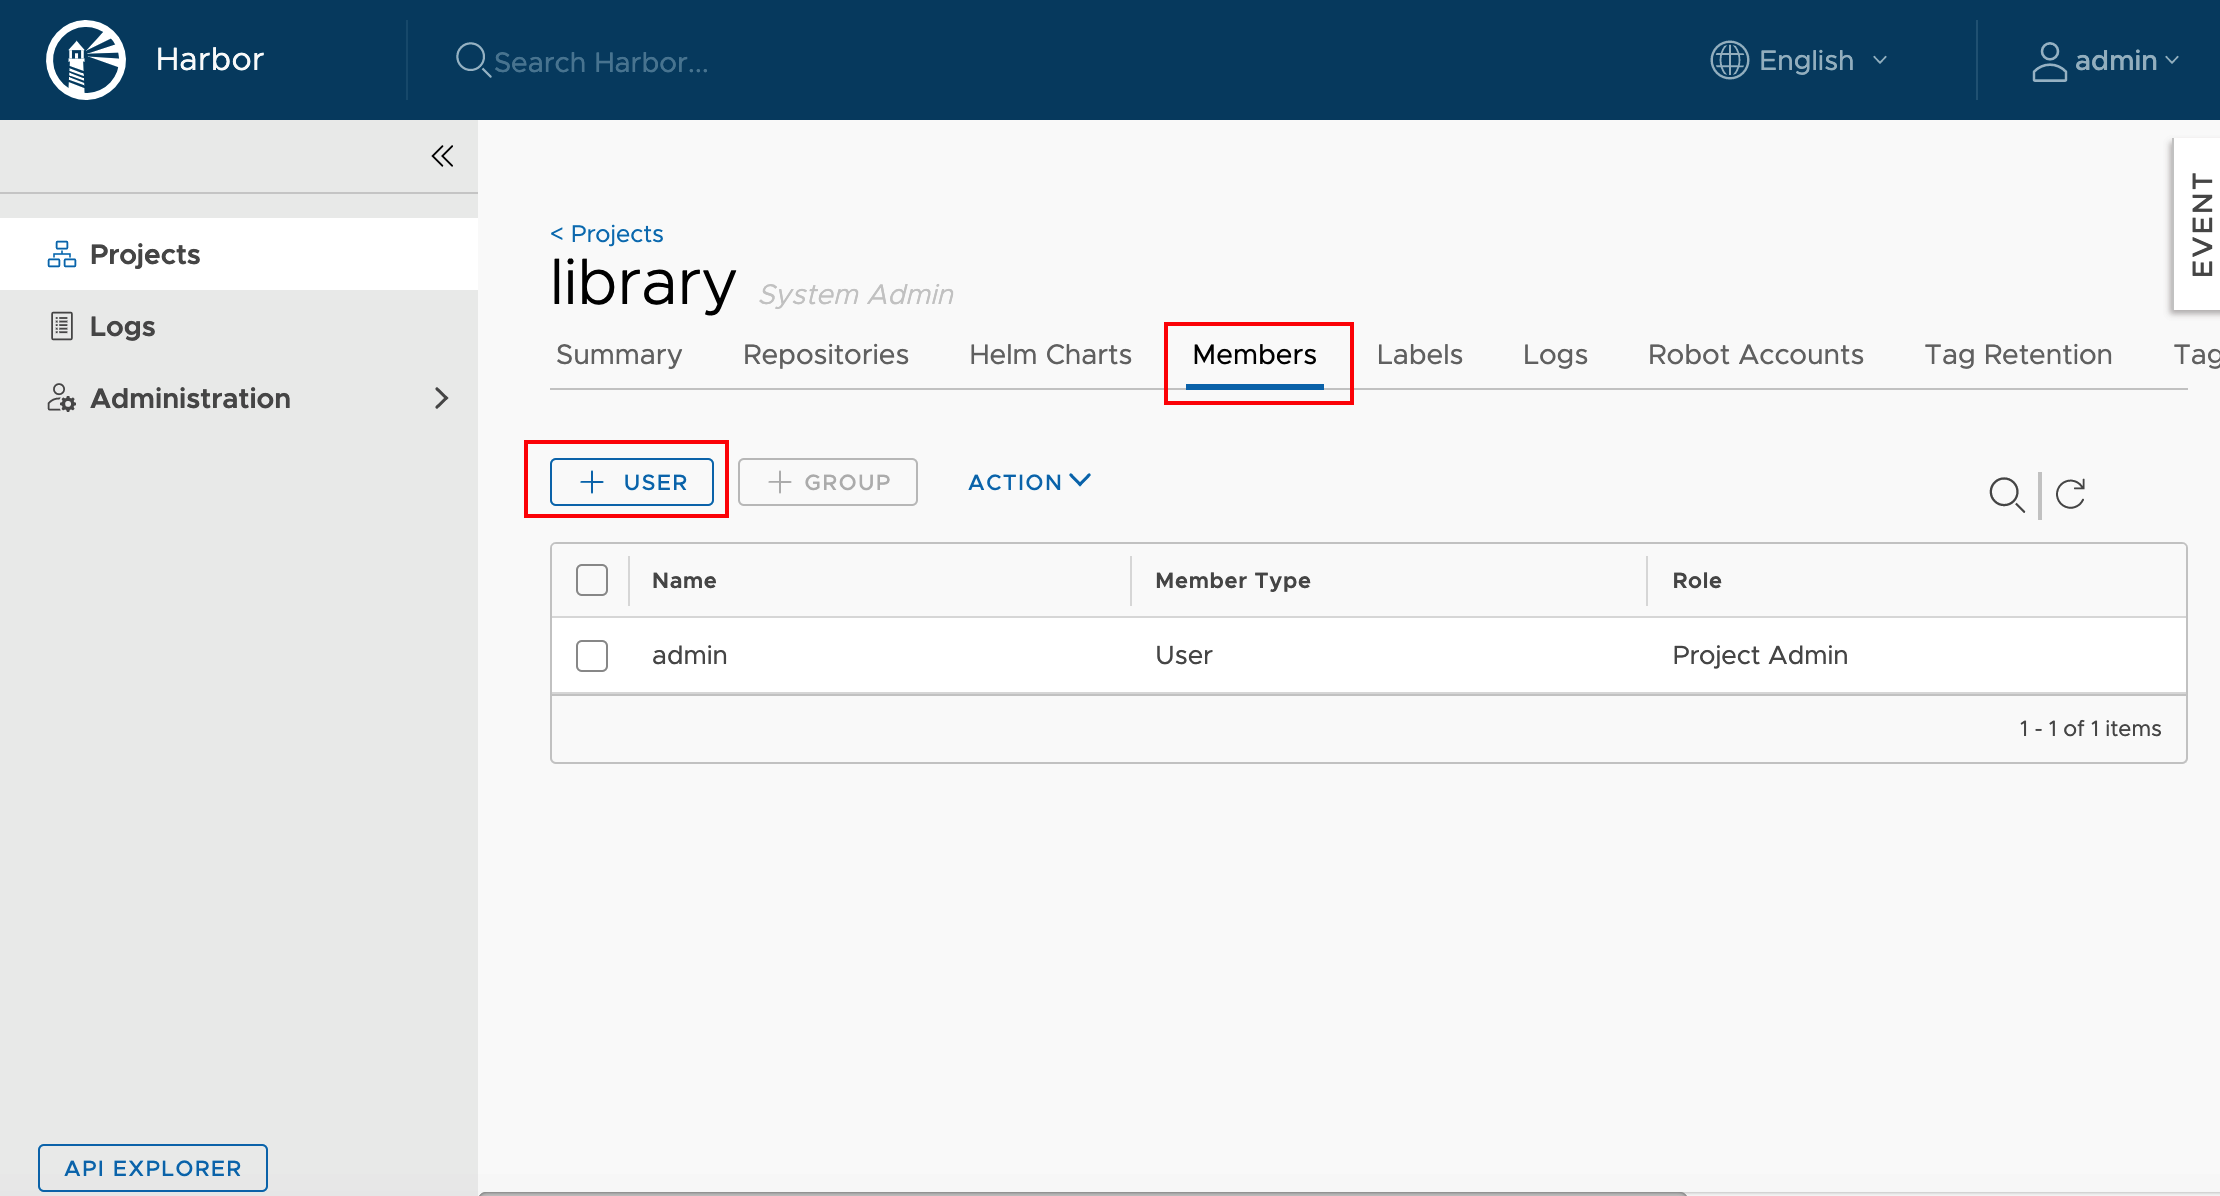
Add new user to the project as Developer
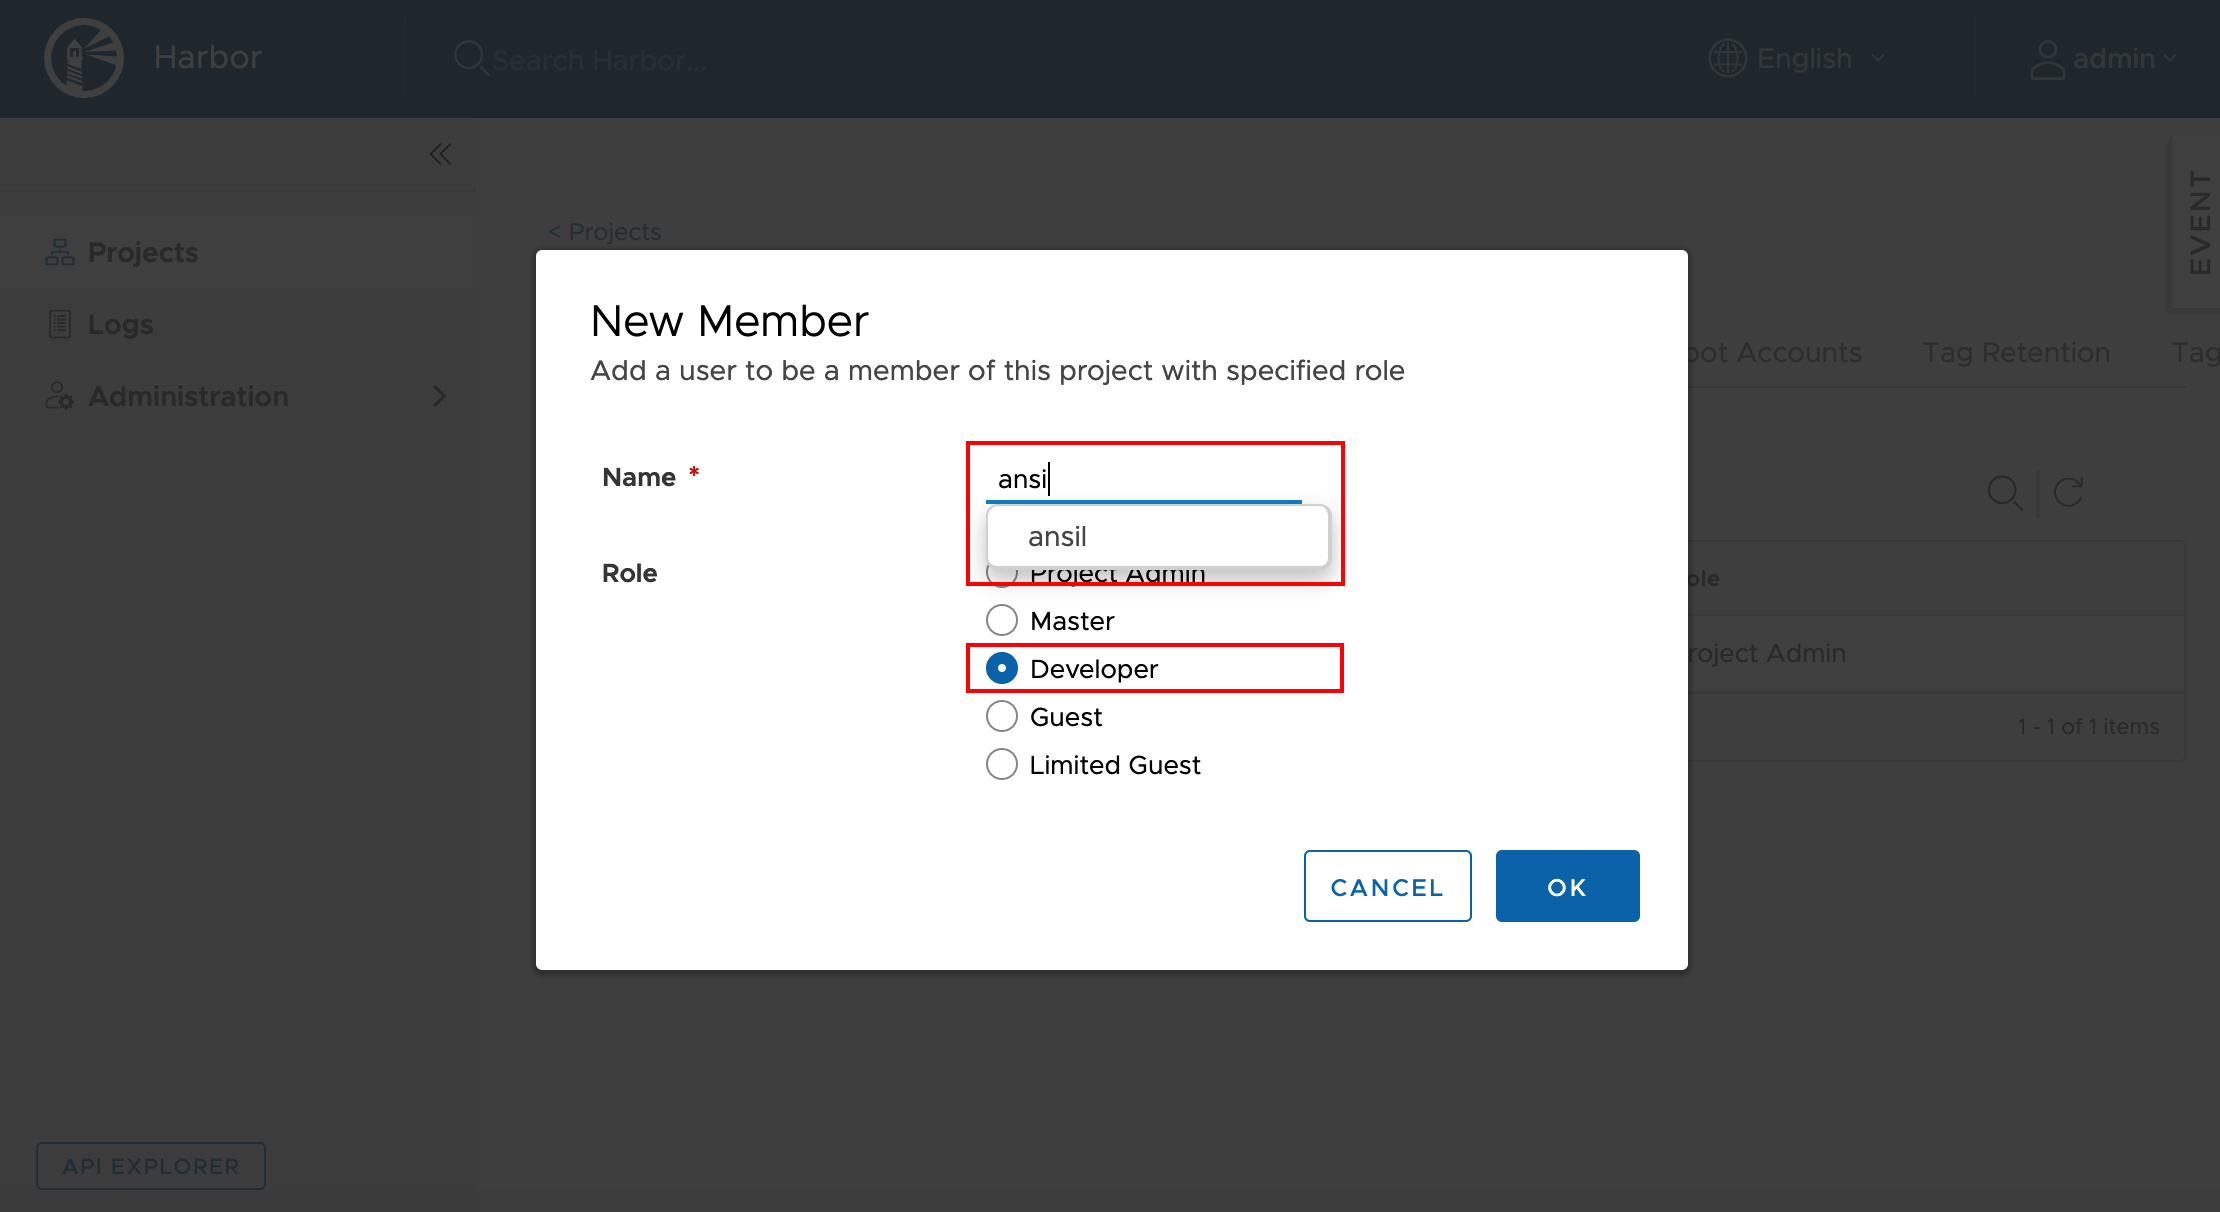
Now we can use this account to push images to this Private registry.
In next session , we will reconfigure docker to use this registry.
Re-Configure Docker to use Harbor
In part 1, we have generated CA certificates. Using the same CA , we will generate docker client certificates. So , logon to the same harbor host and then go the directory where CA certificates were stored. In our case ;
cd ~/harbor_certs/Generate a CSR for docker and get it signed for the client
$ openssl genrsa -out docker-client.linxlabs.com.key 4096
$ openssl req -sha512 -new \
-subj "/C=IN/ST=Kerala/L=Kollam/O=demo/OU=Personal/CN=docker-client.linxlabs.com" \
-key docker-client.linxlabs.com.key \
-out docker-client.linxlabs.com.csrSign Certificates
$ openssl x509 -req -sha512 -days 3650 \
-extfile v3.ext \
-CA ca.crt -CAkey ca.key -CAcreateserial \
-in docker-client.linxlabs.com.csr \
-out docker-client.linxlabs.com.crtYou will get an output like below.
Signature ok
subject=/C=IN/ST=Kerala/L=Kollam/O=demo/OU=Personal/CN=docker-client.linxlabs.com
Getting CA Private Key
Docker needs the certificate in PEM format , so lets convert the client certificate.
$ openssl x509 -inform PEM -in docker-client.linxlabs.com.crt -out docker-client.linxlabs.com.certOn docker client system , create directories to store certificates.
$ sudo mkdir -p /etc/docker/certs.d/k8s-harbor-registry.linxlabs.comCopy certificate from CA server (harbor host) to the docker client host , then follow below procedure.
$ sudo cp ca.crt docker-client.linxlabs.com.key docker-client.linxlabs.com.cert /etc/docker/certs.d/k8s-harbor-registry.linxlabs.comRestart docker after placing certificates.
$ sudo systemctl restart dockerNow try to logon to the private registry.
Warning
If there is no DNS entry for registry FQDN , then make sure the entry is added to /etc/hosts
$ docker login k8s-harbor-registry.linxlabs.com
Username: ansil
Password:
WARNING! Your password will be stored unencrypted in /root/.docker/config.json.
Configure a credential helper to remove this warning. See
https://docs.docker.com/engine/reference/commandline/login/#credentials-store
Login SucceededVerify docker image pull/push
Download an image from docker hub
$ sudo docker pull alpine
Using default tag: latest
latest: Pulling from library/alpine
aad63a933944: Pull complete
Digest: sha256:b276d875eeed9c7d3f1cfa7edb06b22ed22b14219a7d67c52c56612330348239
Status: Downloaded newer image for alpine:latest
docker.io/library/alpine:latest$ docker images
REPOSITORY TAG IMAGE ID CREATED SIZE
alpine latest a187dde48cd2 2 weeks ago 5.6MBTag the image for pushing it to private registry
$ docker tag alpine:latest k8s-harbor-registry.linxlabs.com/library/ansil/alpine:latest$ docker push k8s-harbor-registry.linxlabs.com/library/ansil/alpine:latestOutput
The push refers to repository [k8s-harbor-registry.linxlabs.com/library/ansil/alpine]
beee9f30bc1f: Pushed
latest: digest: sha256:cb8a924afdf0229ef7515d9e5b3024e23b3eb03ddbba287f4a19c6ac90b8d221 size: 528
Logon to Harbor UI and verify the status of the new image & scan it for vulnerability