Chapter 16
K8S From Scratch
We will build a kubernetes cluster from scratch
We will build a kubernetes cluster from scratch
Users access the API using kubectl, client libraries, or by making REST requests. Both human users and Kubernetes service accounts can be authorized for API access. When a request reaches the API, it goes through several stages, illustrated in the following diagram:
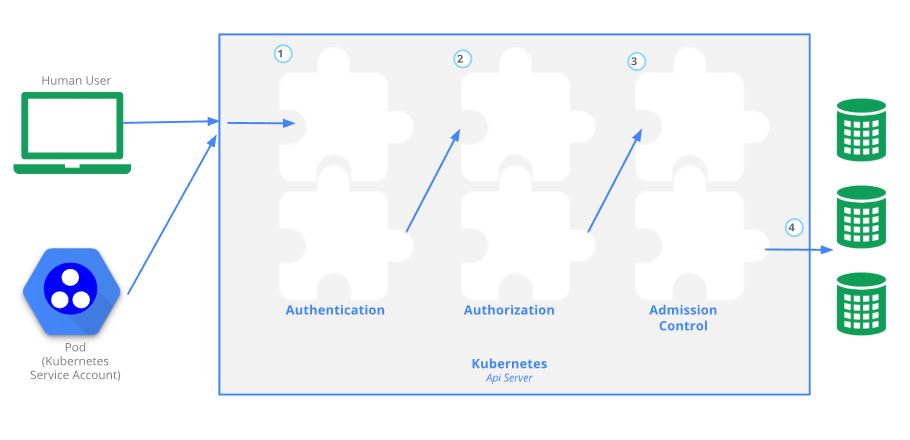
Once TLS is established, the HTTP request moves to the Authentication step. This is shown as step 1 in the diagram.
We use X509 Client Certs for authentication.
When a client certificate is presented and verified, the common name (CN) of the subject is used as the user name for the request.
Client certificates can also indicate a user’s group memberships using the certificate’s organization fields (O). To include multiple group memberships for a user, include multiple organization fields in the certificate.
While Kubernetes uses usernames for access control decisions and in request logging, it does not have a user object nor does it store usernames or other information about users in its object store.
After the request is authenticated as coming from a specific user, the request must be authorized. This is shown as step 2 in the diagram.
A request must include the username of the requester, the requested action, and the object affected by the action. The request is authorized if an existing role and role mapping declares that the user has permissions to complete the requested action.
Admission Control Modules are software modules that can modify or reject requests. This is shown as step 3 in the diagram. In addition to rejecting objects, admission controllers can also set complex defaults for fields. Once a request passes all admission controllers, it is validated using the validation routines for the corresponding API object, and then written to the object store (shown as step 4).
Example of an Admission Controller is here
k8s which will be used in upcoming steps.k8s-master- for Master and k8s-worker- for worker
If you miss this , then the scripts/command may fail down the line.init.sh on each VM and execute it as mentioned below.cat <<EOF >init.sh
#!/usr/bin/env bash
disable_ipv6(){
echo "[INFO] Disabling IPv6"
sysctl -w net.ipv6.conf.all.disable_ipv6=1
sysctl -w net.ipv6.conf.default.disable_ipv6=1
sysctl -w net.ipv6.conf.lo.disable_ipv6=1
cat <<EOF >>/etc/sysctl.conf
net.ipv6.conf.all.disable_ipv6 = 1
net.ipv6.conf.default.disable_ipv6 = 1
net.ipv6.conf.lo.disable_ipv6 = 1
EOF
}
regenerate_uuid(){
echo "[INFO] Regenerating machine UUID"
rm /etc/machine-id /var/lib/dbus/machine-id
systemd-machine-id-setup
}
regenerate_ssh_keys(){
echo "[INFO] Regenerating SSH Keys"
/bin/rm -v /etc/ssh/ssh_host_*
dpkg-reconfigure openssh-server
}
regenerate_iscsi_iqn(){
echo "[INFO] Changing iSCSI InitiatorName"
echo "InitiatorName=iqn.1993-08.org.debian:01:$(openssl rand -hex 4)" >/etc/iscsi/initiatorname.iscsi
}
disable_ipv6
regenerate_uuid
regenerate_ssh_keys
regenerate_iscsi_iqn
EOFsudo$ chmod 755 init.sh
$ sudo ./init.sh$ hostnamectl set-hostname k8s-master-ah-01 --static --transienteg:-
10.136.102.232 k8s-master-ah-01
10.136.102.116 k8s-worker-ah-01
10.136.102.24  k8s-worker-ah-02
10.136.102.253 k8s-worker-ah-03Logon to master node and follow below steps
$ wget -q --show-progress --https-only --timestamping \
  https://pkg.cfssl.org/R1.2/cfssl_linux-amd64 \
  https://pkg.cfssl.org/R1.2/cfssljson_linux-amd64
$ chmod +x cfssl_linux-amd64 cfssljson_linux-amd64$ sudo mv cfssl_linux-amd64 /usr/local/bin/cfssl$ sudo mv cfssljson_linux-amd64 /usr/local/bin/cfssljson$ cfssl versionVersion: 1.2.0
Revision: dev
Runtime: go1.6
kubectlwget https://storage.googleapis.com/kubernetes-release/release/v1.13.0/bin/linux/amd64/kubectl$PATH$ chmod +x kubectl
$ sudo mv kubectl /usr/local/bin/$ kubectl version --clientClient Version: version.Info{Major:"1", Minor:"12", GitVersion:"v1.12.0", GitCommit:"0ed33881dc4355495f623c6f22e7dd0b7632b7c0", GitTreeState:"clean", BuildDate:"2018-09-27T17:05:32Z", GoVersion:"go1.10.4", Compiler:"gc", Platform:"linux/amd64"}
We will provision a PKI Infrastructure using CloudFlare’s PKI toolkit, cfssl, then use it to bootstrap a Certificate Authority, and generate TLS certificates for the following components: etcd, kube-apiserver, kube-controller-manager, kube-scheduler, kubelet, and kube-proxy.
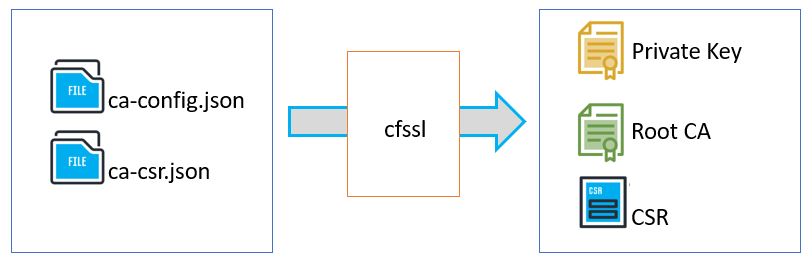
In cryptography, a certificate authority or certification authority (CA) is an entity that issues digital certificates.
$ cfssl print-defaults config > ca-config.json
$ cfssl print-defaults csr > ca-csr.jsonOR
CA Configuration
$ cat <<EOF >ca-config.json
{
    "signing": {
        "default": {
            "expiry": "8760h"
        },
        "profiles": {
            "kubernetes": {
                "expiry": "8760h",
                "usages": [
                    "signing",
                    "key encipherment",
                    "server auth",
                    "client auth"
                ]
            }
        }
    }
}
EOF
CA CSR
$ cat <<EOF >ca-csr.json
{
    "CN": "Kubernetes",
    "key": {
        "algo": "rsa",
        "size": 2048
    },
    "names": [
        {
            "C": "IN",
            "L": "KL",
            "O": "Kubernetes",
            "OU": "CA",
            "ST": "Kerala"
        }
    ]
}
EOF
$ cfssl gencert -initca ca-csr.json |cfssljson -bare ca2018/10/01 22:03:14 [INFO] generating a new CA key and certificate from CSR
2018/10/01 22:03:14 [INFO] generate received request
2018/10/01 22:03:14 [INFO] received CSR
2018/10/01 22:03:14 [INFO] generating key: rsa-2048
2018/10/01 22:03:14 [INFO] encoded CSR
2018/10/01 22:03:14 [INFO] signed certificate with serial number 621260968886516247086480084671432552497699065843$ ls -lrt ca*-rw-rw-r-- 1 k8s k8s 385 Oct 1 21:53 ca-config.json
-rw-rw-r-- 1 k8s k8s 262 Oct 1 21:56 ca-csr.json
-rw-rw-r-- 1 k8s k8s 1350 Oct 1 22:03 ca.pem
-rw------- 1 k8s k8s 1679 Oct 1 22:03 ca-key.pem
-rw-r--r-- 1 k8s k8s 997 Oct 1 22:03 ca.csrIn this section you will generate client and server certificates for each Kubernetes component and a client certificate for the Kubernetes admin user.
kubectl command)$ {
cat > admin-csr.json <<EOF
{
"CN": "admin",
"key": {
"algo": "rsa",
"size": 2048
},
"names": [
{
"C": "IN",
"L": "Bangalore",
"O": "system:masters",
"OU": "Kubernetes from Scratch",
"ST": "Karnataka"
}
]
}
EOF
$ cfssl gencert \
-ca=ca.pem \
-ca-key=ca-key.pem \
-config=ca-config.json \
-profile=kubernetes \
admin-csr.json | cfssljson -bare admin
}Results:
admin-key.pem
admin.pem
Kubernetes uses a special-purpose authorization mode called Node Authorizer, that specifically authorizes API requests made by Kubelets. In order to be authorized by the Node Authorizer, Kubelets must use a credential that identifies them as being in the system:nodes group, with a username of system:node:<nodeName>. In this section you will create a certificate for each Kubernetes worker node that meets the Node Authorizer requirements.
Generate a certificate and private key for each Kubernetes worker node:
$ for instance in $(cat /etc/hosts| grep k8s |awk '{print $2}'); do
cat > ${instance}-csr.json <<EOF
{
  "CN": "system:node:${instance}",
  "key": {
    "algo": "rsa",
    "size": 2048
  },
  "names": [
    {
      "C": "IN",
      "L": "Bangalore",
      "O": "system:masters",
      "OU": "Kubernetes from Scratch",
      "ST": "Karnataka"
    }
  ]
}
EOF


cfssl gencert \
  -ca=ca.pem \
  -ca-key=ca-key.pem \
  -config=ca-config.json \
  -hostname=${instance} \
  -profile=kubernetes \
  ${instance}-csr.json | cfssljson -bare ${instance}
done
Results:
$ ls -lrt k8s*
-rw-rw-r-- 1 k8s k8s  268 Feb  2 16:54 k8s-master-ah-01-csr.json
-rw-rw-r-- 1 k8s k8s  268 Feb  2 16:54 k8s-worker-ah-01-csr.json
-rw-rw-r-- 1 k8s k8s 1513 Feb  2 16:54 k8s-master-ah-01.pem
-rw------- 1 k8s k8s 1679 Feb  2 16:54 k8s-master-ah-01-key.pem
-rw-r--r-- 1 k8s k8s 1082 Feb  2 16:54 k8s-master-ah-01.csr
-rw-rw-r-- 1 k8s k8s 1513 Feb  2 16:54 k8s-worker-ah-01.pem
-rw------- 1 k8s k8s 1679 Feb  2 16:54 k8s-worker-ah-01-key.pem
-rw-r--r-- 1 k8s k8s 1082 Feb  2 16:54 k8s-worker-ah-01.csr
-rw-rw-r-- 1 k8s k8s  268 Feb  2 16:54 k8s-worker-ah-02-csr.json
-rw-rw-r-- 1 k8s k8s  268 Feb  2 16:54 k8s-worker-ah-03-csr.json
-rw-rw-r-- 1 k8s k8s 1513 Feb  2 16:54 k8s-worker-ah-02.pem
-rw------- 1 k8s k8s 1679 Feb  2 16:54 k8s-worker-ah-02-key.pem
-rw-r--r-- 1 k8s k8s 1082 Feb  2 16:54 k8s-worker-ah-02.csr
-rw-rw-r-- 1 k8s k8s 1513 Feb  2 16:54 k8s-worker-ah-03.pem
-rw------- 1 k8s k8s 1675 Feb  2 16:54 k8s-worker-ah-03-key.pem
-rw-r--r-- 1 k8s k8s 1082 Feb 2 16:54 k8s-worker-ah-03.csrGenerate the kube-controller-manager client certificate and private key:
{

cat > kube-controller-manager-csr.json <<EOF
{
  "CN": "system:kube-controller-manager",
  "key": {
    "algo": "rsa",
    "size": 2048
  },
  "names": [
    {
      "C": "IN",
      "L": "Bangalore",
      "O": "system:masters",
      "OU": "Kubernetes from Scratch",
      "ST": "Karnataka"
    }
  ]
}
EOF

cfssl gencert \
  -ca=ca.pem \
  -ca-key=ca-key.pem \
  -config=ca-config.json \
  -profile=kubernetes \
  kube-controller-manager-csr.json | cfssljson -bare kube-controller-manager

}
Results:
$ ls -lrt kube-controller*
-rw-rw-r-- 1 k8s k8s  270 Feb  2 16:55 kube-controller-manager-csr.json
-rw-rw-r-- 1 k8s k8s 1472 Feb  2 16:55 kube-controller-manager.pem
-rw------- 1 k8s k8s 1675 Feb  2 16:55 kube-controller-manager-key.pem
-rw-r--r-- 1 k8s k8s 1086 Feb 2 16:55 kube-controller-manager.csrGenerate the kube-proxy client certificate and private key:
{

cat > kube-proxy-csr.json <<EOF
{
  "CN": "system:kube-proxy",
  "key": {
    "algo": "rsa",
    "size": 2048
  },
  "names": [
    {
      "C": "IN",
      "L": "Bangalore",
      "O": "system:masters",
      "OU": "Kubernetes from Scratch",
      "ST": "Karnataka"
    }
  ]
}
EOF

cfssl gencert \
  -ca=ca.pem \
  -ca-key=ca-key.pem \
  -config=ca-config.json \
  -profile=kubernetes \
  kube-proxy-csr.json | cfssljson -bare kube-proxy

}
Results:
$ ls -lrt kube-proxy*
-rw-rw-r-- 1 k8s k8s  257 Feb  2 16:55 kube-proxy-csr.json
-rw-rw-r-- 1 k8s k8s 1456 Feb  2 16:55 kube-proxy.pem
-rw------- 1 k8s k8s 1675 Feb  2 16:55 kube-proxy-key.pem
-rw-r--r-- 1 k8s k8s 1070 Feb 2 16:55 kube-proxy.csrGenerate the kube-scheduler client certificate and private key:
{

cat > kube-scheduler-csr.json <<EOF
{
  "CN": "system:kube-scheduler",
  "key": {
    "algo": "rsa",
    "size": 2048
  },
  "names": [
    {
      "C": "IN",
      "L": "Bangalore",
      "O": "system:masters",
      "OU": "Kubernetes from Scratch",
      "ST": "Karnataka"
    }
  ]
}
EOF

cfssl gencert \
  -ca=ca.pem \
  -ca-key=ca-key.pem \
  -config=ca-config.json \
  -profile=kubernetes \
  kube-scheduler-csr.json | cfssljson -bare kube-scheduler

}
Results:
$ ls -lrt kube-scheduler*
-rw-rw-r-- 1 k8s k8s  261 Feb  2 16:56 kube-scheduler-csr.json
-rw-rw-r-- 1 k8s k8s 1460 Feb  2 16:56 kube-scheduler.pem
-rw------- 1 k8s k8s 1679 Feb  2 16:56 kube-scheduler-key.pem
-rw-r--r-- 1 k8s k8s 1074 Feb 2 16:56 kube-scheduler.csrIP address will be included in the list of subject alternative names for the Kubernetes API Server certificate. This will ensure the certificate can be validated by remote clients.
Generate the Kubernetes API Server certificate and private key:
{

KUBERNETES_ADDRESS="$(grep k8s /etc/hosts |awk '{print $1}' | sed ':a;N;$!ba;s/\n/,/g'),172.168.0.1"

cat > kubernetes-csr.json <<EOF
{
  "CN": "kubernetes",
  "key": {
    "algo": "rsa",
    "size": 2048
  },
  "names": [
    {
      "C": "IN",
      "L": "Bangalore",
      "O": "system:masters",
      "OU": "Kubernetes from Scratch",
      "ST": "Karnataka"
    }
  ]
}
EOF

cfssl gencert \
  -ca=ca.pem \
  -ca-key=ca-key.pem \
  -config=ca-config.json \
  -hostname=${KUBERNETES_ADDRESS},127.0.0.1,kubernetes.default \
  -profile=kubernetes \
  kubernetes-csr.json | cfssljson -bare kubernetes

}
Results:
$ ls -lrt kubernetes*
-rw-rw-r-- 1 k8s k8s  240 Feb  2 17:01 kubernetes-csr.json
-rw-rw-r-- 1 k8s k8s 1501 Feb  2 17:01 kubernetes.pem
-rw------- 1 k8s k8s 1675 Feb  2 17:01 kubernetes-key.pem
-rw-r--r-- 1 k8s k8s 1045 Feb  2 17:01 kubernetes.csr
The Kubernetes Controller Manager leverages a key pair to generate and sign service account tokens as describe in the managing service accounts documentation.
Generate the service-account certificate and private key:
{

cat > service-account-csr.json <<EOF
{
  "CN": "service-accounts",
  "key": {
    "algo": "rsa",
    "size": 2048
  },
  "names": [
    {
      "C": "IN",
      "L": "Bangalore",
      "O": "system:masters",
      "OU": "Kubernetes from Scratch",
      "ST": "Karnataka"
    }
  ]
}
EOF

cfssl gencert \
  -ca=ca.pem \
  -ca-key=ca-key.pem \
  -config=ca-config.json \
  -profile=kubernetes \
  service-account-csr.json | cfssljson -bare service-account

}
Results:
$ ls -lrt service-account*
-rw-rw-r-- 1 k8s k8s  246 Feb  2 17:02 service-account-csr.json
-rw-rw-r-- 1 k8s k8s 1440 Feb  2 17:02 service-account.pem
-rw------- 1 k8s k8s 1679 Feb  2 17:02 service-account-key.pem
-rw-r--r-- 1 k8s k8s 1054 Feb 2 17:02 service-account.csrEnable SSH key authentication from master node to all worker nodes to transfer files.
$ ssh-keygen$ for instance in $(grep k8s /etc/hosts |awk '{print $2}'); do (ssh-copy-id ${instance}); done$ for instance in $(grep k8s /etc/hosts |awk '{print $2}'); do
scp kubernetes-key.pem kubernetes.pem ca.pem ${instance}-key.pem ${instance}.pem ${instance}:~/
doneCopy the appropriate certificates and private keys to each controller instance:
$ for instance in $(grep master /etc/hosts |awk '{print $2}'); do
  scp ca.pem ca-key.pem kubernetes-key.pem kubernetes.pem \
    service-account-key.pem service-account.pem ${instance}:~/
done
$ for instance in $(grep k8s /etc/hosts |awk '{print $2}'); do
scp /etc/hosts ${instance}:~/
doneThe
kube-proxy,kube-controller-manager,kube-scheduler, andkubeletclient certificates will be used to generate client authentication configuration files in the next lab.
In this lab you will generate Kubernetes configuration files, also known as kubeconfigs, which enable Kubernetes clients to locate and authenticate to the Kubernetes API Servers.
In this section you will generate kubeconfig files for the controller manager, kubelet, kube-proxy, and scheduler clients and the admin user.
Each kubeconfig requires a Kubernetes API Server to connect to. Set the KUBERNETES_PUBLIC_ADDRESS with the IP of master.
KUBERNETES_PUBLIC_ADDRESS=$(grep master /etc/hosts |awk '{print $1}')When generating kubeconfig files for Kubelets the client certificate matching the Kubelet’s node name must be used. This will ensure Kubelets are properly authorized by the Kubernetes Node Authorizer.
Generate a kubeconfig file for each worker node:
$ for instance in $(grep k8s /etc/hosts |awk '{print $2}'); do
  kubectl config set-cluster kubernetes-the-hard-way \
    --certificate-authority=ca.pem \
    --embed-certs=true \
    --server=https://${KUBERNETES_PUBLIC_ADDRESS}:6443 \
    --kubeconfig=${instance}.kubeconfig

  kubectl config set-credentials system:node:${instance} \
    --client-certificate=${instance}.pem \
    --client-key=${instance}-key.pem \
    --embed-certs=true \
    --kubeconfig=${instance}.kubeconfig

  kubectl config set-context default \
    --cluster=kubernetes-the-hard-way \
    --user=system:node:${instance} \
    --kubeconfig=${instance}.kubeconfig

  kubectl config use-context default --kubeconfig=${instance}.kubeconfig
done
Results:
$ ls -lrt *.kubeconfig
-rw------- 1 k8s k8s 6472 Feb  2 17:57 k8s-master-ah-01.kubeconfig
-rw------- 1 k8s k8s 6472 Feb  2 17:57 k8s-worker-ah-01.kubeconfig
-rw------- 1 k8s k8s 6472 Feb  2 17:57 k8s-worker-ah-02.kubeconfig
-rw------- 1 k8s k8s 6468 Feb 2 17:57 k8s-worker-ah-03.kubeconfigGenerate a kubeconfig file for the kube-proxy service:
$ {
  kubectl config set-cluster kubernetes-the-hard-way \
    --certificate-authority=ca.pem \
    --embed-certs=true \
    --server=https://${KUBERNETES_PUBLIC_ADDRESS}:6443 \
    --kubeconfig=kube-proxy.kubeconfig

  kubectl config set-credentials system:kube-proxy \
    --client-certificate=kube-proxy.pem \
    --client-key=kube-proxy-key.pem \
    --embed-certs=true \
    --kubeconfig=kube-proxy.kubeconfig

  kubectl config set-context default \
    --cluster=kubernetes-the-hard-way \
    --user=system:kube-proxy \
    --kubeconfig=kube-proxy.kubeconfig

  kubectl config use-context default --kubeconfig=kube-proxy.kubeconfig
}
Results:
$ ls -lrt kube-proxy.kubeconfig
-rw------- 1 k8s k8s 6370 Feb 2 17:58 kube-proxy.kubeconfigGenerate a kubeconfig file for the kube-controller-manager service:
$ {
  kubectl config set-cluster kubernetes-the-hard-way \
    --certificate-authority=ca.pem \
    --embed-certs=true \
    --server=https://127.0.0.1:6443 \
    --kubeconfig=kube-controller-manager.kubeconfig

  kubectl config set-credentials system:kube-controller-manager \
    --client-certificate=kube-controller-manager.pem \
    --client-key=kube-controller-manager-key.pem \
    --embed-certs=true \
    --kubeconfig=kube-controller-manager.kubeconfig

  kubectl config set-context default \
    --cluster=kubernetes-the-hard-way \
    --user=system:kube-controller-manager \
    --kubeconfig=kube-controller-manager.kubeconfig

  kubectl config use-context default --kubeconfig=kube-controller-manager.kubeconfig
}
Results:
~$ ls -lrt kube-controller-manager.kubeconfig
-rw------- 1 k8s k8s 6411 Feb  2 18:00 kube-controller-manager.kubeconfig
Generate a kubeconfig file for the kube-scheduler service:
$ {
  kubectl config set-cluster kubernetes-the-hard-way \
    --certificate-authority=ca.pem \
    --embed-certs=true \
    --server=https://127.0.0.1:6443 \
    --kubeconfig=kube-scheduler.kubeconfig

  kubectl config set-credentials system:kube-scheduler \
    --client-certificate=kube-scheduler.pem \
    --client-key=kube-scheduler-key.pem \
    --embed-certs=true \
    --kubeconfig=kube-scheduler.kubeconfig

  kubectl config set-context default \
    --cluster=kubernetes-the-hard-way \
    --user=system:kube-scheduler \
    --kubeconfig=kube-scheduler.kubeconfig

  kubectl config use-context default --kubeconfig=kube-scheduler.kubeconfig
}
Results:
$ ls -lrt kube-scheduler.kubeconfig
-rw------- 1 k8s k8s 6381 Feb 2 18:00 kube-scheduler.kubeconfigGenerate a kubeconfig file for the admin user:
$ {
  kubectl config set-cluster kubernetes-the-hard-way \
    --certificate-authority=ca.pem \
    --embed-certs=true \
    --server=https://127.0.0.1:6443 \
    --kubeconfig=admin.kubeconfig

  kubectl config set-credentials admin \
    --client-certificate=admin.pem \
    --client-key=admin-key.pem \
    --embed-certs=true \
    --kubeconfig=admin.kubeconfig

  kubectl config set-context default \
    --cluster=kubernetes-the-hard-way \
    --user=admin \
    --kubeconfig=admin.kubeconfig

  kubectl config use-context default --kubeconfig=admin.kubeconfig
}
Results:
$ ls -lrt admin.kubeconfig
-rw------- 1 k8s k8s 6317 Feb 2 18:01 admin.kubeconfigCopy the appropriate kubelet and kube-proxy kubeconfig files to each worker instance:
$ for instance in $(grep k8s /etc/hosts |awk '{print $2}'); do
  scp ${instance}.kubeconfig kube-proxy.kubeconfig ${instance}:~/
done
Copy the appropriate kube-controller-manager and kube-scheduler kubeconfig files to each controller instance:
$ for instance in $(grep master /etc/hosts |awk '{print $2}'); do
  scp admin.kubeconfig kube-controller-manager.kubeconfig kube-scheduler.kubeconfig ${instance}:~/
doneKubernetes components are stateless and store cluster state in etcd. In this lab you will bootstrap a three node etcd cluster and configure it for high availability and secure remote access.
The commands in this lab must be run on each worker instance:
Login to each controller instance using the k8s user. Example:
ssh k8s-worker-ah-02tmux can be used to run commands on multiple compute instances at the same time.
$ sudo cp hosts /etc/hostsDownload the official etcd release binaries from the coreos/etcd GitHub project:
wget -q --show-progress --https-only --timestamping \
  "https://github.com/coreos/etcd/releases/download/v3.3.9/etcd-v3.3.9-linux-amd64.tar.gz"
Extract and install the etcd server and the etcdctl command line utility:
{
  tar -xvf etcd-v3.3.9-linux-amd64.tar.gz
  sudo mv etcd-v3.3.9-linux-amd64/etcd* /usr/local/bin/
}{
sudo mkdir -p /etc/etcd /var/lib/etcd
sudo cp ca.pem kubernetes-key.pem kubernetes.pem /etc/etcd/
}The instance internal IP address will be used to serve client requests and communicate with etcd cluster peers. Retrieve the internal IP address for the current compute instance:
INTERNAL_IP=$(grep -w $(hostname) /etc/hosts |awk '{print $1}')Each etcd member must have a unique name within an etcd cluster. Set the etcd name to match the hostname of the current compute instance:
ETCD_NAME=$(hostname -s)List of members
$ ETCD_MEMBERS=$(grep worker /etc/hosts |awk '{print $2"=https://"$1":2380"}' |sed ':a;N;$!ba;s/\n/,/g')Create the etcd.service systemd unit file:
cat <<EOF | sudo tee /etc/systemd/system/etcd.service
[Unit]
Description=etcd
Documentation=https://github.com/coreos

[Service]
ExecStart=/usr/local/bin/etcd \\
  --name ${ETCD_NAME} \\
  --cert-file=/etc/etcd/kubernetes.pem \\
  --key-file=/etc/etcd/kubernetes-key.pem \\
  --peer-cert-file=/etc/etcd/kubernetes.pem \\
  --peer-key-file=/etc/etcd/kubernetes-key.pem \\
  --trusted-ca-file=/etc/etcd/ca.pem \\
  --peer-trusted-ca-file=/etc/etcd/ca.pem \\
  --peer-client-cert-auth \\
  --client-cert-auth \\
  --initial-advertise-peer-urls https://${INTERNAL_IP}:2380 \\
  --listen-peer-urls https://${INTERNAL_IP}:2380 \\
  --listen-client-urls https://${INTERNAL_IP}:2379,https://127.0.0.1:2379 \\
  --advertise-client-urls https://${INTERNAL_IP}:2379 \\
  --initial-cluster-token etcd-cluster-0 \\
  --initial-cluster ${ETCD_MEMBERS} \\
  --initial-cluster-state new \\
  --data-dir=/var/lib/etcd
Restart=on-failure
RestartSec=5

[Install]
WantedBy=multi-user.target
EOF{
sudo systemctl daemon-reload
sudo systemctl enable etcd
sudo systemctl start etcd
}Remember to run the above commands on each controller node:
controller-01,controller-02, andcontroller-03.
List the etcd cluster members:
sudo ETCDCTL_API=3 etcdctl member list \
  --endpoints=https://127.0.0.1:2379 \
  --cacert=/etc/etcd/ca.pem \
  --cert=/etc/etcd/kubernetes.pem \
  --key=/etc/etcd/kubernetes-key.pem
output
ff3c9dc8bc4ff6e, started, controller-01, https://192.168.78.201:2380, https://192.168.78.201:2379
adfbdba88b62084e, started, controller-02, https://192.168.78.202:2380, https://192.168.78.202:2379
b9a01cb565f3c5e8, started, controller-03, https://192.168.78.203:2380, https://192.168.78.203:2379In this lab you will bootstrap the Kubernetes control plane across three compute instances and configure it for high availability. You will also create an external load balancer that exposes the Kubernetes API Servers to remote clients. The following components will be installed on each node: Kubernetes API Server, Scheduler, and Controller Manager.
The commands in this lab must be run only on master node (eg: k8s-master-ah-01)
ssh k8s@k8s-master-ah-01Create the Kubernetes configuration directory:
$ sudo mkdir -p /etc/kubernetes/configDownload the official Kubernetes release binaries:
wget -q --show-progress --https-only --timestamping \
  "https://storage.googleapis.com/kubernetes-release/release/v1.13.0/bin/linux/amd64/kube-apiserver" \
  "https://storage.googleapis.com/kubernetes-release/release/v1.13.0/bin/linux/amd64/kube-controller-manager" \
  "https://storage.googleapis.com/kubernetes-release/release/v1.13.0/bin/linux/amd64/kube-scheduler" \
  "https://storage.googleapis.com/kubernetes-release/release/v1.13.0/bin/linux/amd64/kubectl"
Install the Kubernetes binaries:
$ {
  chmod +x kube-apiserver kube-controller-manager kube-scheduler kubectl
  sudo mv kube-apiserver kube-controller-manager kube-scheduler kubectl /usr/local/bin/
}$ {
sudo mkdir -p /var/lib/kubernetes/
sudo cp ca.pem ca-key.pem kubernetes-key.pem kubernetes.pem \
service-account-key.pem service-account.pem \
/var/lib/kubernetes/
}The instance IP address will be used to advertise the API Server to members of the cluster. Retrieve the IP address for the current compute instance:
INTERNAL_IP=$(grep -w $(hostname) /etc/hosts |awk '{print $1}')Etcd servers
$ ETCD_MEMBERS=$(grep worker /etc/hosts |awk '{print "https://"$1":2379"}' |sed ':a;N;$!ba;s/\n/,/g')Create the kube-apiserver.service systemd unit file:
cat <<EOF | sudo tee /etc/systemd/system/kube-apiserver.service
[Unit]
Description=Kubernetes API Server
Documentation=https://github.com/kubernetes/kubernetes

[Service]
ExecStart=/usr/local/bin/kube-apiserver \\
  --advertise-address=${INTERNAL_IP} \\
  --allow-privileged=true \\
  --apiserver-count=3 \\
  --audit-log-maxage=30 \\
  --audit-log-maxbackup=3 \\
  --audit-log-maxsize=100 \\
  --audit-log-path=/var/log/audit.log \\
  --authorization-mode=Node,RBAC \\
  --bind-address=0.0.0.0 \\
  --client-ca-file=/var/lib/kubernetes/ca.pem \\
  --enable-admission-plugins=Initializers,NamespaceLifecycle,NodeRestriction,LimitRanger,ServiceAccount,DefaultStorageClass,ResourceQuota \\
  --enable-swagger-ui=true \\
  --etcd-cafile=/var/lib/kubernetes/ca.pem \\
  --etcd-certfile=/var/lib/kubernetes/kubernetes.pem \\
  --etcd-keyfile=/var/lib/kubernetes/kubernetes-key.pem \\
  --etcd-servers=${ETCD_MEMBERS} \\
  --event-ttl=1h \\
  --kubelet-certificate-authority=/var/lib/kubernetes/ca.pem \\
  --kubelet-client-certificate=/var/lib/kubernetes/kubernetes.pem \\
  --kubelet-client-key=/var/lib/kubernetes/kubernetes-key.pem \\
  --kubelet-https=true \\
  --runtime-config=api/all \\
  --service-account-key-file=/var/lib/kubernetes/service-account.pem \\
  --service-cluster-ip-range=172.168.0.0/16 \\
  --service-node-port-range=30000-32767 \\
  --tls-cert-file=/var/lib/kubernetes/kubernetes.pem \\
  --tls-private-key-file=/var/lib/kubernetes/kubernetes-key.pem \\
  --requestheader-client-ca-file=/var/lib/kubernetes/ca.pem \\
  --v=2
Restart=on-failure
RestartSec=5

[Install]
WantedBy=multi-user.target
EOFMove the kube-controller-manager kubeconfig into place:
sudo mv kube-controller-manager.kubeconfig /var/lib/kubernetes/Create the kube-controller-manager.service systemd unit file:
cat <<EOF | sudo tee /etc/systemd/system/kube-controller-manager.service
[Unit]
Description=Kubernetes Controller Manager
Documentation=https://github.com/kubernetes/kubernetes

[Service]
ExecStart=/usr/local/bin/kube-controller-manager \\
  --allocate-node-cidrs=true \\
  --bind-address=0.0.0.0 \\
  --cluster-cidr=10.10.0.0/16 \\
  --cluster-name=kubernetes \\
  --cluster-signing-cert-file=/var/lib/kubernetes/ca.pem \\
  --cluster-signing-key-file=/var/lib/kubernetes/ca-key.pem \\
  --kubeconfig=/var/lib/kubernetes/kube-controller-manager.kubeconfig \\
  --leader-elect=true \\
  --root-ca-file=/var/lib/kubernetes/ca.pem \\
  --service-account-private-key-file=/var/lib/kubernetes/service-account-key.pem \\
  --service-cluster-ip-range=172.168.0.0/16 \\
  --use-service-account-credentials=true \\
  --v=2
Restart=on-failure
RestartSec=5

[Install]
WantedBy=multi-user.target
EOFMove the kube-scheduler kubeconfig into place:
sudo mv kube-scheduler.kubeconfig /var/lib/kubernetes/Create the kube-scheduler.yaml configuration file:
cat <<EOF | sudo tee /etc/kubernetes/config/kube-scheduler.yaml >/dev/null
apiVersion: kubescheduler.config.k8s.io/v1alpha1
kind: KubeSchedulerConfiguration
clientConnection:
  kubeconfig: "/var/lib/kubernetes/kube-scheduler.kubeconfig"
leaderElection:
  leaderElect: true
EOF
Create the kube-scheduler.service systemd unit file:
cat <<EOF | sudo tee /etc/systemd/system/kube-scheduler.service
[Unit]
Description=Kubernetes Scheduler
Documentation=https://github.com/kubernetes/kubernetes

[Service]
ExecStart=/usr/local/bin/kube-scheduler \\
  --config=/etc/kubernetes/config/kube-scheduler.yaml \\
  --v=2
Restart=on-failure
RestartSec=5

[Install]
WantedBy=multi-user.target
EOF{
sudo systemctl daemon-reload
sudo systemctl enable kube-apiserver kube-controller-manager kube-scheduler
sudo systemctl start kube-apiserver kube-controller-manager kube-scheduler
}Allow up to 10 seconds for the Kubernetes API Server to fully initialize.
kubectl get componentstatuses --kubeconfig admin.kubeconfigNAME STATUS MESSAGE ERROR
controller-manager Healthy ok
scheduler Healthy ok
etcd-0 Healthy {"health":"true"}
etcd-2 Healthy {"health":"true"}
etcd-1 Healthy {"health":"true"} In this section you will configure RBAC permissions to allow the Kubernetes API Server to access the Kubelet API on each worker node. Access to the Kubelet API is required for retrieving metrics, logs, and executing commands in pods.
This tutorial sets the Kubelet
--authorization-modeflag toWebhook. Webhook mode uses the SubjectAccessReview API to determine authorization.
Create the system:kube-apiserver-to-kubelet ClusterRole with permissions to access the Kubelet API and perform most common tasks associated with managing pods:
cat <<EOF | kubectl apply --kubeconfig admin.kubeconfig -f -
apiVersion: rbac.authorization.k8s.io/v1beta1
kind: ClusterRole
metadata:
annotations:
rbac.authorization.kubernetes.io/autoupdate: "true"
labels:
kubernetes.io/bootstrapping: rbac-defaults
name: system:kube-apiserver-to-kubelet
rules:
- apiGroups:
- ""
resources:
- nodes/proxy
- nodes/stats
- nodes/log
- nodes/spec
- nodes/metrics
verbs:
- "*"
EOFThe Kubernetes API Server authenticates to the Kubelet as the kubernetes user using the client certificate as defined by the --kubelet-client-certificate flag.
Bind the system:kube-apiserver-to-kubelet ClusterRole to the kubernetes user:
cat <<EOF | kubectl apply --kubeconfig admin.kubeconfig -f -
apiVersion: rbac.authorization.k8s.io/v1beta1
kind: ClusterRoleBinding
metadata:
name: system:kube-apiserver
namespace: ""
roleRef:
apiGroup: rbac.authorization.k8s.io
kind: ClusterRole
name: system:kube-apiserver-to-kubelet
subjects:
- apiGroup: rbac.authorization.k8s.io
kind: User
name: kubernetes
EOFMake a HTTP request for the Kubernetes version info:
curl --cacert /var/lib/kubernetes/ca.pem https://$(grep master /etc/hosts |awk '{print $1}'):6443/versionoutput
{
"major": "1",
"minor": "13",
"gitVersion": "v1.13.0",
"gitCommit": "ddf47ac13c1a9483ea035a79cd7c10005ff21a6d",
"gitTreeState": "clean",
"buildDate": "2018-12-03T20:56:12Z",
"goVersion": "go1.11.2",
"compiler": "gc",
"platform": "linux/amd64"
}Execute this small script to copy the admin.kubeconfig config file to ~/.kube/config
if [ -d ~/.kube ]
then
echo "Directory .kube exist. Copying config file"
if [ -f ~/.kube/config ]
then
cp ~/admin.kubeconfig ~/.kube/config
else
echo "Directory .kube dosn't exist, so creating and then copying config file"
mkdir ~/.kube
cp ~/admin.kubeconfig ~/.kube/config
fi
fiIn this lab , we will bootstrap three worker nodes. The following components will be installed on each node.
Instructions are here
Once docker is installed , execute below steps to make docker ready for kubelet integration.
$ sudo vi /lib/systemd/system/docker.serviceDisable iptables, default bridge network and masquerading on docker
ExecStart=/usr/bin/dockerd -H fd:// --bridge=none --iptables=false --ip-masq=falseCleanup all docker specific networking from worker nodes
$ sudo iptables -t nat -F
$ sudo ip link set docker0 down
$ sudo ip link delete docker0Reload and then stop docker (we will start it later)
$ sudo systemctl daemon-reload
$ sudo systemctl stop dockerInstall few binaries which are needed for proper networking
$ {
sudo apt-get update
sudo apt-get -y install socat conntrack ipset
}Download kuberctl, kube-proxy and kubelet
$ wget -q --show-progress --https-only --timestamping \
https://storage.googleapis.com/kubernetes-release/release/v1.13.0/bin/linux/amd64/kubectl \
https://storage.googleapis.com/kubernetes-release/release/v1.13.0/bin/linux/amd64/kube-proxy \
https://storage.googleapis.com/kubernetes-release/release/v1.13.0/bin/linux/amd64/kubeletCreate needed directories
$ sudo mkdir -p \
/var/lib/kubelet \
/var/lib/kube-proxy \
/var/lib/kubernetesProvide execution permission and move to one of the shell $PATH
$ chmod +x kubectl kube-proxy kubelet
$ sudo mv kubectl kube-proxy kubelet /usr/local/bin/Move certificates and configuration files to the path created earlier
$ {
sudo mv ${HOSTNAME}-key.pem ${HOSTNAME}.pem /var/lib/kubelet/
sudo mv ${HOSTNAME}.kubeconfig /var/lib/kubelet/kubeconfig
sudo mv ca.pem /var/lib/kubernetes/
}Create kubelet configuration
$ cat <<EOF | sudo tee /var/lib/kubelet/kubelet-config.yaml
kind: KubeletConfiguration
apiVersion: kubelet.config.k8s.io/v1beta1
authentication:
anonymous:
enabled: false
webhook:
enabled: true
x509:
clientCAFile: "/var/lib/kubernetes/ca.pem"
authorization:
mode: Webhook
clusterDomain: "cluster.local"
clusterDNS:
- "172.168.0.2"
podCIDR: "${POD_CIDR}"
resolvConf: "/run/resolvconf/resolv.conf"
runtimeRequestTimeout: "15m"
tlsCertFile: "/var/lib/kubelet/${HOSTNAME}.pem"
tlsPrivateKeyFile: "/var/lib/kubelet/${HOSTNAME}-key.pem"
EOFCreate systemd unit file for kubelet
$ cat <<EOF | sudo tee /etc/systemd/system/kubelet.service
[Unit]
Description=Kubernetes Kubelet
Documentation=https://github.com/kubernetes/kubernetes
After=containerd.service
Requires=containerd.service
[Service]
ExecStart=/usr/local/bin/kubelet \\
--config=/var/lib/kubelet/kubelet-config.yaml \\
--image-pull-progress-deadline=2m \\
--kubeconfig=/var/lib/kubelet/kubeconfig \\
--network-plugin=cni \\
--register-node=true \\
--v=2
Restart=on-failure
RestartSec=5
[Install]
WantedBy=multi-user.target
EOF$ sudo mv kube-proxy.kubeconfig /var/lib/kube-proxy/kubeconfig$ cat <<EOF | sudo tee /var/lib/kube-proxy/kube-proxy-config.yaml
kind: KubeProxyConfiguration
apiVersion: kubeproxy.config.k8s.io/v1alpha1
clientConnection:
kubeconfig: "/var/lib/kube-proxy/kubeconfig"
mode: "iptables"
clusterCIDR: "10.10.0.0/16"
EOF$ cat <<EOF | sudo tee /etc/systemd/system/kube-proxy.service
[Unit]
Description=Kubernetes Kube Proxy
Documentation=https://github.com/kubernetes/kubernetes
[Service]
ExecStart=/usr/local/bin/kube-proxy \\
--config=/var/lib/kube-proxy/kube-proxy-config.yaml
Restart=on-failure
RestartSec=5
[Install]
WantedBy=multi-user.target
EOF$ {
sudo systemctl daemon-reload
sudo systemctl enable docker kubelet kube-proxy
sudo systemctl start docker kubelet kube-proxy
}Download deployment yaml.
$ curl \
https://docs.projectcalico.org/v3.5/getting-started/kubernetes/installation/hosted/kubernetes-datastore/calico-networking/1.7/calico.yaml \
-OModify Pod cidr pool as below
$ vi calico.yaml- name: CALICO_IPV4POOL_CIDR
value: "10.10.0.0/16"Create deployment
$ kubectl apply -f calico.yamlDownload and apply prebuilt CoreDNS yaml
$ kubectl apply -f https://raw.githubusercontent.com/ansilh/kubernetes-the-hardway-virtualbox/master/config/coredns.yaml$ kubectl cluster-infoOutput
Kubernetes master is running at http://localhost:8080
CoreDNS is running at http://localhost:8080/api/v1/namespaces/kube-system/services/kube-dns:dns/proxy$ kubectl get componentstatusOutput
NAME                 STATUS    MESSAGE             ERROR
controller-manager   Healthy   ok
scheduler            Healthy   ok
etcd-0               Healthy   {"health":"true"}
etcd-2               Healthy   {"health":"true"}
etcd-1 Healthy {"health":"true"}$ kubectl get nodesOutput
NAME               STATUS   ROLES    AGE   VERSION
k8s-worker-ah-01   Ready    <none>   47m   v1.13.0
k8s-worker-ah-02   Ready    <none>   47m   v1.13.0
k8s-worker-ah-03   Ready    <none>   47m   v1.13.0
$ kubectl get pods -n kube-systemOutput
NAME                       READY   STATUS    RESTARTS   AGE
calico-node-8ztcq          1/1     Running   0          21m
calico-node-hb7gt          1/1     Running   0          21m
calico-node-mjkfn          1/1     Running   0          21m
coredns-69cbb76ff8-kw8ls   1/1     Running   0          20m
coredns-69cbb76ff8-vb7rz   1/1     Running   0          20m