Chapter 8
Multi-Container Pods
In this session we will create Pods with more than one containers and few additional features in k8s.
In this session we will create Pods with more than one containers and few additional features in k8s.
 In this session , we will discuss about InitContainer
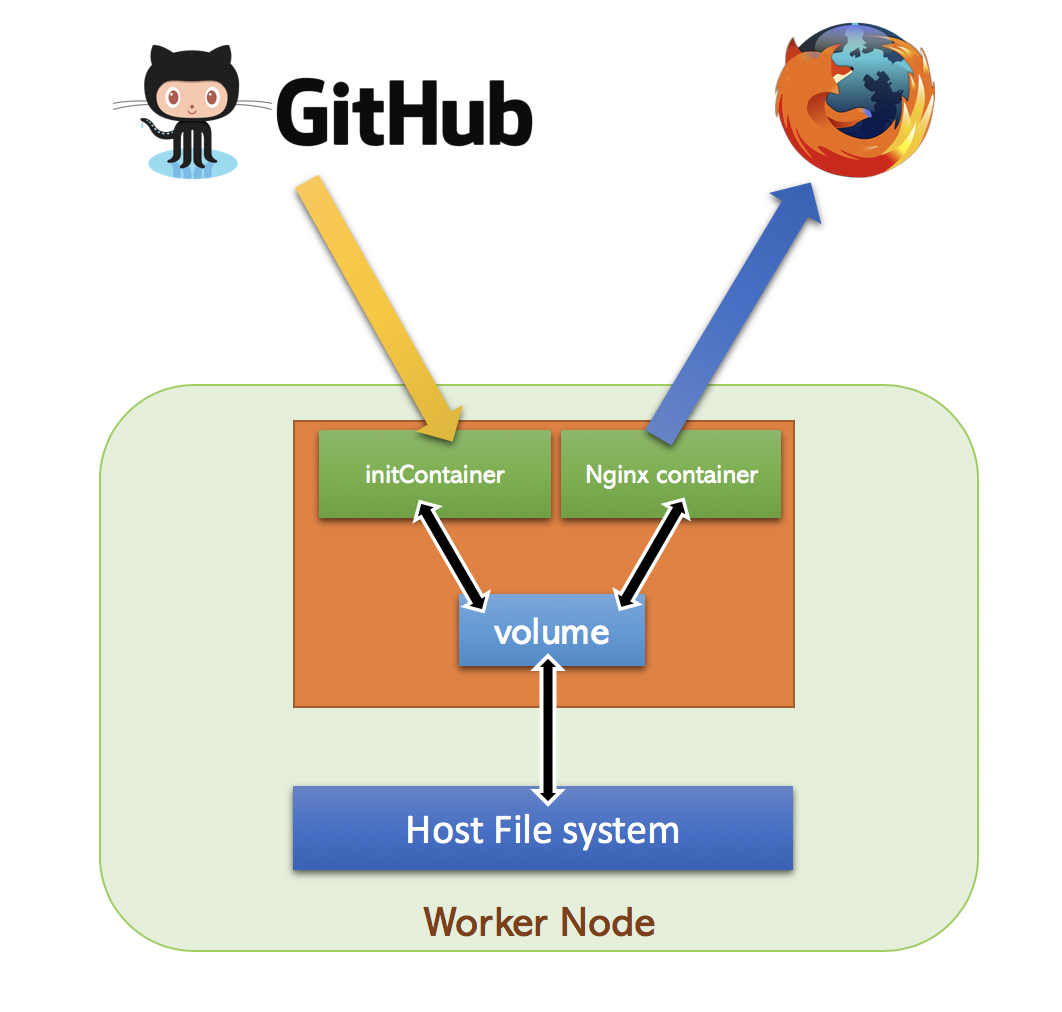
As we already know ,containers are ephemeral and the modifications will be lost when container is destroyed.
In this example , we will download webpages from Github repository and store it in a emptyDir volume.
From this emptyDir volume , we will serve the HTML pages using an Nginx Pod
emptyDir is a volume type , just like hostPath , but the contents of emptyDir will be destroyed when Pod is stopped.
So lets write a Pod specification for Nginx container and add InitContainer to download HTML page
apiVersion: v1
kind: Pod
metadata:
  labels:
    run: demo-web
  name: demo-web
spec:
  volumes:
  - name: html
    emptyDir: {}
  containers:
  - image: nginx
    name: demo-web
    volumeMounts:
    - name: html
      mountPath: /usr/share/nginx/html
  initContainers:
  - image: ansilh/debug-tools
    name: git-pull
    args:
    - git
    - clone
    - https://github.com/ansilh/k8s-demo-web.git
    - /html/.
    volumeMounts:
    - name: html
      mountPath: /html/
Problem with this design is , no way to pull the changes once Pod is up. InitContainer run only once during the startup of the Pod.
Incase of InitContainer failure , Pod startup will fail and never start other containers.
We can specify more than one initcontainer if needed. Startup of initcontainer will be sequential and the order will be selected based on the order in yaml spec.
In next session , we will discuss about other design patterns for Pod.
We will create a Coffee Pod
$ kubectl run tea --image=ansilh/demo-tea --env=MY_NODE_NAME=scratch --restart=Never --dry-run -o yaml >pod-with-env.yamlapiVersion: v1
kind: Pod
metadata:
creationTimestamp: null
labels:
run: tea
name: tea
spec:
containers:
- env:
- name: MY_NODE_NAME
value: scratch
image: ansilh/demo-tea
name: coffee-new
resources: {}
dnsPolicy: ClusterFirst
restartPolicy: Never
status: {}Lets run this Pod
$ kubectl create -f pod-with-env.yaml$ kubectl get pods
NAME READY STATUS RESTARTS AGE
tea 1/1 Running 0 7sLets expose the pod as NodePort
$ kubectl expose pod tea --port=80 --target-port=8080 --type=NodePort$ kubectl get svc tea
NAME TYPE CLUSTER-IP EXTERNAL-IP PORT(S) AGE
tea NodePort 192.168.10.37 <none> 80:32258/TCP 42sAccess the service using browser uisng node IP and port 32258
You will see below in Page
Node:scratch
Lets extract the nodeName from spec ( Excuse me ? yeah we will see that in a moment )
k8s@k8s-master-01:~$ kubectl get pods tea -o=jsonpath='{.spec.nodeName}' && echo
k8s-worker-01
k8s@k8s-master-01:~$ kubectl get pods tea -o=jsonpath='{.status.hostIP}' && echo
192.168.56.202
k8s@k8s-master-01:~$ kubectl get pods tea -o=jsonpath='{.status.podIP}' && echo
10.10.1.23
k8s@k8s-master-01:~$
To get the JSON path , first we need to get the entire object output in JSON.
We have used output in YAML so far because its easy . But internally kubectl convers YAML to JSON
$ kubectl get pod tea -o json{
"apiVersion": "v1",
"kind": "Pod",
"metadata": {
"annotations": {
"cni.projectcalico.org/podIP": "10.10.1.23/32"
},
"creationTimestamp": "2019-01-06T15:09:36Z",
"labels": {
"run": "tea"
},
"name": "tea",
"namespace": "default",
"resourceVersion": "218696",
"selfLink": "/api/v1/namespaces/default/pods/tea",
"uid": "14c1715b-11c5-11e9-9f0f-0800276a1bd2"
},
"spec": {
"containers": [
{
"env": [
{
"name": "MY_NODE_NAME",
"value": "scratch"
}
],
"image": "ansilh/demo-tea",
"imagePullPolicy": "Always",
"name": "coffee-new",
"resources": {},
"terminationMessagePath": "/dev/termination-log",
"terminationMessagePolicy": "File",
"volumeMounts": [
{
"mountPath": "/var/run/secrets/kubernetes.io/serviceaccount",
"name": "default-token-72pzg",
"readOnly": true
}
]
}
],
"dnsPolicy": "ClusterFirst",
"enableServiceLinks": true,
"nodeName": "k8s-worker-01",
"priority": 0,
"restartPolicy": "Never",
"schedulerName": "default-scheduler",
"securityContext": {},
"serviceAccount": "default",
"serviceAccountName": "default",
"terminationGracePeriodSeconds": 30,
"tolerations": [
{
"effect": "NoExecute",
"key": "node.kubernetes.io/not-ready",
"operator": "Exists",
"tolerationSeconds": 300
},
{
"effect": "NoExecute",
"key": "node.kubernetes.io/unreachable",
"operator": "Exists",
"tolerationSeconds": 300
}
],
"volumes": [
{
"name": "default-token-72pzg",
"secret": {
"defaultMode": 420,
"secretName": "default-token-72pzg"
}
}
]
},
"status": {
"conditions": [
{
"lastProbeTime": null,
"lastTransitionTime": "2019-01-06T15:09:36Z",
"status": "True",
"type": "Initialized"
},
{
"lastProbeTime": null,
"lastTransitionTime": "2019-01-06T15:09:42Z",
"status": "True",
"type": "Ready"
},
{
"lastProbeTime": null,
"lastTransitionTime": "2019-01-06T15:09:42Z",
"status": "True",
"type": "ContainersReady"
},
{
"lastProbeTime": null,
"lastTransitionTime": "2019-01-06T15:09:36Z",
"status": "True",
"type": "PodScheduled"
}
],
"containerStatuses": [
{
"containerID": "docker://291a72e7fdab6a9f7afc47c640126cf596f5e071903b6a9055b44ef5bcb1c104",
"image": "ansilh/demo-tea:latest",
"imageID": "docker-pullable://ansilh/demo-tea@sha256:998d07a15151235132dae9781f587ea4d2822c62165778570145b0f659dda7bb",
"lastState": {},
"name": "coffee-new",
"ready": true,
"restartCount": 0,
"state": {
"running": {
"startedAt": "2019-01-06T15:09:42Z"
}
}
}
],
"hostIP": "192.168.56.202",
"phase": "Running",
"podIP": "10.10.1.23",
"qosClass": "BestEffort",
"startTime": "2019-01-06T15:09:36Z"
}
}Remove below from pod-with-env.yaml
  - name: MY_NODE_NAME
    value: scratch
Add below Pod spec
- name: MY_NODE_NAME
  valueFrom:
   fieldRef:
    fieldPath: spec.nodeName
Resulting Pod Yaml
apiVersion: v1
kind: Pod
metadata:
  creationTimestamp: null
  labels:
    run: tea
  name: tea
spec:
  containers:
  - env:
    - name: MY_NODE_NAME
      valueFrom:
       fieldRef:
        fieldPath: spec.nodeName
    image: ansilh/demo-tea
    name: coffee-new
    resources: {}
  dnsPolicy: ClusterFirst
  restartPolicy: Never
status: {}
Delete the running pod files
$ kubectl delete pod teaCreate the pod with modified yaml file
$ kubectl create -f pod-with-env.yamlMake sure endpoint is up in service
$ kubectl get ep tea
NAME   ENDPOINTS         AGE
tea    10.10.1.26:8080   31m
Refresh the browser page. This time you will see Node:k8s-worker-01
Lets do a cleanup on default namespace.
$ kubectl delete --all pods
$ kubectl delete --all services
Now you know
jsonpathPodPod using environmental variablesWhen a Pod dies , all container’s contents will be destroyed and never preserved by default. Sometimes you need to store the contents persistently (for eg:- etcd pod)
Kubernetes have a Volumes filed in Pod spec , which can be used to mount a volume inside container.
Lets explain the volume specs
$ kubectl explain pod.spec.volumesSo when you write Yaml , you have to put volumes object in spec. As we have seen , volumes type is <[]Object> ; means its an array
So the contents below volumes should start with a dash “-”. Name is a mandatory field , so lets write those.
spec:
 volumes:
 - name: "data"
We will use hostPath for now
$ kubectl explain pod.spec.volumes.hostPath
KIND:     Pod
VERSION:  v1

RESOURCE: hostPath <Object>

DESCRIPTION:
     HostPath represents a pre-existing file or directory on the host machine
     that is directly exposed to the container. This is generally used for
     system agents or other privileged things that are allowed to see the host
     machine. Most containers will NOT need this. More info:
     https://kubernetes.io/docs/concepts/storage/volumes#hostpath

     Represents a host path mapped into a pod. Host path volumes do not support
     ownership management or SELinux relabeling.

FIELDS:
   path <string> -required-
     Path of the directory on the host. If the path is a symlink, it will follow
     the link to the real path. More info:
     https://kubernetes.io/docs/concepts/storage/volumes#hostpath

   type <string>
     Type for HostPath Volume Defaults to "" More info:
     https://kubernetes.io/docs/concepts/storage/volumes#hostpath

k8s@k8s-master-01:~$
Host path needs a path on the host , so lets add that as well to the spec
spec:
 volumes:
 - name: "data"
   hostPath:
    path: "/var/data"
This will add a volume to Pod
Now we have to tell the pods to use it.
In containers specification, we have volumeMounts field which can be used to mount the volume.
$ kubectl explain pod.spec.containers.volumeMounts
KIND:     Pod
VERSION:  v1

RESOURCE: volumeMounts <[]Object>

DESCRIPTION:
     Pod volumes to mount into the container's filesystem. Cannot be updated.

     VolumeMount describes a mounting of a Volume within a container.

FIELDS:
   mountPath    <string> -required-
     Path within the container at which the volume should be mounted. Must not
     contain ':'.

   mountPropagation     <string>
     mountPropagation determines how mounts are propagated from the host to
     container and the other way around. When not set, MountPropagationNone is
     used. This field is beta in 1.10.

   name <string> -required-
     This must match the Name of a Volume.

   readOnly     <boolean>
     Mounted read-only if true, read-write otherwise (false or unspecified).
     Defaults to false.

   subPath      <string>
     Path within the volume from which the container's volume should be mounted.
     Defaults to "" (volume's root).
volumeMounts is <[]Object> . mountPath is required and name
name must match the Name of a Volume
Resulting Pod spec will become ;
spec:
 volumes:
 - name: "data"
   hostPath:
    path: "/var/data"
  containers:
  - name: nginx
    image: nginx
    volumeMounts:
    - name: "data"
      mountPath: "/usr/share/nginx/html"
Lets add the basic fields to complete the Yaml and save the file as nginx.yaml
apiVersion: v1
kind: Pod
metadata:
 name: nginx-pod01
spec:
 volumes:
 - name: "data"
   hostPath:
    path: "/var/data"
 containers:
 - name: nginx
   image: nginx
   volumeMounts:
   - name: "data"
     mountPath: "/usr/share/nginx/html"
Create the Pod
kubectl create -f nginx.yamlCheck where its running.
$ kubectl get pods -o wide
NAME          READY   STATUS    RESTARTS   AGE   IP           NODE            NOMINATED NODE   READINESS GATES
nginx-pod01   1/1     Running   0          55s   10.10.1.27   k8s-worker-01   <none>           <none>
Lets expose this Pod first.
$ kubectl expose pod nginx-pod01 --port=80 --target-port=80 --type=NodePorterror: couldn't retrieve selectors via --selector flag or introspection: the pod has no labels and cannot be exposed
See 'kubectl expose -h' for help and examples.This indicates that we didn’t add label , because the service needs a label to map the Pod to endpoint
Lets add a label to the Pod.
$ kubectl label pod nginx-pod01 run=nginx-pod01Now we can we can expose the Pod
$ kubectl expose pod nginx-pod01 --port=80 --target-port=80 --type=NodePortGet the node port which service is listening to
$ kubectl get svc nginx-pod01
NAME          TYPE       CLUSTER-IP      EXTERNAL-IP   PORT(S)        AGE
nginx-pod01   NodePort   192.168.10.51   <none>        80:31538/TCP   26s
You will get 403 Forbidden page , because there is no html page to load.
Now we can go to the node where the Pod is running and check the path /var/data
k8s@k8s-worker-01:~$ ls -ld /var/data
drwxr-xr-x 2 root root 4096 Jan  7 00:52 /var/data
k8s@k8s-worker-01:~$ cd /var/data
k8s@k8s-worker-01:/var/data$ ls -lrt
total 0
k8s@k8s-worker-01:/var/data$
Nothing is there.The directory is owned by root , so you have to create the file index.html with root.
k8s@k8s-worker-01:/var/data$ sudo -i
[sudo] password for k8s:
root@k8s-worker-01:~# cd /var/data
root@k8s-worker-01:/var/data#
root@k8s-worker-01:/var/data# echo "This is a test page" >index.html
root@k8s-worker-01:/var/data#
Reload the web page and you should see “This is a test page”
Now you know;
Suppose you have a Pod which needs to be running on a Pod which is having SSD in it.
First we need to add a label to the node which is having SSD
$ kubectl label node k8s-worker-01 disktype=ssdNow we can write a Pod spec with nodeSelector
apiVersion: v1
kind: Pod
metadata:
  name: nginx
  labels:
    env: test
spec:
  containers:
  - name: nginx
    image: nginx
  nodeSelector:
    disktype: ssd
Scheduler will look at the node selector and select apropriate node to run the pod
This means , we can manually specify the nodeName in Pod spec and schedule it.
You can read more about nodeName in below URL
https://kubernetes.io/docs/concepts/configuration/assign-pod-node/#nodename
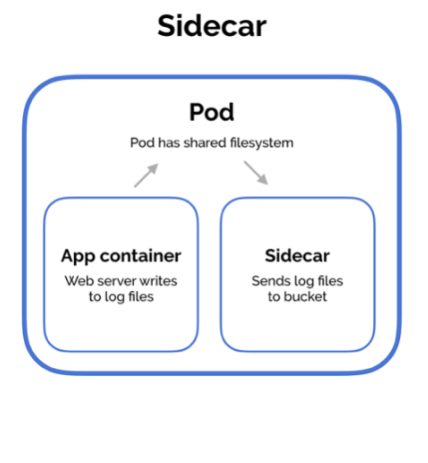
When the containers have the exact same lifecycle, or when the containers must run on the same node. The most common scenario is that you have a helper process that needs to be located and managed on the same node as the primary container.
Another reason to combine containers into a single pod is for simpler communication between containers in the pod. These containers can communicate through shared volumes (writing to a shared file or directory) and through inter-process communication (semaphores or shared memory).
There are three common design patterns and use-cases for combining multiple containers into a single pod. We’ll walk through the sidecar pattern, the adapter pattern, and the ambassador pattern.
Sidecar containers extend and enhance the “main” container, they take existing containers and make them better. As an example, consider a container that runs the Nginx web server. Add a different container that syncs the file system with a git repository, share the file system between the containers and you have built Git push-to-deploy.
apiVersion: v1
kind: Pod
metadata:
  labels:
    run: demo-web
  name: demo-web
spec:
  volumes:
  - name: html
    emptyDir: {}
  containers:
  - image: nginx
    name: demo-web
    volumeMounts:
    - name: html
      mountPath: /usr/share/nginx/html
  - image: ansilh/debug-tools
    name: git-pull
    args:
    - sh
    - -c
    - 'while true ; do [ ! -d /html/.git ] && git  clone https://github.com/ansilh/k8s-demo-web.git /html/ || { cd /html; git pull; } ; date; sleep 5 ; done'
    volumeMounts:
    - name: html
      mountPath: /html/
Lets do a tail on the logs and see how the git-pull works
$ kubectl logs demo-web git-pull -f
Cloning into '/html'...
Fri Jan 11 20:39:25 UTC 2019
Already up to date.
Fri Jan 11 20:39:31 UTC 2019
Lets modify the WebPage and push the changes to Github
Already up to date.
Fri Jan 11 20:44:04 UTC 2019
From https://github.com/ansilh/k8s-demo-web
   e2df24f..1791ee1  master     -> origin/master
Updating e2df24f..1791ee1
Fast-forward
 images/pic-k8s.jpg | Bin 0 -> 14645 bytes
 index.html         |   4 ++--
 2 files changed, 2 insertions(+), 2 deletions(-)
 create mode 100644 images/pic-k8s.jpg
Fri Jan 11 20:44:10 UTC 2019
Already up to date.
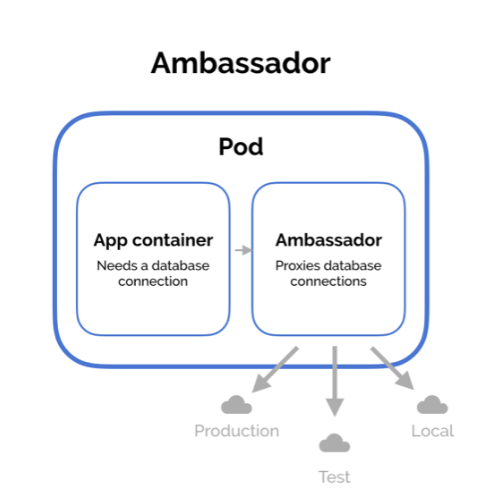
Ambassador containers proxy a local connection to the world. As an example, consider a Redis cluster with read-replicas and a single write master. You can create a Pod that groups your main application with a Redis ambassador container. The ambassador is a proxy is responsible for splitting reads and writes and sending them on to the appropriate servers. Because these two containers share a network namespace, they share an IP address and your application can open a connection on “localhost” and find the proxy without any service discovery. As far as your main application is concerned, it is simply connecting to a Redis server on localhost. This is powerful, not just because of separation of concerns and the fact that different teams can easily own the components, but also because in the development environment, you can simply skip the proxy and connect directly to a Redis server that is running on localhost.
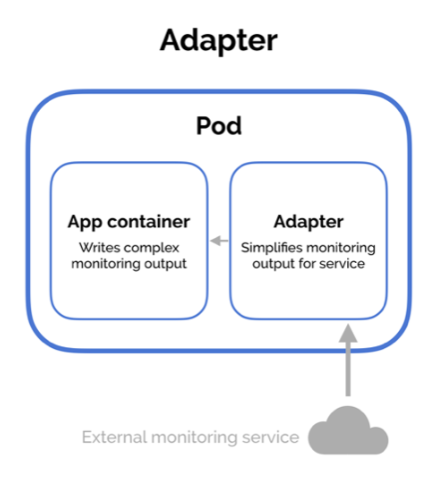
Adapter containers standardize and normalize output. Consider the task of monitoring N different applications. Each application may be built with a different way of exporting monitoring data. (e.g. JMX, StatsD, application specific statistics) but every monitoring system expects a consistent and uniform data model for the monitoring data it collects. By using the adapter pattern of composite containers, you can transform the heterogeneous monitoring data from different systems into a single unified representation by creating Pods that groups the application containers with adapters that know how to do the transformation. Again because these Pods share namespaces and file systems, the coordination of these two containers is simple and straightforward.
You add a taint to a node using kubectl taint. For example,
$ kubectl taint nodes k8s-worker-02 key=value:NoScheduleplaces a taint on node node1. The taint has key key, value value, and taint effect NoSchedule. This means that no pod will be able to schedule onto node1 unless it has a matching toleration.
To remove the taint added by the command above, you can run:
kubectl taint nodes k8s-worker-02 key:NoSchedule-You specify a toleration for a pod in the PodSpec. Both of the following tolerations “match” the taint created by the kubectl taint line above, and thus a pod with either toleration would be able to schedule onto node1:
tolerations:
- key: "key"
  operator: "Equal"
  value: "value"
  effect: "NoSchedule"
tolerations:
- key: "key"
operator: "Exists"
effect: "NoSchedule"A toleration “matches” a taint if the keys are the same and the effects are the same, and:
The above example used effect of NoSchedule. Alternatively, you can use effect of PreferNoSchedule. This is a “preference” or “soft” version of NoSchedule – the system will try to avoid placing a pod that does not tolerate the taint on the node, but it is not required. The third kind of effect is NoExecute
Normally, if a taint with effect NoExecute is added to a node, then any pods that do not tolerate the taint will be evicted immediately, and any pods that do tolerate the taint will never be evicted. However, a toleration with NoExecute effect can specify an optional tolerationSeconds field that dictates how long the pod will stay bound to the node after the taint is added. For example,
tolerations:
- key: "key1"
  operator: "Equal"
  value: "value1"
  effect: "NoExecute"
  tolerationSeconds: 3600