Chapter 1
Subsections of Introduction
Linux Kernel Architecture
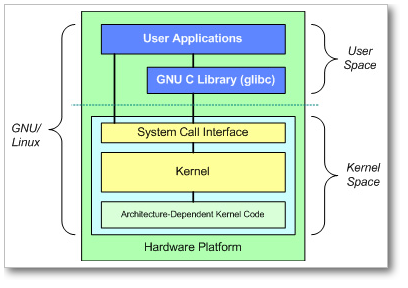
At the top is the user, or application, space. This is where the user applications are executed. Below the user space is the kernel space.
There is also the GNU C Library (glibc). This provides the system call interface that connects to the kernel and provides the mechanism to transition between the user-space application and the kernel. This is important because the kernel and user application occupy different protected address spaces. And while each user-space process occupies its own virtual address space, the kernel occupies a single address space.
The Linux kernel can be further divided into three gross levels.
- At the top is the system call interface, which implements the basic functions such as read and write.
- Below the system call interface is the kernel code, which can be more accurately defined as the architecture-independent kernel code. This code is common to all of the processor architectures supported by Linux.
- Below this is the architecture-dependent code, which forms what is more commonly called a BSP (Board Support Package). This code serves as the processor and platform-specific code for the given architecture.
The Linux kernel implements a number of important architectural attributes. At a high level, and at lower levels, the kernel is layered into a number of distinct subsystems.
Linux Namespaces
Namespaces are a feature of the Linux kernel that partitions kernel resources such that one set of processes sees one set of resources while another set of processes sees a different set of resources. The feature works by having the same name space for these resources in the various sets of processes, but those names referring to distinct resources. Examples of resource names that can exist in multiple spaces, so that the named resources are partitioned, are process IDs, hostnames, user IDs, file names, and some names associated with network access, and interprocess communication.
Namespaces are a fundamental aspect of containers on Linux.
| Namespace | Constant | Isolates |
|---|---|---|
| Cgroup | CLONE_NEWCGROUP | Cgroup root directory |
| IPC | CLONE_NEWIPC | System V IPC, POSIX message queues |
| Network | CLONE_NEWNET | Network devices, stacks, ports, etc. |
| Mount | CLONE_NEWNS | Mount points |
| PID | CLONE_NEWPID | Process IDs |
| User | CLONE_NEWUSER | User and group IDs |
| UTS | CLONE_NEWUTS | Hostname and NIS domain name |
The kernel assigns each process a symbolic link per namespace kind in /proc/<pid>/ns/. The inode number pointed to by this symlink is the same for each process in this namespace. This uniquely identifies each namespace by the inode number pointed to by one of its symlinks.
Reading the symlink via readlink returns a string containing the namespace kind name and the inode number of the namespace.
CGroups
cgroups (abbreviated from control groups) is a Linux kernel feature that limits, accounts for, and isolates the resource usage (CPU, memory, disk I/O, network, etc.) of a collection of processes.
Resource limiting
groups can be set to not exceed a configured memory limit
Prioritization
Some groups may get a larger share of CPU utilization or disk I/O throughput
Accounting
Measures a group’s resource usage, which may be used
Control
Freezing groups of processes, their checkpointing and restarting
You can read and explore more about cGroups in this post
Container from scratch
Using namespaces , we can start a process which will be completely isolated from other processes running in the system.
Create root File System
Create directory to store rootfs contents
$ mkdir -p /root/busybox/rootfs
$ CONTAINER_ROOT=/root/busybox/rootfs
$ cd ${CONTAINER_ROOT}
Download busybox binary
$ wget https://busybox.net/downloads/binaries/1.28.1-defconfig-multiarch/busybox-x86_64Create needed directories and symlinks
$ mv busybox-x86_64 busybox
$ chmod 755 busybox
$ mkdir bin
$ mkdir proc
$ mkdir sys
$ mkdir tmp
$ for i in $(./busybox --list)
do
   ln -s /busybox bin/$i
done
Start Container
Start a shell in new contianer
$ unshare --mount --uts --ipc --net --pid --fork --user --map-root-user chroot ${CONTAINER_ROOT} /bin/shMount essential kernel structures
$ mount -t proc none /proc
$ mount -t sysfs none /sys
$ mount -t tmpfs none /tmp
Configure networking
From Host system , create a veth pair and then map that to container
$ sudo ip link add vethlocal type veth  peer name vethNS
$ sudo ip link set vethlocal up
$ sudo ip link set vethNS up
$ sudo ps -ef |grep '/bin/sh'
$ sudo ip link set vethNS netns <pid of /bin/sh>
From container , execute ip link
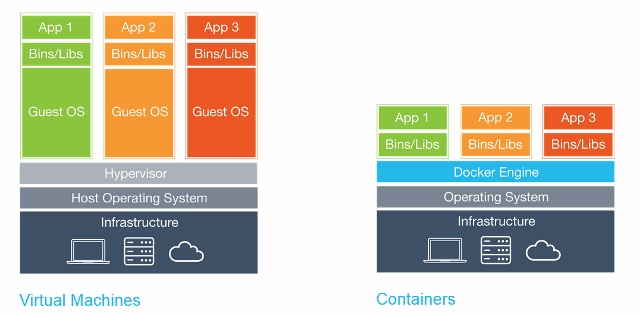
What is Docker
Docker is a tool designed to make it easier to create, deploy, and run applications by using containers. Containers allow a developer to package up an application with all of the parts it needs, such as libraries and other dependencies, and ship it all out as one package.
In a way, Docker is a bit like a virtual machine. But unlike a virtual machine, rather than creating a whole virtual operating system, Docker allows applications to use the same Linux kernel as the system that they’re running on and only requires applications be shipped with things not already running on the host computer. This gives a significant performance boost and reduces the size of the application.
Kubernetes
Pet vs Cattle.
In the pets service model, each pet server is given a loving names like zeus, ares, hades, poseidon, and athena. They are “unique, lovingly hand-raised, and cared for, and when they get sick, you nurse them back to health”. You scale these up by making them bigger, and when they are unavailable, everyone notices.
In the cattle service model, the servers are given identification numbers like web-01, web-02, web-03, web-04, and web-05, much the same way cattle are given numbers tagged to their ear. Each server is “almost identical to each other” and “when one gets sick, you replace it with another one”. You scale these by creating more of them, and when one is unavailable, no one notices.
Kubernetes is a portable, extensible open-source platform for managing containerized workloads and services, that facilitates both declarative configuration and automation. It has a large, rapidly growing ecosystem. Kubernetes services, support, and tools are widely available.
Google open-sourced the Kubernetes project in 2014. Kubernetes builds upon a decade and a half of experience that Google has with running production workloads at scale, combined with best-of-breed ideas and practices from the community

Kubernetes Architecture
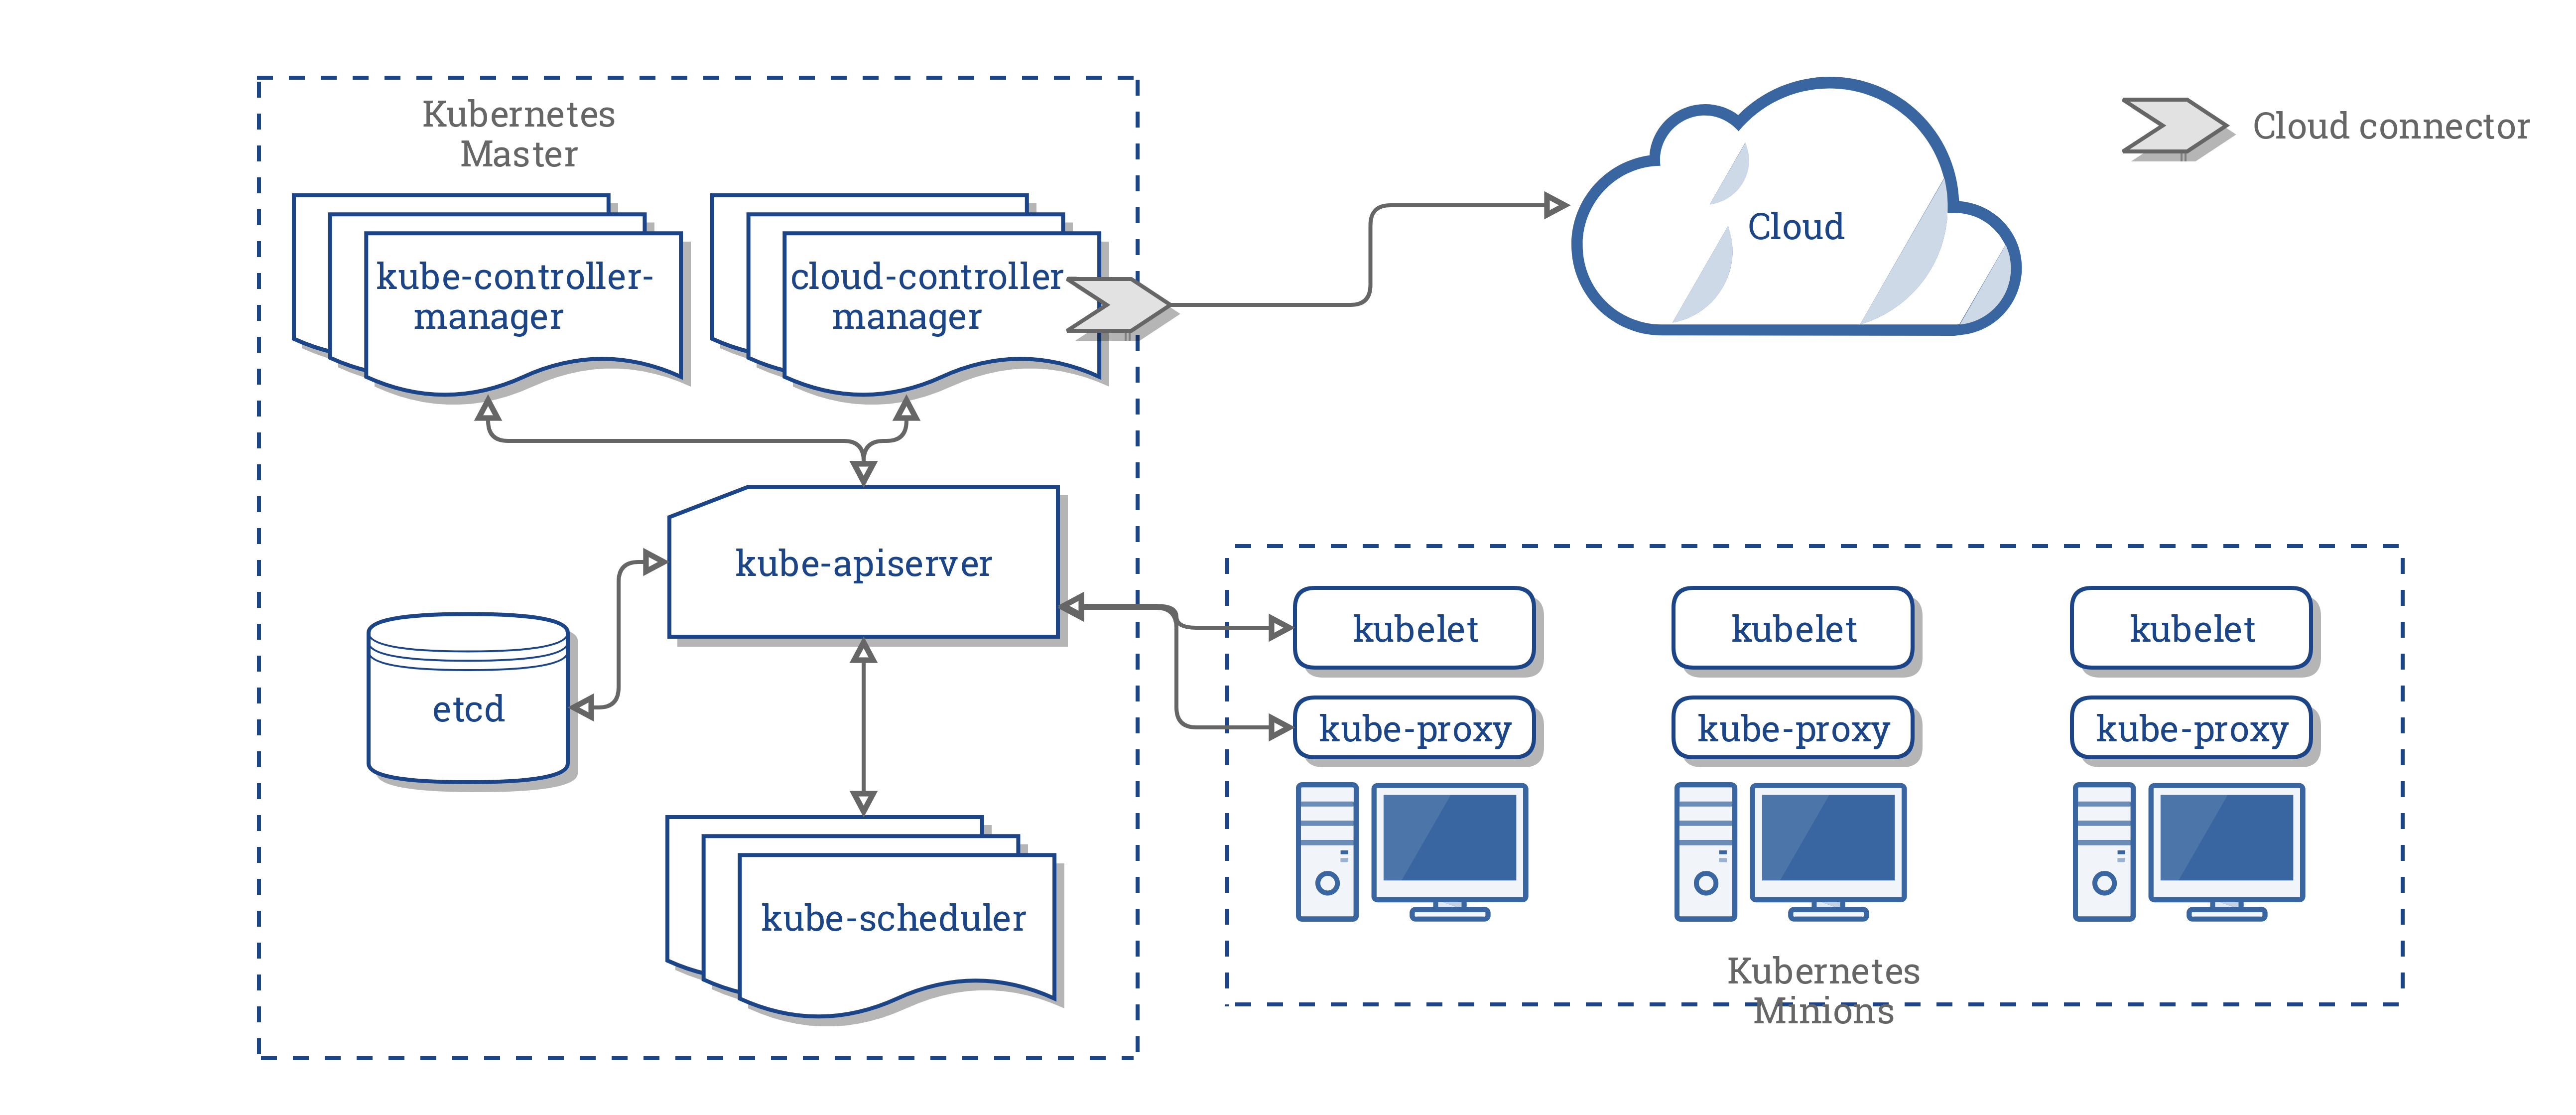
Container runtime
Docker , rkt , containerd or any OCI compliant runtime which will download image , configures network , mount volumes and assist container life cycle management.
kubelet
Responsible for instructing container runtime to start , stop or modify a container
kube-proxy
Manage service IPs and iptables rules
kube-apiserver
API server interacts with all other components in cluster All client interactions will happen via API server
kube-scheduler
Responsible for scheduling workload on minions or worker nodes based on resource constraints
kube-controller-manager
Responsible for monitoring different containers in reconciliation loop Will discuss more about different controllers later in this course
etcd
Persistent store where we store all configurations and cluster state
cloud-controller-manager
Cloud vendor specific controller and cloud vendor is Responsible to develop this program
Container Networking
We need to access the container from outside world and the container running on different hosts have to communicate each other.
Here we will see how can we do it with bridging.
Traditional networking
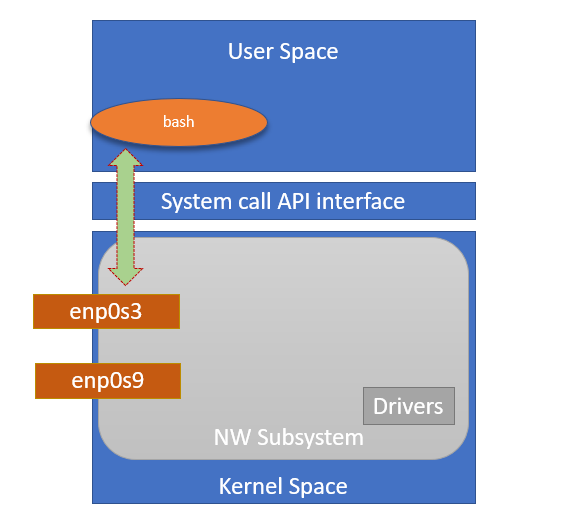
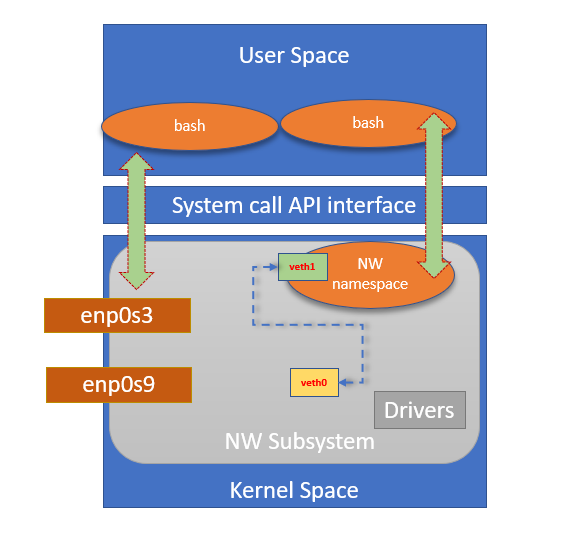
Create a veth pair on Host.
$ sudo ip link add veth0 type veth peer name veth1
$ sudo ip link show
Create a network namespace
$ sudo ip netns add bash-nw-namespace
$ sudo ip netns show
Connect one end to namespace
$ sudo ip link set veth1 netns bash-nw-namespace
$ sudo ip link list
Resulting network
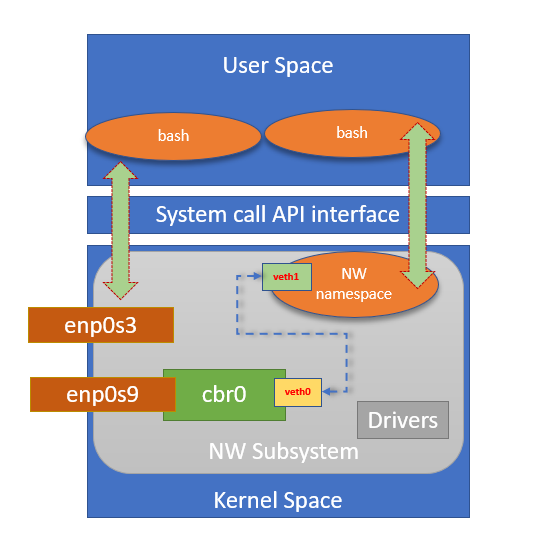
Create a Bridge interface
$ sudo brctl addbr cbr0Add an external interface to bridge
$ sudo brctl addif cbr0 enp0s9
$ sudo brctl show
Connect other end to a switch
$ sudo brctl addif cbr0 veth0
$ sudo brctl show
Resulting network
Assign IP to interface
$ sudo ip netns exec bash-nw-namespace bash
$ sudo ip addr add 192.168.56.10/24 dev veth1
$ sudo ip link set lo up
$ sudo ip link set dev veth1 up
Access container IP from outside
Like bridging , we can opt other networking solutions.
Later we will see how Weave Network and Calico plugins works. You may read bit more on Docker networking basics on below blog post